Step Light Control
Now looking at Modeino instead of JeeNodes
- Tutorial on MosFET PWM LED dimming
- joost - Dimming 12v LED dimming with MosFET
- instructables - Semiconductor totem-pole
- Adafruit - N-channel power MOSFET - 30V / 60A
- JeeNodes got me looking at arduino with radio
- JeeLabs - Dive into JeeNodes
- Modern Device is US seller of JeeLabs
Radios are available in 433 MHz & 915 MHz in the US, all unlicensed ISM (Industrial, Scientific, Medical) bands.
The JeeNode Kit contains all the parts needed to build a JeeNode v6 – including an ATmega328p processor and an RFM12B radio module. The processor chip is pre-flashed with the Arduino boot loader and the RF12demo sketch, so it works to talk to another JeeNode right out of the box.
- Modern Device - Jee Proto Board $4.75
- Modern Device - JeeLabs Lux Plug
- JeeLabs - Light detector
- Modern Device - JeeLabs Relay Plug $14.00
- Meet the Relay Plug
- Modern Device - JeeLabs MOSFET Plug Kit $14.00
- Modern Device - JeeLabs Dimmer Plug $12.50
- JeeLabs - Meet the LED Node
- Modern Device - JeeLabs LED Node v2 Kit $28.00
- Modern Device - Jee Labs battery power board
- Adafruit - 6 push buttons example
- Modern Device - Jeelabs memory plug
- Adafruit Assembled Data Logging shield for Arduino - ID: 1141
Hardware newbie project - Wireless exterior LED strip control.
Here is an introduction of my first attempt at an Arduino project.
I have installed
260 inches of this 12v LED strip into my front steps.
My estimate of maximum power consumed is 32W as shown here. Their rating is 24W for a 16.4 foot reel. So my power estimate is
260 in. X (24w / 197in) ~= 32W.
The strip is too bright by itself so I use a PWM dimmer from LEDWholesalers set about as low as it will go.
What I would like to do is use a JeeNode and LEDnode pair to make a remote controller for the lights.
- Main control: On / Off / Sunset timer
- Select sunset timer duration: 2 / 4 / 6 hours
- Restart timer momentary switch if in Sunset timer mode.
- Brightness control rotary dial
I’m hoping to get some help and encouragement here and to end up with a sweet controller for our LED step lighting.
Tinker Kit MosFET
This module switches a high current load using a high power transistor. Unlike a mechanical relay, this is capable of high speed switching for use with PWM.
Output: This module lets you control devices operating at a maximun of 24VDC with an Arduino pin. To wire the module, connect the power supply for your device (max 24 V) to the V+ and GND terminals. Connect the device to M+ and M-. Be aware of your circuit’s polarity, you could damage your components if it is not wired correctly.
Module Description: This module features an IRF520 power MOSFET transistor, a kick-back diode, a standard TinkerKit 3pin connector,a signal amplifier, a green LED that signals that the module is correctly powered and one yellow LED whose brightness depends on the input signal received by the module.
SparkFun Rotary Encoder COM-09117
Description: This is a 12-step rotary encoder with a nice ‘clicking’ feel. It’s breadboard friendly, and has a pretty handy select switch (by pushing in on the knob). The encoder is different from a potentiometer in that an encoder has full rotation without limits. The unit outputs gray code so that you can tell how much and in which direction the encoder has been turned.
JeeLabs - 16-channel input multiplexer
The Input Plug is a small board containing a CD4067 16-channel analog multiplexer plus a dedicated ATtiny microcontroller to take care of channel selection. It allows you to connect up to 16 analog inputs to a single AIO pin on any port. There is an “InputPlug” class in the Ports library to interface with this board and perform the channel selection.
This board can also be used as 16-channel digital input multiplexer, and even for digital outputs or PWM – with the restriction than a channel goes into high-impedance mode when not selected (there is no latching or buffering).
Sparkfun - Momentary Push Button Switch - 12mm Square
Description: This is a standard 12mm square momentary button. What we really like is the large button head and good tactile feel (it ‘clicks’ really well). This button is great for user input on a PCB or a good, big reset button on a breadboard. Breadboard friendly!
Sparkfun - TSL2561 Luminosity Sensor Breakout
The TSL2561 Luminosity Sensor Breakout is a sophisticated light sensor which has a flat response across most of the visible spectrum. Unlike simpler sensors, the TSL2561 measures both infrared and visible light to better approximate the response of the human eye. And because the TSL2561 is an integrating sensor (it soaks up light for a predetermined amount of time), it is capable of measuring both small and large amounts of light by changing the integration time.
The TSL2561 is capable of direct I2C communication and is able to conduct specific light ranges from 0.1 - 40k+ Lux easily. Additionally, the TSL12561 contains two integrating analog-to-digital converters (ADC) that integrate currents from two photodiodes, simultaneously. Each breakout requires a supply voltage of 3V and a low supply current max of 0.6mA.
TSL2561 Luminosity Sensor Hookup Guide
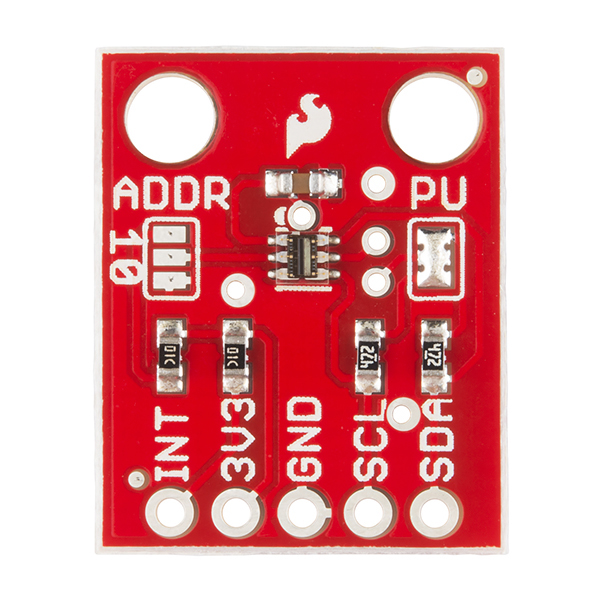
| TSL2561 label | Pin function | Arduino connection |
|---|---|---|
| SDA | I2C data | pin labeled A4/SDA |
| SCL | I2C clock | pin labeled A5/SCL |
| GND | Ground | GND |
| 3V3 | 3.3V power supply | 3.3V (NOT 5V) |
| INT | Interrupt | Optional, leave disconnected unless you're using interrupts. |
Adafruit tsl2561 Breakout - wiring Tsl2561 and RTC
Notes on using the Tsl2561 and the RTC both on I2c.
You may be wondering, how is it OK to connect a 3.3V chip like the TSL2561 to 5.0V data pins like the Arduino? Isn’t that bad? Well, in this specific case its OK. I2c uses pullup lines to the 3.3V power pin, so the data is actually being sent at 3.3V. As long as all the sensors/device on the i2c bus are running on 3.3V power, we’re fine. However, don’t use a 5.0v powered i2c device (like the DS1307) with pullups at the same time as a 3.3V device like the TSL2561! If you want to use this sensor with a datalogger that uses the DS1307, remove any/all of the pullup resistors from the DS1307 SDA/SCL pins. The pullups built into the TSL2561 will then be active and keep the voltage at 3.3V which is safe for both the RTC and the sensor.
You don’t need to connect the ADDR (i2c address change) or INT (interrupt output) pins.
The ADDR pin can be used if you have an i2c address conflict, to change the address. Connect it to ground to set the address to 0x29, connect it to 3.3V (vcc) to set the address to 0x49 or leave it floating (unconnected) to use address 0x39.
The INT pin is an ouput from the sensor used when you have the sensor configured to signal when the light level has changed. We don’t have that code written in this tutorial so you don’t have to use it. If you do end up using it, use a 10K-100K pullup from INT to 3.3V (vcc)
Changing the I2C address (ADDR) - default 0x29
Every component attached to an I2C bus has a fixed address from 0 to 127. You can theoretically have a maximum of 128 devices on a single bus, but in practice you are limited to the options available for each part.
The TSL2561 supports three possible addresses: 0x29, 0x39, or 0x49. Practically speaking, this means you can have up to three TSL2561s attached to a single I2C bus.
Which address the part uses is controlled by the solder jumper labeled “ADDR”. When there is no solder on this jumper, the TSL2561 will used the default address of 0x39.
To use one of the other addresses, add solder to bridge the center pad to ONE of the two side pads. If you bridge to the “0” side, the address will be 0x29. If you bridge to the “1” side, the address will be 0x49. Don’t bridge both sides.
Adafruit DS1307 RTC breakout
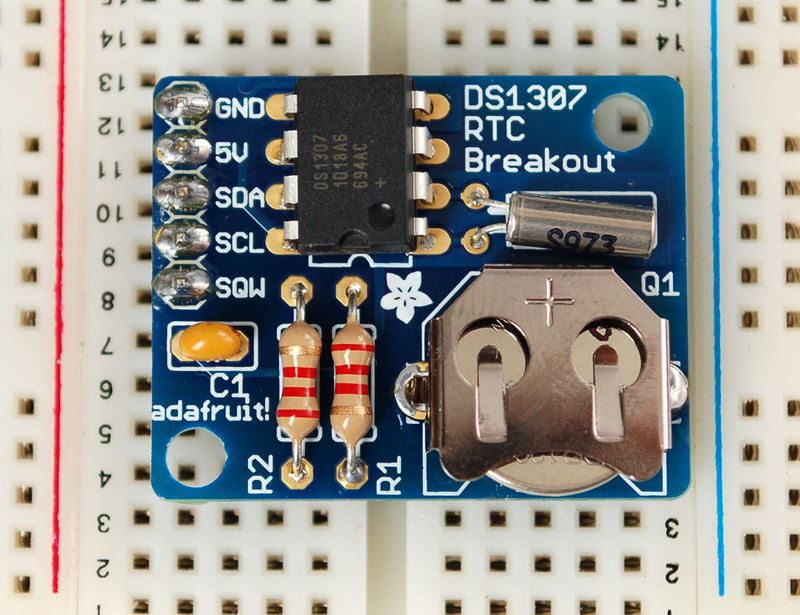
#define DS1307_ADDRESS 0x68
##
Using Solderable breadboards - Off-board Connections
BPS AN0002 Introducing Solderable PC BreadBoard
Here are some suggestions for connecting power and other off-board signal connections to a solderable PC breadboard:
- Use stranded 22 AWG wire for wire connections running off-board to other boards or devices. Solid 22 AWG wire will crack and break after being flexed many times. Stranded wire can be flexed more times.
- Use a strain relief to keep the wire from flexing at the point where it is soldered. Solder will wick up stranded wire when it is soldered, and make it stiff and susceptible to cracking. Using a strain relief causes the wire to flex away from the solder joint, where it is more flexible.
- Use headers or other connectors with removable plugs for off-board
9/12 to 5v Regulations
Jumptuck - Voltage regulation with our friend the 7805

Electrolytic smoothing caps
- input - 0.33uF
-
output - 0.1uF
- Digikey - 0.1uF. Nichicon UVR1H0R1MDD CAP ALUM 0.1UF 50V 20% RADIAL
- Digikey - 0.33uf. Nichicon UVR1HR33MDD CAP ALUM 0.33UF 50V 20% RADIA
JST PH connectors
Digikey - JST Sales America Inc B2B-PH-K-S(LF)(SN) CONN HEADER PH TOP 2POS 2MM