Coot the Craig's Blog
20 December 2014 » Look at Keyboards
17 December 2014 » Personal vm guest - mydeb
current IP
            192.168.88.180 mydeb.coot.local mydeb
Debian 7.7 netinstall
Install selections
- Print Server
- SSH Server
Saved as /data/vm_backups/mydeb/mydeb_20141217_2211/mydeb_20141217_2211
My Base installs
apt-get update
            apt-get dist-upgrade

            apt-get install sudo
            adduser craig sudo
apt-get install vim

            Reading package lists... Done
            Building dependency tree
            Reading state information... Done
            The following extra packages will be installed:
              vim-runtime
            Suggested packages:
              ctags vim-doc vim-scripts
            The following NEW packages will be installed:
              vim vim-runtime
            0 upgraded, 2 newly installed, 0 to remove and 0 not upgraded.
            Need to get 5,448 kB of archives.
            After this operation, 24.8 MB of additional disk space will be used.
Add contrib and non-free to sources.list
diff sources.list.1 sources.list

            7,8c7,8
            < deb http://ftp.us.debian.org/debian/ wheezy main
            < deb-src http://ftp.us.debian.org/debian/ wheezy main
            ---
            > deb http://ftp.us.debian.org/debian/ wheezy main contrib non-free
            > deb-src http://ftp.us.debian.org/debian/ wheezy main contrib non-free
            10,11c10,11
            < deb http://security.debian.org/ wheezy/updates main
            < deb-src http://security.debian.org/ wheezy/updates main
            ---
            > deb http://security.debian.org/ wheezy/updates main contrib non-free
            > deb-src http://security.debian.org/ wheezy/updates main contrib non-free
            14,15c14,15
            < deb http://ftp.us.debian.org/debian/ wheezy-updates main
            < deb-src http://ftp.us.debian.org/debian/ wheezy-updates main
            ---
            > deb http://ftp.us.debian.org/debian/ wheezy-updates main contrib non-free
            > deb-src http://ftp.us.debian.org/debian/ wheezy-updates main contrib non-free
apt-get update
- Package: lightdm (1.10.3-3)
- Package: accountsservice (0.6.37-3 and others)
- Package: xfonts-base (1:1.0.3)
- Package: rxvt-unicode-256color (9.20-1 and others)
apt-get install lightdm accountsservice xfonts-base rxvt-unicode-256color

            Reading package lists... Done
            Building dependency tree
            Reading state information... Done
            xfonts-base is already the newest version.
            xfonts-base set to manually installed.
            The following extra packages will be installed:
              dbus-x11 dconf-gsettings-backend dconf-service desktop-base fontconfig fonts-vlgothic gconf-service gconf2 gconf2-common gnome-accessibility-themes
              gnome-icon-theme gnome-themes-standard gnome-themes-standard-data gtk2-engines hicolor-icon-theme libaccountsservice0 libatk1.0-0 libatk1.0-data
              libcairo-gobject2 libcroco3 libdatrie1 libdconf0 libgconf-2-4 libgdk-pixbuf2.0-0 libgdk-pixbuf2.0-common libgtk-3-0 libgtk-3-bin libgtk-3-common
              libgtk2.0-0 libgtk2.0-bin libgtk2.0-common liblightdm-gobject-1-0 libmtdev1 libpango1.0-0 librsvg2-2 librsvg2-common libstartup-notification0
              libthai-data libthai0 libx11-xcb1 libxcb-util0 libxcursor1 libxft2 libxi6 libxinerama1 libxklavier16 libxtst6 lightdm-gtk-greeter ttf-dejavu
              ttf-dejavu-extra xserver-xorg xserver-xorg-input-all xserver-xorg-input-evdev xserver-xorg-input-mouse xserver-xorg-input-synaptics
              xserver-xorg-input-vmmouse xserver-xorg-input-wacom
            Suggested packages:
              gnome-control-center gnome kde-standard xfce4 wmaker gconf-defaults-service gvfs ttf-baekmuk ttf-arphic-gbsn00lp ttf-arphic-bsmi00lp ttf-arphic-gkai00mp
              ttf-arphic-bkai00mp librsvg2-bin upower gpointing-device-settings touchfreeze xinput
            The following NEW packages will be installed:
              accountsservice dbus-x11 dconf-gsettings-backend dconf-service desktop-base fontconfig fonts-vlgothic gconf-service gconf2 gconf2-common
              gnome-accessibility-themes gnome-icon-theme gnome-themes-standard gnome-themes-standard-data gtk2-engines hicolor-icon-theme libaccountsservice0
              libatk1.0-0 libatk1.0-data libcairo-gobject2 libcroco3 libdatrie1 libdconf0 libgconf-2-4 libgdk-pixbuf2.0-0 libgdk-pixbuf2.0-common libgtk-3-0
              libgtk-3-bin libgtk-3-common libgtk2.0-0 libgtk2.0-bin libgtk2.0-common liblightdm-gobject-1-0 libmtdev1 libpango1.0-0 librsvg2-2 librsvg2-common
              libstartup-notification0 libthai-data libthai0 libx11-xcb1 libxcb-util0 libxcursor1 libxft2 libxi6 libxinerama1 libxklavier16 libxtst6 lightdm
              lightdm-gtk-greeter rxvt-unicode-256color ttf-dejavu ttf-dejavu-extra xserver-xorg xserver-xorg-input-all xserver-xorg-input-evdev
              xserver-xorg-input-mouse xserver-xorg-input-synaptics xserver-xorg-input-vmmouse xserver-xorg-input-wacom
            0 upgraded, 60 newly installed, 0 to remove and 0 not upgraded.
            Need to get 43.8 MB of archives.
            After this operation, 128 MB of additional disk space will be used.
apt-get install gnome-disk-utility

            Reading package lists... Done
            Building dependency tree
            Reading state information... Done
            The following extra packages will be installed:
              cryptsetup-bin dosfstools fuse hdparm libasound2 libatasmart4 libavahi-glib1 libavahi-ui-gtk3-0 libcanberra-gtk3-0 libcanberra-gtk3-module libcanberra0
              libcryptsetup4 libdevmapper-event1.02.1 libgdu-gtk0 libgdu0 libgnome-keyring-common libgnome-keyring0 liblvm2app2.2 libnautilus-extension1a libnotify4
              libogg0 libparted0debian1 libsgutils2-2 libunique-3.0-0 libvorbis0a libvorbisfile3 notification-daemon ntfs-3g powermgmt-base udisks
            Suggested packages:
              apmd libasound2-plugins libcanberra-gtk0 libcanberra-pulse gnome-keyring parted nparted libparted0-dev libparted0-i18n sg3-utils xfsprogs reiserfsprogs
              mdadm
            The following NEW packages will be installed:
              cryptsetup-bin dosfstools fuse gnome-disk-utility hdparm libasound2 libatasmart4 libavahi-glib1 libavahi-ui-gtk3-0 libcanberra-gtk3-0
              libcanberra-gtk3-module libcanberra0 libcryptsetup4 libdevmapper-event1.02.1 libgdu-gtk0 libgdu0 libgnome-keyring-common libgnome-keyring0 liblvm2app2.2
              libnautilus-extension1a libnotify4 libogg0 libparted0debian1 libsgutils2-2 libunique-3.0-0 libvorbis0a libvorbisfile3 notification-daemon ntfs-3g
              powermgmt-base udisks
            0 upgraded, 31 newly installed, 0 to remove and 0 not upgraded.
            Need to get 5,184 kB of archives.
            After this operation, 18.8 MB of additional disk space will be used.
apt-get install dkms

            Reading package lists... Done
            Building dependency tree
            Reading state information... Done
            dkms is already the newest version.
            dkms set to manually installed.
            0 upgraded, 0 newly installed, 0 to remove and 0 not upgraded.
apt-get install cifs-utils

            Reading package lists... Done
            Building dependency tree
            Reading state information... Done
            The following extra packages will be installed:
              keyutils libnss-winbind libpam-winbind winbind
            The following NEW packages will be installed:
              cifs-utils keyutils libnss-winbind libpam-winbind winbind
            0 upgraded, 5 newly installed, 0 to remove and 0 not upgraded.
            Need to get 3,389 kB of archives.
            After this operation, 15.5 MB of additional disk space will be used.
apt-get install pulseaudio

            Reading package lists... Done
            Building dependency tree
            Reading state information... Done
            The following extra packages will be installed:
              gstreamer0.10-pulseaudio libasound2-plugins libasyncns0 libavcodec53 libavutil51 libdirac-encoder0 libfftw3-3 libflac8 libgsm1
              libgstreamer-plugins-base0.10-0 libgstreamer0.10-0 libjack-jackd2-0 libjson0 libmp3lame0 liborc-0.4-0 libpulse0 libsamplerate0 libschroedinger-1.0-0
              libsndfile1 libspeex1 libspeexdsp1 libsystemd-daemon0 libtheora0 libva1 libvorbisenc2 libvpx1 libwebrtc-audio-processing-0 libx264-123 libxvidcore4
              pulseaudio-module-x11 pulseaudio-utils rtkit
            Suggested packages:
              libfftw3-bin libfftw3-dev libvisual-0.4-plugins gstreamer-codec-install gnome-codec-install gstreamer0.10-tools gstreamer0.10-plugins-base jackd2 speex
              pavumeter pavucontrol paman paprefs
            The following NEW packages will be installed:
              gstreamer0.10-pulseaudio libasound2-plugins libasyncns0 libavcodec53 libavutil51 libdirac-encoder0 libfftw3-3 libflac8 libgsm1
              libgstreamer-plugins-base0.10-0 libgstreamer0.10-0 libjack-jackd2-0 libjson0 libmp3lame0 liborc-0.4-0 libpulse0 libsamplerate0 libschroedinger-1.0-0
              libsndfile1 libspeex1 libspeexdsp1 libsystemd-daemon0 libtheora0 libva1 libvorbisenc2 libvpx1 libwebrtc-audio-processing-0 libx264-123 libxvidcore4
              pulseaudio pulseaudio-module-x11 pulseaudio-utils rtkit
            0 upgraded, 33 newly installed, 0 to remove and 0 not upgraded.
            Need to get 14.3 MB of archives.
            After this operation, 40.2 MB of additional disk space will be used.
apt-get install tmux git terminator

            Reading package lists... Done
            Building dependency tree
            Reading state information... Done
            The following extra packages will be installed:
              desktop-file-utils git-man gnome-mime-data gvfs gvfs-common gvfs-daemons gvfs-libs libaacs0 libblas3 libbluray1 libbonobo2-0 libbonobo2-common
              libbonoboui2-0 libbonoboui2-common libcurl3-gnutls libencode-locale-perl liberror-perl libfam0 libfile-basedir-perl libfile-desktopentry-perl
              libfile-listing-perl libfile-mimeinfo-perl libfont-afm-perl libgail18 libgconf2-4 libgfortran3 libgl1-mesa-glx libglade2-0 libglapi-mesa libgnome2-0
              libgnome2-common libgnomecanvas2-0 libgnomecanvas2-common libgnomeui-0 libgnomeui-common libgnomevfs2-0 libgnomevfs2-common libgnomevfs2-extra
              libhtml-form-perl libhtml-format-perl libhtml-parser-perl libhtml-tagset-perl libhtml-tree-perl libhttp-cookies-perl libhttp-daemon-perl
              libhttp-date-perl libhttp-message-perl libhttp-negotiate-perl libidl0 libio-socket-ip-perl libio-socket-ssl-perl libkeybinder0 liblapack3
              liblwp-mediatypes-perl liblwp-protocol-https-perl libmailtools-perl libnet-dbus-perl libnet-http-perl libnet-ssleay-perl liborbit2 librtmp0 libsmbclient
              libsocket-perl libssh2-1 libtie-ixhash-perl libtimedate-perl liburi-perl libvte-common libvte9 libwww-perl libwww-robotrules-perl libx11-protocol-perl
              libxcb-glx0 libxcb-shape0 libxml-parser-perl libxml-twig-perl libxml-xpathengine-perl libxv1 libxxf86dga1 libxxf86vm1 policykit-1-gnome python-cairo
              python-gconf python-gnome2 python-gobject python-gtk2 python-keybinder python-numpy python-pyorbit python-vte rsync x11-utils x11-xserver-utils xdg-utils
            Suggested packages:
              git-daemon-run git-daemon-sysvinit git-doc git-el git-arch git-cvs git-svn git-email git-gui gitk gitweb gvfs-backends libbluray-bdj libbonobo2-bin fam
              libgnomevfs2-bin libdata-dump-perl libcrypt-ssleay-perl libauthen-ntlm-perl libunicode-map8-perl libunicode-string-perl xml-twig-tools python-gnome2-doc
              python-gtk2-doc python-numpy-doc python-numpy-dbg python-nose python-dev gfortran mesa-utils nickle cairo-5c xorg-docs-core gvfs-bin
            The following NEW packages will be installed:
              desktop-file-utils git git-man gnome-mime-data gvfs gvfs-common gvfs-daemons gvfs-libs libaacs0 libblas3 libbluray1 libbonobo2-0 libbonobo2-common
              libbonoboui2-0 libbonoboui2-common libcurl3-gnutls libencode-locale-perl liberror-perl libfam0 libfile-basedir-perl libfile-desktopentry-perl
              libfile-listing-perl libfile-mimeinfo-perl libfont-afm-perl libgail18 libgconf2-4 libgfortran3 libgl1-mesa-glx libglade2-0 libglapi-mesa libgnome2-0
              libgnome2-common libgnomecanvas2-0 libgnomecanvas2-common libgnomeui-0 libgnomeui-common libgnomevfs2-0 libgnomevfs2-common libgnomevfs2-extra
              libhtml-form-perl libhtml-format-perl libhtml-parser-perl libhtml-tagset-perl libhtml-tree-perl libhttp-cookies-perl libhttp-daemon-perl
              libhttp-date-perl libhttp-message-perl libhttp-negotiate-perl libidl0 libio-socket-ip-perl libio-socket-ssl-perl libkeybinder0 liblapack3
              liblwp-mediatypes-perl liblwp-protocol-https-perl libmailtools-perl libnet-dbus-perl libnet-http-perl libnet-ssleay-perl liborbit2 librtmp0 libsmbclient
              libsocket-perl libssh2-1 libtie-ixhash-perl libtimedate-perl liburi-perl libvte-common libvte9 libwww-perl libwww-robotrules-perl libx11-protocol-perl
              libxcb-glx0 libxcb-shape0 libxml-parser-perl libxml-twig-perl libxml-xpathengine-perl libxv1 libxxf86dga1 libxxf86vm1 policykit-1-gnome python-cairo
              python-gconf python-gnome2 python-gobject python-gtk2 python-keybinder python-numpy python-pyorbit python-vte rsync terminator tmux x11-utils
              x11-xserver-utils xdg-utils
            0 upgraded, 97 newly installed, 0 to remove and 0 not upgraded.
            Need to get 36.0 MB of archives.
            After this operation, 110 MB of additional disk space will be used.
apt-get install vim-gtk gnome-icon-theme

            Reading package lists... Done
            Building dependency tree
            Reading state information... Done
            gnome-icon-theme is already the newest version.
            gnome-icon-theme set to manually installed.
            The following extra packages will be installed:
              liblua5.1-0 libpython2.7 libruby1.9.1 libyaml-0-2 tcl8.5 vim-gui-common
            Suggested packages:
              tcl-tclreadline cscope vim-doc
            The following NEW packages will be installed:
              liblua5.1-0 libpython2.7 libruby1.9.1 libyaml-0-2 tcl8.5 vim-gtk vim-gui-common
            0 upgraded, 7 newly installed, 0 to remove and 0 not upgraded.
            Need to get 8,666 kB of archives.
            After this operation, 22.9 MB of additional disk space will be used.
apt-get install thunar iceweasel icedove gedit

            Reading package lists... Done
            Building dependency tree
            Reading state information... Done
            The following extra packages will be installed:
              aspell aspell-en enchant exo-utils freepats gedit-common gir1.2-atk-1.0 gir1.2-clutter-1.0 gir1.2-cogl-1.0 gir1.2-coglpango-1.0 gir1.2-freedesktop
              gir1.2-gdkpixbuf-2.0 gir1.2-gstreamer-0.10 gir1.2-gtk-3.0 gir1.2-gtksource-3.0 gir1.2-json-1.0 gir1.2-pango-1.0 gir1.2-peas-1.0 glib-networking
              glib-networking-common glib-networking-services gnome-js-common gnome-user-guide gsettings-desktop-schemas gstreamer0.10-ffmpeg gstreamer0.10-gconf
              gstreamer0.10-plugins-bad gstreamer0.10-plugins-base gstreamer0.10-plugins-good gstreamer0.10-x hunspell-en-us libaa1 libaspell15 libass4 libavc1394-0
              libavformat53 libcaca0 libcdaudio1 libcdparanoia0 libclutter-1.0-0 libclutter-1.0-common libcogl-common libcogl-pango0 libcogl9 libdc1394-22 libdca0
              libdirectfb-1.2-9 libdv4 libdvdnav4 libdvdread4 libenca0 libenchant1c2a libexo-1-0 libexo-common libexo-helpers libfaad2 libflite1 libfribidi0
              libgail-3-0 libgarcon-1-0 libgarcon-common libgeoclue0 libglu1-mesa libgme0 libgstreamer-plugins-bad0.10-0 libgtksourceview-3.0-0
              libgtksourceview-3.0-common libhunspell-1.3-0 libicu48 libiec61883-0 libjavascriptcoregtk-1.0-0 libjavascriptcoregtk-3.0-0 libjson-glib-1.0-0 libkate1
              libmhash2 libmimic0 libmms0 libmodplug1 libmpcdec6 libofa0 libopenal-data libopenal1 libopus0 libpeas-1.0-0 libpeas-common libpoppler-glib8 libpostproc52
              libproxy0 libraptor2-0 librasqal3 libraw1394-11 librdf0 libseed-gtk3-0 libshout3 libslv2-9 libsoundtouch0 libsoup-gnome2.4-1 libsoup2.4-1 libspandsp2
              libswscale2 libtag1-vanilla libtag1c2a libthunarx-2-0 libts-0.0-0 libtumbler-1-0 libvisual-0.4-0 libvisual-0.4-plugins libvo-aacenc0 libvo-amrwbenc0
              libwavpack1 libwebkitgtk-1.0-0 libwebkitgtk-1.0-common libwebkitgtk-3.0-0 libwebkitgtk-3.0-common libwildmidi-config libwildmidi1 libwnck-common
              libwnck22 libxfce4ui-1-0 libxfce4util-bin libxfce4util-common libxfce4util4 libxfconf-0-2 libxres1 libxslt1.1 libyajl2 libyelp0 libzbar0 libzvbi-common
              libzvbi0 python-gi-cairo thunar-data thunar-volman tsconf tumbler tumbler-common xdg-user-dirs xfce-keyboard-shortcuts xfce4-panel xfconf yelp yelp-xsl
              zenity zenity-common
            Suggested packages:
              aspell-doc spellutils gedit-plugins frei0r-plugins hunspell openoffice.org-hunspell openoffice.org-core fonts-lyx fonts-stix otf-stix
              fonts-oflb-asana-math fonts-mathjax mozplugger libdv-bin oss-compat libdvdcss2 libenchant-voikko alsa-base geoclue libportaudio2 libroar-compat2
              opus-tools raptor2-utils rasqal-utils libraw1394-doc librdf-storage-postgresql librdf-storage-mysql librdf-storage-sqlite redland-utils slv2-jack
              thunar-archive-plugin thunar-media-tags-plugin tumbler-plugins-extra
            Recommended packages:
              myspell-en-us hunspell-dictionary myspell-dictionary
            The following NEW packages will be installed:
              aspell aspell-en enchant exo-utils freepats gedit gedit-common gir1.2-atk-1.0 gir1.2-clutter-1.0 gir1.2-cogl-1.0 gir1.2-coglpango-1.0 gir1.2-freedesktop
              gir1.2-gdkpixbuf-2.0 gir1.2-gstreamer-0.10 gir1.2-gtk-3.0 gir1.2-gtksource-3.0 gir1.2-json-1.0 gir1.2-pango-1.0 gir1.2-peas-1.0 glib-networking
              glib-networking-common glib-networking-services gnome-js-common gnome-user-guide gsettings-desktop-schemas gstreamer0.10-ffmpeg gstreamer0.10-gconf
              gstreamer0.10-plugins-bad gstreamer0.10-plugins-base gstreamer0.10-plugins-good gstreamer0.10-x hunspell-en-us icedove iceweasel libaa1 libaspell15
              libass4 libavc1394-0 libavformat53 libcaca0 libcdaudio1 libcdparanoia0 libclutter-1.0-0 libclutter-1.0-common libcogl-common libcogl-pango0 libcogl9
              libdc1394-22 libdca0 libdirectfb-1.2-9 libdv4 libdvdnav4 libdvdread4 libenca0 libenchant1c2a libexo-1-0 libexo-common libexo-helpers libfaad2 libflite1
              libfribidi0 libgail-3-0 libgarcon-1-0 libgarcon-common libgeoclue0 libglu1-mesa libgme0 libgstreamer-plugins-bad0.10-0 libgtksourceview-3.0-0
              libgtksourceview-3.0-common libhunspell-1.3-0 libicu48 libiec61883-0 libjavascriptcoregtk-1.0-0 libjavascriptcoregtk-3.0-0 libjson-glib-1.0-0 libkate1
              libmhash2 libmimic0 libmms0 libmodplug1 libmpcdec6 libofa0 libopenal-data libopenal1 libopus0 libpeas-1.0-0 libpeas-common libpoppler-glib8 libpostproc52
              libproxy0 libraptor2-0 librasqal3 libraw1394-11 librdf0 libseed-gtk3-0 libshout3 libslv2-9 libsoundtouch0 libsoup-gnome2.4-1 libsoup2.4-1 libspandsp2
              libswscale2 libtag1-vanilla libtag1c2a libthunarx-2-0 libts-0.0-0 libtumbler-1-0 libvisual-0.4-0 libvisual-0.4-plugins libvo-aacenc0 libvo-amrwbenc0
              libwavpack1 libwebkitgtk-1.0-0 libwebkitgtk-1.0-common libwebkitgtk-3.0-0 libwebkitgtk-3.0-common libwildmidi-config libwildmidi1 libwnck-common
              libwnck22 libxfce4ui-1-0 libxfce4util-bin libxfce4util-common libxfce4util4 libxfconf-0-2 libxres1 libxslt1.1 libyajl2 libyelp0 libzbar0 libzvbi-common
              libzvbi0 python-gi-cairo thunar thunar-data thunar-volman tsconf tumbler tumbler-common xdg-user-dirs xfce-keyboard-shortcuts xfce4-panel xfconf yelp
              yelp-xsl zenity zenity-common
            0 upgraded, 148 newly installed, 0 to remove and 0 not upgraded.
            Need to get 168 MB of archives.
            After this operation, 439 MB of additional disk space will be used.
- Package: i3-wm (4.8-1)
- Package: libanyevent-i3-perl (0.16-1)
- Package: libjson-xs-perl (2.340-1 and others)
apt-get install i3-wm libanyevent-i3-perl libjson-xs-perl

            Reading package lists... Done
            Building dependency tree
            Reading state information... Done
            The following extra packages will be installed:
              libanyevent-perl libcommon-sense-perl libev4 libxcb-icccm4 libxcb-keysyms1 libxcb-randr0 libxcb-xinerama0
            Suggested packages:
              libasync-interrupt-perl libev-perl libevent-perl libglib-perl libguard-perl libio-async-perl libpoe-perl libtask-weaken-perl perl-tk
            The following NEW packages will be installed:
              i3-wm libanyevent-i3-perl libanyevent-perl libcommon-sense-perl libev4 libjson-xs-perl libxcb-icccm4 libxcb-keysyms1 libxcb-randr0 libxcb-xinerama0
            0 upgraded, 10 newly installed, 0 to remove and 0 not upgraded.
            Need to get 1,476 kB of archives.
            After this operation, 3,168 kB of additional disk space will be used.
apt-get install dunst i3lock i3status suckless-tools

            Reading package lists... Done
            Building dependency tree
            Reading state information... Done
            The following extra packages will be installed:
              libcap2-bin libconfuse-common libconfuse0 libiw30 libpam-cap libxcb-dpms0 libxcb-image0 libxdg-basedir1 libxss1
            Suggested packages:
              libcap-dev dwm
            The following NEW packages will be installed:
              dunst i3lock i3status libcap2-bin libconfuse-common libconfuse0 libiw30 libpam-cap libxcb-dpms0 libxcb-image0 libxdg-basedir1 libxss1 suckless-tools
            0 upgraded, 13 newly installed, 0 to remove and 0 not upgraded.
            Need to get 296 kB of archives.
            After this operation, 1,065 kB of additional disk space will be used.
apt-get install python-pip debian-keyring g++-multilib g++-4.7-multilib gcc-4.7-doc libstdc++6-4.7-dbg libstdc++6-4.7-doc python-distribute python-distribute-doc python-dev

            Reading package lists... Done
            Building dependency tree
            Reading state information... Done
            Note, selecting 'python-setuptools' instead of 'python-distribute'
            The following extra packages will be installed:
              build-essential dpkg-dev g++ g++-4.7 gcc-4.7-multilib gcc-doc-base gcc-multilib javascript-common lib32gcc1 lib32gomp1 lib32itm1 lib32quadmath0
              lib32stdc++6 libalgorithm-diff-perl libalgorithm-diff-xs-perl libalgorithm-merge-perl libc6-dev-i386 libc6-i386 libdpkg-perl libexpat1-dev
              libfile-fcntllock-perl libgcc1-dbg libjs-jquery libssl-dev libssl-doc libstdc++6-4.7-dev python-pkg-resources python2.7-dev wwwconfig-common zlib1g-dev
            Suggested packages:
              lib32stdc++6-4.7-dbg doc-base lib32mudflap0 apache2 httpd python-distribute mysql-client postgresql-client
            Recommended packages:
              python-dev-all
            The following NEW packages will be installed:
              build-essential debian-keyring dpkg-dev g++ g++-4.7 g++-4.7-multilib g++-multilib gcc-4.7-doc gcc-4.7-multilib gcc-doc-base gcc-multilib
              javascript-common lib32gcc1 lib32gomp1 lib32itm1 lib32quadmath0 lib32stdc++6 libalgorithm-diff-perl libalgorithm-diff-xs-perl libalgorithm-merge-perl
              libc6-dev-i386 libc6-i386 libdpkg-perl libexpat1-dev libfile-fcntllock-perl libgcc1-dbg libjs-jquery libssl-dev libssl-doc libstdc++6-4.7-dbg
              libstdc++6-4.7-dev libstdc++6-4.7-doc python-dev python-distribute-doc python-pip python-pkg-resources python-setuptools python2.7-dev wwwconfig-common
              zlib1g-dev
            0 upgraded, 40 newly installed, 0 to remove and 0 not upgraded.
            Need to get 132 MB of archives.
            After this operation, 290 MB of additional disk space will be used.
pip install py3status

            Downloading/unpacking py3status
              Downloading py3status-1.6.tar.gz
              Running setup.py egg_info for package py3status

            Installing collected packages: py3status
              Running setup.py install for py3status

                Installing py3status script to /usr/local/bin
            Successfully installed py3status
            Cleaning up...
apt-get install weechat

            Reading package lists... Done
            Building dependency tree
            Reading state information... Done
            The following extra packages will be installed:
              guile-1.8-libs weechat-core weechat-curses weechat-plugins
            Suggested packages:
              weechat-doc weechat-scripts
            The following NEW packages will be installed:
              guile-1.8-libs weechat weechat-core weechat-curses weechat-plugins
            0 upgraded, 5 newly installed, 0 to remove and 0 not upgraded.
            Need to get 2,562 kB of archives.
            After this operation, 7,842 kB of additional disk space will be used.
~~~~~~~~~~~~
echo “hello”
~~~~~~~~~~~
17 December 2014 » Minimal Music Player
Research
links
- [OmgUbuntu – Five lightweight music players]((http://www.omgubuntu.co.uk/2010/12/omg-5-five-lightweight-music-players)
- MyLinuxBook - 3 Popular Command Line Music Players for Linux
- lxer - penguinist - mplayer command line
music on console
What is MOC?
MOC (music on console) is a console audio player for LINUX/UNIX designed to be powerful and easy to use.
You just need to select a file from some directory using the menu similar to Midnight Commander, and MOC will start playing all files in this directory beginning from the chosen file. There is no need to create playlists as in other players.
However if you want to combine some files from one or more directories on one playlist, you can still do it. The playlist will be remembered between runs or you can save it as an m3u file and load it whenever you want.
========================= Installation results ===========================
            Making install in themes
            make[1]: Entering directory '/opt/moc/moc-2.5.0/themes'
            make[2]: Entering directory '/opt/moc/moc-2.5.0/themes'
            make[2]: Nothing to be done for 'install-exec-am'.
            test -z "/usr/local/share/moc/themes" || /bin/mkdir -p "/usr/local/share/moc/themes"
            /bin/mkdir: cannot create directory ‘/usr/local/share/moc’: No such file or directory
            Makefile:335: recipe for target 'install-themesDATA' failed
            make[2]: *** [install-themesDATA] Error 1
            make[2]: Leaving directory '/opt/moc/moc-2.5.0/themes'
            Makefile:404: recipe for target 'install-am' failed
            make[1]: *** [install-am] Error 2
            make[1]: Leaving directory '/opt/moc/moc-2.5.0/themes'
            Makefile:717: recipe for target 'install-recursive' failed
            make: *** [install-recursive] Error 1

            ****  Installation failed. Aborting package creation.
/bin/mkdir -p "/usr/local/share/moc/themes"
libtool: install: /usr/bin/install -c mocp /usr/local/bin/mocp
            test -z "/usr/local/share/doc/moc" || /bin/mkdir -p "/usr/local/share/doc/moc"
            /bin/mkdir: cannot create directory ‘/usr/local/share/doc’: No such file or directory
/bin/mkdir -p "/usr/local/share/doc/moc"
Using DeadBeef now
16 December 2014 » PPTP VPN Client on Debian
- pptpclient.sourceforge.net - Debian Howto
- HowToGeek - How to Setup a VPN (PPTP) Server on Debian Linux
apt-get install pptp-linux

            The following NEW packages will be installed:
              libpcap0.8 ppp pptp-linux
            0 upgraded, 3 newly installed, 0 to remove and 0 not upgraded.
            Need to get 520 kB of archives.
            After this operation, 1,368 kB of additional disk space will be used.
create or edit the /etc/ppp/options.pptp
diff options.pptp.1 options.pptp

            26,27c26,35
            < refuse-chap
            < refuse-mschap
            ---
            > #refuse-chap
            > #refuse-mschap
            >
            > usepeerdns
            > require-mppe
            > #require-mppe-128
            > nomppe-stateful
            > #require-mschap-v2
            > bsdcomp 15
            > deflate 15
create or add lines to the /etc/ppp/chap-secrets file, which holds usernames and passwords:
create a /etc/ppp/peers/$TUNNEL file:
find /etc/ppp -name '*gcs*'

            /etc/ppp/peers/gcsww
            /etc/ppp/ip-up.d/100gcsww
- 10.10.10.111
- 10.10.10.116
15 December 2014 » Firefox Browswer Howtos
Research
15 December 2014 » External USB SD Reader
Research
14 December 2014 » Xmonad Tiling Window Manager
research
14 December 2014 » Low Price Laptop
Purchased Thinkpad T500
Lenovo ThinkPad T500, 2.4GHz Core 2 Duo 2GB / 160GB / WiFi / LINUX MINT 17.1
$115
Use 2x4Gb memory from HP Envy
Research Linux on T500
Research docking stations
LENOVO IBM 2504 - $19 + $15 on ebay
Lenovo ThinkPad Advanced Mini-Dock Port Replicator (250410U)
models
- Thinkpad T400 - Jul. 2008
- Thinkpad T500 - Jul. 2008
- Thinkpad T400s - Jun. 2009
- Thinkpad T410 - Jan. 2010
- Thinkpad T510 - Jan. 2010
- Thinkpad T420 - Mar. 2011
Thinkpad T500 - Jul. 2008
- Lenovo ThinkPad T500, 2.4GHz Core 2 Duo 2GB / 160GB / WiFi / LINUX MINT 17.1 ebay $115
- Battdepot.com - T500 battery $25
- Debian on Thinkpad T500
Thinkpad T420 - Mar. 2011
- Lenovo ThinkPad T420 [4180-WND] 14” [WXGA] 2.50GHz CORE i5 [2520M] 4GB 320GB
- ebay $259 + 16 shipping
research links
14 December 2014 » IRC
IRC Information
freenod faq
What is the recommended way to set up my IRC nickname?
Please follow these steps to set up your nick and configure your client. Check off each step to make sure it’s been done:
Select a permanent, master nickname. If the nickname you want is registered but has expired, just ask a staffer and in most cases, we will be happy to drop it for you.
Please avoid using the name of a community project or trademarked entity, to avoid conflicts. Write down your password and be sure to keep the sheet of paper in a safe place.
Register your IRC nick:
/msg NickServ REGISTER password youremail@example.com
Replace password with a secure, unguessable password that you keep secret.
The email address that you select will not be given out by staff, and is mainly used to allow us to help you recover the account in the event that you forget your password. For this reason, you are required to use a real, non-disposable, email address. Upon registering, you will receive an email with a verification command that you will need to run to complete the registration process. Failure to verify the account will cause it to be automatically dropped after about 24 hours.
To keep your email address private, rather than displaying it publicly, mark it as hidden (which is done by default for new accounts):
/msg NickServ SET HIDEMAIL ON
It’s useful, but not required, to have an alternate nick grouped to your account. For example, if your primary nick is foo:
/nick foo_
then identify to your primary account:
/msg NickServ IDENTIFY foo password
and finally, group the new nick to your account
/msg NickServ GROUP
We prefer you to use just one account, and group nicks to it as described above, rather than registering for multiple accounts. Grouping nicks in this way gives you the benefit of having all your nicks covered by the same cloak, should you choose to wear a cloak.
The exception to this is where you might want to run a bot. You should register a separate account for your bot.
Configure your client to identify itself to NickServ automatically whenever it connects to freenode so that it’s less likely you’ll connect to the network without being identified to NickServ. The easiest approach is to specify your NickServ password as a server password.
If your client supports server password, please set this up as accountname:password. Make sure to include the colon. This will allow you to identify to your services account on connect, regardless of the nickname you are using when you connect. For example:
/connect chat.freenode.net 6667 mquin:uwhY8wgzWw22-zXs.M39p
What’s the easiest way to identify to NickServ when I connect to freenode?
If your client supports SASL, that is best. Otherwise, just plug your NickServ password into your client as a server password. To make this work when connecting from a different nick than the one you’ve got registered, use nick:password. You’ll be identified to NickServ automatically when you connect.
In some cases, it’s more convenient to configure your client to send this command to achieve the same effect:
/msg NickServ IDENTIFY account password
mibbit - Create your own nickname
Registering your Nickname
Choose a user name or nick.
This user name should consist only of the letters from A-Z, the ciphers from 0-9 (but not as first character) and certain symbols such as “_” and “-“ (“" breakes some mails). It may have a maximum of 16 characters. Please note that some nicknames are used internally and cannot be used. Also, please stay family friendly with your nicknames
Change your user name to the user name you have chosen. Suppose you chose the nick “StupidName” for example. Type the following in the input line:
/nick StupidName
Register your nick or user name. Type the following command and replace yourPassword with a password that will be easy to remember and use a working email address.
irc command
            /ns register yourPassword yourEmailAccountName@yourMailProvider

            (no nick here, otherwise you'll get "use a more obscure password" or similar)
Get the confirmation code from your email inbox. Type the following command and replace confirmationCode with the code sent to you in the email (NEVER replace the word “nickserv” in /msg nickserv … with your nick). It has the template shown below
irc command
            /ns confirm confirmationCode

            If you want your email address to remain private, use the following command:

            /ns set hide email on
Register an alternate nickname using the same password. If you would like to register an alternate nickname, repeat the same procedure, using steps 2 to 4. Alternatively type /ns GROUP mainNick mainPass (see /ns help group)
Identify with NickServ. Each time you connect, you should sign in, or “identify” yourself, using the following command:
/ns identify your_password
Auto connect with mibbit: For your convience, if you are using the fully featured http://chat.mibbit.com (main client) and created a Mibbit account and are logged in, you can add that nick and password to the “My Account” list to be auto-identified, see Autoidentify. Most clients have their own way of setting up an auto-connect also.
Package: weechat (1.0.1-1)
Weechat links
- Best starter - kmacphail.blogspot
- WeeChat is a fast, light and extensible chat client
- The Practical Sysadmin - Introduction to Weechat
Weechat Install
apt-get install weechat

            apt-get install weechat
            Reading package lists... Done
            Building dependency tree
            Reading state information... Done
            The following extra packages will be installed:
              liblua5.1-0 libtcl8.5 weechat-core weechat-curses weechat-plugins
            Suggested packages:
              tcl8.5 weechat-doc weechat-scripts
            The following NEW packages will be installed:
              liblua5.1-0 libtcl8.5 weechat weechat-core weechat-curses weechat-plugins
            0 upgraded, 6 newly installed, 0 to remove and 0 not upgraded.
            Need to get 2,297 kB of archives.
            After this operation, 9,975 kB of additional disk space will be used.
configure weechat
/server add twice-irc.de irc.twice-irc.de
Using weechat tips
stuff
/set irc.server.freenode.nicks "cootcraig"
            /set irc.server.freenode.username "cootcraig"
            /set irc.server.freenode.realname "Craig Anderson"
            /set irc.server.freenode.command "/msg nickserv identify cootcraig **********"

            /connect freenode
            /join #cobug

            /server add twice-irc irc.twice-irc.de
            /connect twice-irc
            /join #i3
Register nick cootcraig at twice-irc
irc commands

            /msg nickserv help register

            /msg nickserv register ********** craig@coot.net

            A password has been sent to craig@coot.net , please type / msg NickServ
            confirm < passcode > to | complete the registration process .
irc commands
            /msg NickServ confirm x2WB6Tmuc

            The nickname craig has been successfully registered .
            Your password is ********** - keep it for later use.

            /msg nickserv identify craig **********

            You are already registered.

            /nick cootcraig

            /msg nickserv identify craig **********

            /msg nickserv group craig **********

            You are now represented by craig in the group.

            /join #i3

            craig (~craig@twice-F85F5742.hsd1.co.comcast.net) has joined #i3
connect to: irc.twice-irc.de
/set irc.server.twice-irc.nicks "craig cootcraig"
            /set irc.server.twice-irc.username "craig@coot.net"
            /set irc.server.twice-irc.realname "Craig Anderson"
            /set irc.server.twice-irc.command "/msg nickserv identify **********; /nick cootcraig"
[23:08] [1] [core] 1:weechat
Using Weechat
My Notes
useful commands
            /buffer 1 - goto buffer 1, the core weechat buffer
            /buffer weechat - goto buffer 1, the core weechat buffer
            /buffer list - list the buffers
            /buffer #cobug - goto buffer with channel #cobug
            /buffer 3 - goto buffer 3
            /plugin list
            /alias b /buffer
            /alias - list aliases
            /join [-server freenode] #weechat
            /server list
            /server listfull [<server>]
3.2. Screen layout
3.12.3. WeeChat commands
away set or remove away status
/away  [-all] [<message>]

               -all: set or remove away status on all connected servers
            message: message for away (if no message is given, away status is removed)
bar manage bars
buffer manage buffers
/buffer  list
            clear [<number>|<name>|-merged|-all [<number>|<name>...]]
            move <number>|-|+
            swap <number1>|<name1> [<number2>|<name2>]
            merge <number>
            unmerge [<number>|-all]
            hide [<number>|<name>|-all [<number>|<name>...]]
            unhide [<number>|<name>|-all [<number>|<name>...]]
            renumber [<number1> [<number2> [<start>]]]
            close [<n1>[-<n2>]|<name>]
            notify <level>
            localvar
            set <property> <value>
            get <property>
window manage windows
/window  list
            -1|+1|b#|up|down|left|right [-window <number>]
            <number>
            splith|splitv [-window <number>] [<pct>]
            resize [-window <number>] [+/-]<pct>
            balance
            merge [-window <number>] [all]
            page_up|page_down [-window <number>]
            refresh
            scroll [-window <number>] [+/-]<value>[s|m|h|d|M|y]
            scroll_horiz [-window <number>] [+/-]<value>[%]
            scroll_up|scroll_down|scroll_top|scroll_bottom|scroll_beyond_end|scroll_previous_highlight|scroll_next_highlight|scroll_unread [-window <number>]
            swap [-window <number>] [up|down|left|right]
            zoom[-window <number>]
            bare [<delay>]
research links
irssi or WeeChat
- Double Union IRC Tutorial
- Webchat at freenode
- ChatZilla extension
- irchelp.org - An IRC Tutorial
- freenode - Frequently-Asked Questions
- thoughtbot - WeeChat for Slack’s IRC Gateway
14 December 2014 » Seamonkey
research links
- SeaMonkey Home
- SeaMonkey Official build downloads
- SeaMonkey - More than a Web Browser - Andrew Powell
14 December 2014 » Thunderbird for Email
research links
13 December 2014 » Log set up Debian on i3 Mini-ITX
First round of install
Hostname: ivie.coot.local
Software Selection
            ---------------------
            remove Debian desktop environment
            leave Print server
            Add SSH server
            remove laptop
apt-get update
            apt-get dist-upgrade

            apt-get install vim tmux git sudo

            adduser craig sudo
apt-git install lightdm i3 thunar iceweasel icedove
            apt-get install gparted gedit rxvt terminator
            apt-get install gnome-disk-utility
apt-get install audacity pulseaudio
apt-get install cifs-utils
            apt-get install dkms
/etc/fstab from lug
UUID=59230da6-d4e1-4e4f-95bb-4914b473b3fe /               ext4    errors=remount-ro 0       1
            /dev/sdb1 /mnt/disk2 ext4 auto 0 1
            # swap was on /dev/sda5 during installation
            UUID=fbfdf184-9b7a-41b2-97da-24a7fe0f2edd none            swap    sw              0       0
            //10.10.10.111/c$ /media/gcs1c cifs rw,noauto,credentials=/home/craig/gcsww_canderson.txt,uid=craig 0 0
            //10.10.10.111/d$ /media/gcs1d cifs rw,noauto,credentials=/home/craig/gcsww_canderson.txt,uid=craig 0 0
            //10.10.10.117/f$ /media/gcs3f cifs rw,noauto,credentials=/home/craig/gcsww_canderson.txt,uid=craig 0 0
            //10.10.10.117/e$ /media/gcs3e cifs rw,noauto,credentials=/home/craig/gcsww_canderson.txt,uid=craig 0 0
            //192.168.88.209/media /media/nas1 cifs rw,noperm,noauto,credentials=/home/craig/nas1_credentials.txt,uid=craig,sec=ntlmv2 0 0
            UUID=030f7503-7498-44a0-94c6-9b88f0a985fc /media/gcsvm ext4 noauto 0 0
Added
UUID=030f7503-7498-44a0-94c6-9b88f0a985fc /media/gcsvm ext4 noauto 0 0
X.org video driver
Probably not, you will likely need a newer X.org driver
            (xserver-xorg-video-intel) and Mesa (libgl1-mesa-dri), and possibly a
            newer libdrm.  Unfortunately, the xserver-xorg-video-intel package is
            way behind upstream even in experimental, and libgl1-mesa-dri in
            unstable requires a newer libc6 than is available in Wheezy.
- Package: xserver-xorg-video-intel (2:2.21.15-2 and others)
- Package: libgl1-mesa-dri (10.3.2-1)
apt-get install xserver-xorg-video-intel

            already the latest version
Set up the other 3 HD
/dev/sdb mount as /data
/dev/sdc - /dev/sdd -
root@ivie:~# blkid
            /dev/sda1: UUID="fd5a5c3d-45d1-489b-9cd5-6de24d8cfd66" TYPE="ext4" PARTUUID="56e4161b-01"
            /dev/sda5: UUID="0b90163a-b607-47ad-9f4d-d731dbb884f7" TYPE="swap" PARTUUID="56e4161b-05"
            /dev/sdb1: LABEL="sata02" UUID="964ae5ac-42a4-44f7-8a99-57ecd3397563" TYPE="ext4" PARTUUID="5ac5be25-01"
            /dev/sdc1: LABEL="mixing" UUID="234aaeda-a40a-4ba3-8b48-19a5209d45a9" TYPE="ext4" PARTUUID="5237fb2c-01"
            /dev/sdd1: LABEL="sata01" UUID="8105507a-f283-40f0-8051-3649d89229d5" TYPE="ext4" PARTUUID="aab12b11-01"
            /dev/sde1: LABEL="gcsvm" UUID="030f7503-7498-44a0-94c6-9b88f0a985fc" TYPE="ext4" PARTUUID="fc7fb9bb-01"
Label sata02 /dev/sdb1 298Gb ext4
/dev/sdb1: LABEL="sata02" UUID="964ae5ac-42a4-44f7-8a99-57ecd3397563" TYPE="ext4" PARTUUID="5ac5be25-01"
UUID=fd5a5c3d-45d1-489b-9cd5-6de24d8cfd66 /               ext4    errors=remount-ro 0       1

            UUID=964ae5ac-42a4-44f7-8a99-57ecd3397563 /data               ext4    errors=remount-ro 0       2
raid 1 465.76 Gb - /dev/sdc1: LABEL=”mixing” - /dev/sdd1: LABEL=”sata01”
/dev/sdc1: LABEL="mixing" UUID="234aaeda-a40a-4ba3-8b48-19a5209d45a9" TYPE="ext4" PARTUUID="5237fb2c-01"
            /dev/sdd1: LABEL="sata01" UUID="8105507a-f283-40f0-8051-3649d89229d5" TYPE="ext4" PARTUUID="aab12b11-01"
An exact copy (or mirror) of a set of data on two disks. This is useful when read performance or reliability is more important than data storage capacity. Such an array can only be as big as the smallest member disk. A classic RAID 1 mirrored pair contains two disks.
- Debian SoftwareRAID
- Package: mdadm (3.3.2-2) (jessie)
using this article
apt-get install mdadm
            fdisk and create partitions type 0xfd
            mdadm -Cv /dev/md0 -l1 -n2 /dev/sdc1 /dev/sdd1
Watch the progress of building the mdm array
cat /proc/mdstat

            Personalities : [raid1]
            md0 : active raid1 sdd1[1] sdc1[0]
                  488254464 blocks super 1.2 [2/2] [UU]
                  [==>..................]  resync = 10.2% (50215168/488254464) finish=92.0min speed=79290K/sec
                  bitmap: 4/4 pages [16KB], 65536KB chunk
Format raid1 md0
mkfs.ext4 /dev/md0

            mke2fs 1.42.12 (29-Aug-2014)
            Creating filesystem with 122063616 4k blocks and 30523392 inodes
            Filesystem UUID: 6d6c9846-6c60-40cf-b8f0-24fd5eeafdfa
            Superblock backups stored on blocks:
            	32768, 98304, 163840, 229376, 294912, 819200, 884736, 1605632, 2654208,
            	4096000, 7962624, 11239424, 20480000, 23887872, 71663616, 78675968,
            	102400000

            Allocating group tables: done
            Writing inode tables: done
            Creating journal (32768 blocks): done
            Writing superblocks and filesystem accounting information: done
local printer setup
Some office programs
abiword
apt-get install abiword

            The following NEW packages will be installed:
              abiword abiword-common abiword-plugin-grammar abiword-plugin-mathview evolution-data-server-common fonts-liberation fonts-lyx libabiword-3.0
              libboost-date-time1.55.0 libboost-system1.55.0 libboost-thread1.55.0 libcamel-1.2-49 libchamplain-0.12-0 libchamplain-gtk-0.12-0 libclutter-1.0-0
              libclutter-1.0-common libclutter-gtk-1.0-0 libcogl-common libcogl-pango20 libcogl-path20 libcogl20 libebackend-1.2-7 libebook-1.2-14
              libebook-contacts-1.2-0 libecal-1.2-16 libedata-book-1.2-20 libedataserver-1.2-18 libfribidi0 libgck-1-0 libgcr-3-common libgcr-base-3-1 libgdome2-0
              libgdome2-cpp-smart0c2a libgoffice-0.10-10 libgoffice-0.10-10-common libgsf-1-114 libgsf-1-common libgtkmathview0c2a libical1 libinput5 liblink-grammar4
              libloudmouth1-0 libmhash2 libots0 libphonenumber6 libprotobuf9 libraptor2-0 librasqal3 librdf0 librevenge-0.0-0 libtelepathy-glib0 libtidy-0.99-0
              libwmf0.2-7 libwpd-0.10-10 libwpg-0.3-3 libwps-0.3-3 libwv-1.2-4 link-grammar-dictionaries-en
            0 upgraded, 58 newly installed, 0 to remove and 0 not upgraded.
            Need to get 20.2 MB of archives.
            After this operation, 92.4 MB of additional disk space will be used.
Package: libreoffice (1:4.3.3-2)
This metapackage installs all components of libreoffice:
- libreoffice-writer: Word processor
- libreoffice-calc: Spreadsheet
- libreoffice-impress: Presentation
- libreoffice-draw: Drawing
- libreoffice-base: Database
- libreoffice-math: Equation editor
apt-get install libreoffice

            The following NEW packages will be installed:
              coinor-libcbc3 coinor-libcgl1 coinor-libclp1 coinor-libcoinmp1 coinor-libcoinutils3 coinor-libosi1 firebird2.5-common firebird2.5-common-doc
              firebird2.5-server-common fonts-opensymbol fonts-sil-gentium fonts-sil-gentium-basic libabw-0.1-1 libcdr-0.1-1 libclucene-contribs1 libclucene-core1
              libcmis-0.4-4 libcolamd2.8.0 libe-book-0.1-1 libeot0 libetonyek-0.1-1 libexttextcat-2.0-0 libexttextcat-data libfbclient2 libfbembed2.5 libfreehand-0.1-1
              libglew1.10 libgltf-0.0-0 libhsqldb1.8.0-java libhyphen0 liblangtag-common liblangtag1 libmspub-0.1-1 libmwaw-0.3-3 libmythes-1.2-0 libneon27-gnutls
              libodfgen-0.1-1 liborcus-0.8-0 libreoffice libreoffice-avmedia-backend-gstreamer libreoffice-base libreoffice-base-core libreoffice-base-drivers
              libreoffice-calc libreoffice-common libreoffice-core libreoffice-draw libreoffice-impress libreoffice-java-common libreoffice-math
              libreoffice-report-builder-bin libreoffice-sdbc-firebird libreoffice-sdbc-hsqldb libreoffice-style-galaxy libreoffice-writer libservlet2.5-java
              libvisio-0.1-1 lp-solve python3-uno uno-libs3 ure
            0 upgraded, 61 newly installed, 0 to remove and 0 not upgraded.
            Need to get 94.0 MB of archives.
            After this operation, 355 MB of additional disk space will be used.
Package: gv (1:3.7.4-1)
apt-get install gv

            The following NEW packages will be installed:
              ghostscript-x gv xaw3dg
            0 upgraded, 3 newly installed, 0 to remove and 0 not upgraded.
            Need to get 459 kB of archives.
            After this operation, 1,225 kB of additional disk space will be used.
Package: hdparm (9.43-1.1)
apt-get install hdparm

            The following NEW packages will be installed:
              hdparm powermgmt-base
            0 upgraded, 2 newly installed, 0 to remove and 0 not upgraded.
            Need to get 114 kB of archives.
            After this operation, 244 kB of additional disk space will be used.
Package: flashplugin-nonfree (1:3.6)
apt-get install flashplugin-nonfree
How to control audio mixer?
Package: paman (0.9.4-1 and others)
Package: pasystray (0.4.0-1)
Pasystray enables control of various PulseAudio server settings from the X11 system tray. It can:
- adjust the volume of streams and sinks/sources
- transfer streams between sinks/sources
- switch the default sink/source
- set the default server (PULSE_SERVER)
- detect network PulseAudio services
-
rename devices
- sug: paman - PulseAudio Manager
- sug: paprefs - PulseAudio Preferences
- sug: pavumeter - PulseAudio Volume Meter
- sug: pulseaudio-module-zeroconf - Zeroconf module for PulseAudio sound server
Try install
apt-get install paman pasystray

            The following NEW packages will be installed:
              libglademm-2.4-1c2a paman pasystray pavumeter
            0 upgraded, 4 newly installed, 0 to remove and 0 not upgraded.
            Need to get 193 kB of archives.
            After this operation, 949 kB of additional disk space will be used.
Package: inkscape (0.48.5-3)
Package: dia (0.97.3-1)
Package: mupdf (1.5-1 and others)
Unable to read HP Envy SATA drives
hdparm -N /dev/sdf

            /dev/sdf:
             max sectors   = 0/268435455, HPA is enabled
hdparm --verbose /dev/sdf

            geometry      = 91201/255/63, sectors = 1465149168, start = 0

            1465149168
            268435455
Research on HPA on SATA
http://superuser.com/questions/642637/harddrive-wipe-out-hidden-areas-like-hpa-and-dco-also-after-malware-infectio
To use HDPARM to clear the HPA
For x = device you’re targeting, use the following HDPARM command to show if you have an HPA enabled.
hdparm -N /dev/sdx
It will spit back something like the following if you have an HPA defined:
/dev/sdx:
            max sectors   = 78125000/78165360, HPA is enabled
To remove the HPA and expand the visible area out to the full size of the drive use the denominator in the above report (visible area/max sectors):
hdparm -N p78165360 /dev/sdx
It will spit back a report that the visible area is equal to the max sectors and that the HPA is disabled.
/dev/sdx:
            setting max visible sectors to 78165360 (permanent)
            max sectors   = 78165360/78165360, HPA is disabled
RDP remmina
- Package: remmina (1.1.1-2)
- Package: remmina-plugin-rdp (1.1.1-2)
- Package: remmina-plugin-vnc (1.1.1-2)
apt-get install remmina remmina-plugin-rdp remmina-plugin-vnc

            Reading package lists... Done
            Building dependency tree
            Reading state information... Done
            The following extra packages will be installed:
              libavahi-ui-gtk3-0 libfreerdp-cache1.1 libfreerdp-client1.1 libfreerdp-codec1.1 libfreerdp-common1.1.0 libfreerdp-core1.1 libfreerdp-crypto1.1
              libfreerdp-gdi1.1 libfreerdp-locale1.1 libfreerdp-plugins-standard libfreerdp-primitives1.1 libfreerdp-utils1.1 libgstreamer-plugins-base0.10-0
              libgstreamer0.10-0 libssh-4 libvncclient0 libvte-2.90-9 libvte-2.90-common libwinpr-crt0.1 libwinpr-crypto0.1 libwinpr-dsparse0.1 libwinpr-environment0.1
              libwinpr-file0.1 libwinpr-handle0.1 libwinpr-heap0.1 libwinpr-input0.1 libwinpr-interlocked0.1 libwinpr-library0.1 libwinpr-path0.1 libwinpr-pool0.1
              libwinpr-registry0.1 libwinpr-rpc0.1 libwinpr-sspi0.1 libwinpr-synch0.1 libwinpr-sysinfo0.1 libwinpr-thread0.1 libwinpr-utils0.1 remmina-common
            Suggested packages:
              freerdp-x11 gstreamer-codec-install gnome-codec-install gstreamer0.10-tools gstreamer0.10-plugins-base
            The following NEW packages will be installed:
              libavahi-ui-gtk3-0 libfreerdp-cache1.1 libfreerdp-client1.1 libfreerdp-codec1.1 libfreerdp-common1.1.0 libfreerdp-core1.1 libfreerdp-crypto1.1
              libfreerdp-gdi1.1 libfreerdp-locale1.1 libfreerdp-plugins-standard libfreerdp-primitives1.1 libfreerdp-utils1.1 libgstreamer-plugins-base0.10-0
              libgstreamer0.10-0 libssh-4 libvncclient0 libvte-2.90-9 libvte-2.90-common libwinpr-crt0.1 libwinpr-crypto0.1 libwinpr-dsparse0.1 libwinpr-environment0.1
              libwinpr-file0.1 libwinpr-handle0.1 libwinpr-heap0.1 libwinpr-input0.1 libwinpr-interlocked0.1 libwinpr-library0.1 libwinpr-path0.1 libwinpr-pool0.1
              libwinpr-registry0.1 libwinpr-rpc0.1 libwinpr-sspi0.1 libwinpr-synch0.1 libwinpr-sysinfo0.1 libwinpr-thread0.1 libwinpr-utils0.1 remmina remmina-common
              remmina-plugin-rdp remmina-plugin-vnc
            0 upgraded, 41 newly installed, 0 to remove and 0 not upgraded.
            Need to get 9,511 kB of archives.
            After this operation, 20.6 MB of additional disk space will be used.
IRC client
irssi - irc client ChatZilla extension for Firefox.
Package: irssi (0.8.17-1)
install
apt-get install irssi irssi-scripts libdbi-perl libclone-perl libmldbm-perl libnet-daemon-perl libsql-statement-perl

            Reading package lists... Done
            Building dependency tree
            Reading state information... Done
            The following extra packages will be installed:
              libfreezethaw-perl libparams-util-perl libtext-soundex-perl libval14
            The following NEW packages will be installed:
              irssi irssi-scripts libclone-perl libdbi-perl libfreezethaw-perl libmldbm-perl libnet-daemon-perl libparams-util-perl libsql-statement-perl
              libtext-soundex-perl libval14
            0 upgraded, 11 newly installed, 0 to remove and 0 not upgraded.
            Need to get 2,878 kB of archives.
            After this operation, 8,864 kB of additional disk space will be used.
package libdb-dev
apt-get install libdb-dev

            Reading package lists... Done
            Building dependency tree
            Reading state information... Done
            The following extra packages will be installed:
              libdb5.3-dev
            Suggested packages:
              db5.3-doc
            The following NEW packages will be installed:
              libdb-dev libdb5.3-dev
            0 upgraded, 2 newly installed, 0 to remove and 0 not upgraded.
            Need to get 742 kB of archives.
            After this operation, 3,143 kB of additional disk space will be used.
apt-get install ncurses-dev

            Reading package lists... Done
            Building dependency tree
            Reading state information... Done
            Note, selecting 'libncurses5-dev' instead of 'ncurses-dev'
            The following extra packages will be installed:
              libtinfo-dev
            Suggested packages:
              ncurses-doc
            The following NEW packages will be installed:
              libncurses5-dev libtinfo-dev
            0 upgraded, 2 newly installed, 0 to remove and 0 not upgraded.
            Need to get 252 kB of archives.
            After this operation, 1,526 kB of additional disk space will be used.
apt-get install libpopt-dev

            Reading package lists... Done
            Building dependency tree
            Reading state information... Done
            The following NEW packages will be installed:
              libpopt-dev
            0 upgraded, 1 newly installed, 0 to remove and 0 not upgraded.
            Need to get 50.6 kB of archives.
            After this operation, 122 kB of additional disk space will be used.
            Get:1 http://ftp.us.debian.org/debian/ jessie/main libpopt-dev amd64 1.16-10 [50.6 kB]
            Fetched 50.6 kB in 0s (90.6 kB/s)
            Selecting previously unselected package libpopt-dev:amd64.
            (Reading database ... 127283 files and directories currently installed.)
            Preparing to unpack .../libpopt-dev_1.16-10_amd64.deb ...
            Unpacking libpopt-dev:amd64 (1.16-10) ...
            Processing triggers for man-db (2.7.0.2-4) ...
            Setting up libpopt-dev:amd64 (1.16-10) ...
apt-get install libltdl-dev

            Reading package lists... Done
            Building dependency tree
            Reading state information... Done
            The following extra packages will be installed:
              autotools-dev libtool
            Suggested packages:
              libtool-doc autoconf automaken gfortran fortran95-compiler gcj-jdk
            The following NEW packages will be installed:
              autotools-dev libltdl-dev libtool
            0 upgraded, 3 newly installed, 0 to remove and 0 not upgraded.
            Need to get 418 kB of archives.
            After this operation, 1,909 kB of additional disk space will be used.
apt-get install checkinstall

            Reading package lists... Done
            Building dependency tree
            Reading state information... Done
            The following extra packages will be installed:
              build-essential dpkg-dev g++ g++-4.9 libalgorithm-diff-perl libalgorithm-diff-xs-perl libalgorithm-merge-perl libdpkg-perl libfile-fcntllock-perl
              libstdc++-4.9-dev
            Suggested packages:
              gettext debian-keyring g++-multilib g++-4.9-multilib gcc-4.9-doc libstdc++6-4.9-dbg libstdc++-4.9-doc
            The following NEW packages will be installed:
              build-essential checkinstall dpkg-dev g++ g++-4.9 libalgorithm-diff-perl libalgorithm-diff-xs-perl libalgorithm-merge-perl libdpkg-perl
              libfile-fcntllock-perl libstdc++-4.9-dev
            0 upgraded, 11 newly installed, 0 to remove and 0 not upgraded.
            Need to get 25.5 MB of archives.
            After this operation, 50.8 MB of additional disk space will be used.
research
- LinuxReviews - Irssi quickstart guide
- ArchLinux on irssi
- ArchLinux - irssi with nicklist in tmux
- Linode howto on Irssi
- A Guide to Efficiently Using Irssi and Screen
- irssi.org - Startup HOWTO
- Aaron Toponce - Irssi’s /channel, /network, /server and /connect - What It Means
- BitlBee brings IM (instant messaging) to IRC clients.
- Anton Fagerberg - My perfect Irssi setup
- Uves Way - Irssi and tmux (or screen)
- steelmanronald06 - irssi For Beginners
next
deadbeef - unpacked to /opt
12 December 2014 » How to secure Debian https ssh
Goal
Reasonable security for public Debian 7 server with:
- https
- ssh
Research
- Securing Debian Manual
- Package: harden (0.1.38+nmu1)
- Stack Exchange - hardening-debian
- Noobsysadmin - Hardening your Linux Debian 7 Wheezy – Part 1
- biapy - harden ssh on Debian
- linoxide - Lynis - Security Tool for Audit and Hardening Linux / Unix Systems
- digitalocean - How To Install and Use Bastille To Harden an Ubuntu 12.04
- unixmen - How to Harden Your Linux Servers Security with Bastille
- linode - Securing Your Server
- Hardening ssh Servers
09 December 2014 » Notes on i3wm
Notes
Named Workspaces
6.5.2. Renaming workspaces
You can rename workspaces. This might be useful to start with the default numbered workspaces, do your work, and rename the workspaces afterwards to reflect what’s actually on them. You can also omit the old name to rename the currently focused workspace. This is handy if you want to use the rename command with i3-input.
i3-msg 'rename workspace to "2: irc"'

            bindsym $mod+n exec i3-input -F 'rename workspace to "%s"' -P 'New name: '
IRC
-
i3 on irc.twice-irc.de
- i3wm Contact page
- Freenode webchat
Channel #i3
Asked on #i3 - Tue Dec 16 09:03:50 MST 2014
Reading 6.5.1. Named workspaces in the User’s Guide. I don’t understand how to do a rename command.
research links
09 December 2014 » Setup up work Gitlab server
Gitlab Omnibus Readme
Configuration options
Configuration done in file:
- /etc/gitlab/gitlab.rb
sudo gitlab-ctl reconfigure
GitLab and GitLab CI are configured by setting their relevant options in /etc/gitlab/gitlab.rb. For a complete list of available options, visit the gitlab.rb.template. New installations starting from GitLab 7.6, will have all the options of the template listed in /etc/gitlab/gitlab.rb by default.
SMTP settings
If you would rather send application email via an SMTP server instead of via Sendmail, add the following configuration information to /etc/gitlab/gitlab.rb and run gitlab-ctl reconfigure.
in /etc/gitlab/gitlab.rb
            gitlab_rails['smtp_enable'] = true
            gitlab_rails['smtp_address'] = "smtp.server"
            gitlab_rails['smtp_port'] = 456
            gitlab_rails['smtp_user_name'] = "smtp user"
            gitlab_rails['smtp_password'] = "smtp password"
            gitlab_rails['smtp_domain'] = "example.com"
            gitlab_rails['smtp_authentication'] = "login"
            gitlab_rails['smtp_enable_starttls_auto'] = true
If your SMTP server does not like the default ‘From: gitlab@localhost’ you can change the ‘From’ with this setting.
in /etc/gitlab/gitlab.rb
            gitlab_rails['gitlab_email_from'] = 'gitlab@example.com'
To change GitLab CI email configuration (e.g. use SMTP), use gitlab_ci instead of gitlab_rails.
in /etc/gitlab/gitlab.rb
            gitlab_ci['gitlab_ci_email_from'] = 'gitlab-ci@example.com'
            gitlab_ci['smtp_enable'] = true
            gitlab_ci['smtp_address'] = "smtp.server"
GitLab Community Edition Omnibus package for Debian 7
The current “stable” distribution of Debian is version 7, codenamed wheezy. It was initially released as version 7.0 on May 4th, 2013 and its latest update, version 7.7, was released on October 18th, 2014.
Base install
Hostname: gitlab.gcsww.com
            Software Selection
            ---------------------
            remove Debian desktop environment
            leave Print server
            Add SSH server
            remove laptop
            apt-get update
            apt-get dist-upgrade

            apt-get install vim
            apt-get install tmux
            apt-get install git
            apt-get install sudo

            adduser craig sudo

            git config --global user.name "Your Name Here"
             Sets the default name for git to use when you commit

            git config --global user.email "your_email@example.com"
             Sets the default email for git to use when you commit
ssh-copy-id -i ~/.ssh/id_rsa.pub $host
Gitlab install / Setup
From Debian 7 selection
            wget https://downloads-packages.s3.amazonaws.com/debian-7.6/gitlab_7.5.3-omnibus.5.2.1.ci-1_amd64.deb
            sudo apt-get install openssh-server
            sudo apt-get install postfix # Select 'Internet Site', using sendmail instead also works, exim has problems

            Suggested packages:
              postfix-mysql postfix-pgsql postfix-ldap postfix-pcre sasl2-bin dovecot-common resolvconf postfix-cdb ufw postfix-doc
            The following packages will be REMOVED:
              exim4 exim4-base exim4-config exim4-daemon-light
            The following NEW packages will be installed:
              postfix

             Internet site:
              │   Mail is sent and received directly using SMTP.

            System mail name:                                                                                                                                                 │
                │                                                                                                                                                                   │
                │ gitlab.gcsww.com

            sudo dpkg -i gitlab_7.5.3-omnibus.5.2.1.ci-1_amd64.deb

            Setting up gitlab (7.5.3-omnibus.5.2.1.ci-1) ...
            Thank you for installing GitLab!
            Configure and start GitLab by running the following command:

            sudo gitlab-ctl reconfigure

            GitLab should be reachable at gitlab.gcsww.com
            Otherwise configure GitLab for your system by editing /etc/gitlab/gitlab.rb file
            And running reconfigure again.

            gitlab-ctl reconfigure
reconfigure failed the first time. Edit /etc/gitlab/gitlab.rb Also, set the email from.
diff /etc/gitlab/gitlab.rb.1 /etc/gitlab/gitlab.rb
            2c2,4
            < external_url 'gitlab.gcsww.com'
             ---
            > external_url 'http://gitlab.gcsww.com'
            > gitlab_rails['gitlab_email_from'] = 'gitlab@gcsww.com'
            2c2
            < external_url 'gitlab.gcsww.com'
            ---
            > external_url 'http://gitlab.gcsww.com'
Browse to the hostname and login
            Username: root
            Password: 5iveL!fe
Change password.
smtp access to mail.coot.net
- server name: mail.coot.net
- port: 26
- user name: craig@coot.net
- Authentication method: Normal password
- Connection Security: STARTTLS
postfix configuration
Need to configure postfix
$ hostname --fqdn
            gitlab.gcsww.com
$ postconf -n
            alias_database = hash:/etc/aliases
            alias_maps = hash:/etc/aliases
            append_dot_mydomain = no
            biff = no
            config_directory = /etc/postfix
            inet_interfaces = all
            mailbox_command = procmail -a "$EXTENSION"
            mailbox_size_limit = 0
            mydestination = gitlab.gcsww.com, localhost.gcsww.com, , localhost
            myhostname = gitlab.gcsww.com
            mynetworks = 127.0.0.0/8 [::ffff:127.0.0.0]/104 [::1]/128
            myorigin = /etc/mailname
            readme_directory = no
            recipient_delimiter = +
            relayhost =
            smtp_tls_session_cache_database = btree:${data_directory}/smtp_scache
            smtpd_banner = $myhostname ESMTP $mail_name (Debian/GNU)
            smtpd_tls_cert_file = /etc/ssl/certs/ssl-cert-snakeoil.pem
            smtpd_tls_key_file = /etc/ssl/private/ssl-cert-snakeoil.key
            smtpd_tls_session_cache_database = btree:${data_directory}/smtpd_scache
            smtpd_use_tls = yes
Postfix on a null client
A null client is a machine that can only send mail. It receives no mail from the network, and it does not deliver any mail locally. A null client typically uses POP, IMAP or NFS for mailbox access.
- /etc/postfix/main.cf:
- myhostname = hostname.example.com
- myorigin = $mydomain
- relayhost = $mydomain
- inet_interfaces = loopback-only
- mydestination =
Translation:
- Line 2: Set myhostname to hostname.example.com, in case the machine name isn’t set to a fully-qualified domain name (use the command “postconf -d myhostname” to find out what the machine name is).
- Line 2: The myhostname value also provides the default value for the mydomain parameter (here, “mydomain = example.com”).
- Line 3: Send mail as “user@example.com” (instead of “user@hostname.example.com”), so that nothing ever has a reason to send mail to “user@hostname.example.com”.
- Line 4: Forward all mail to the mail server that is responsible for the “example.com” domain. This prevents mail from getting stuck on the null client if it is turned off while some remote destination is unreachable. Specify a real hostname here if your “example.com” domain has no MX record.
- Line 5: Do not accept mail from the network.
-
Line 6: Disable local mail delivery. All mail goes to the mail server as specified in line 4.
- Linode - Configure Postfix to Send Mail Using an External SMTP Server
Edit /etc/postfix/main.cf
            /etc/postfix# diff main.cf.1 main.cf
            33,35c33,35
            < myorigin = /etc/mailname
            < mydestination = gitlab.gcsww.com, localhost.gcsww.com, , localhost
            < relayhost =
            ---
            > myorigin = $mydomain
            > mydestination =
            > relayhost = [mail.coot.net]:26
            40c40,54
            < inet_interfaces = all
            ---
            > inet_interfaces = loopback-only
            >
            > # see - https://www.linode.com/docs/email/postfix/postfix-smtp-debian7
            > # enable SASL authentication
            > smtp_sasl_auth_enable = yes
            > # disallow methods that allow anonymous authentication.
            > smtp_sasl_security_options = noanonymous
            > # where to find sasl_passwd
            > smtp_sasl_password_maps = hash:/etc/postfix/sasl_passwd
            >
            > # Enable STARTTLS encryption
            > smtp_use_tls = yes
            > # where to find CA certificates
            > smtp_tls_CAfile = /etc/ssl/certs/ca-certificates.crt
            >
Configuring SMTP Usernames and Passwords
/etc/postfix/sasl_passwd
            [mail.coot.net]:26 craig@coot.net:mypassword
Create the hash db file for Postfix by running the postmap command:
postmap /etc/postfix/sasl_passwd
If all went well, you should have a new file named sasl_passwd.db in the /etc/postfix/ directory.
Securing Your Password and Hash Database Files
The /etc/postfix/sasl_passwd and the /etc/postfix/sasl_passwd.db files created in the previous steps contain your SMTP credentials in plain text.
For security reasons, you should change their permissions so that only the root user can read or write to the file. Run the following commands to change the ownership to root and update the permissions for the two files:
Change permissions of sasl_passwd and sasl_passwd.db
            chown root:root /etc/postfix/sasl_passwd /etc/postfix/sasl_passwd.db
            chmod 0600 /etc/postfix/sasl_passwd /etc/postfix/sasl_passwd.db
Test
echo "body of your email" | mail -s "This is a Subject" -a "From: you@example.com" recipient@elsewhere.com
10.10.9.175
            http://gitlab.gcsww.com/cootcraig/game_justin_craig_20141209.git
            http://10.10.9.175/cootcraig/game_justin_craig_20141209.git

            git remote set-url origin http://10.10.9.175/cootcraig/game_justin_craig_20141209.git
postfix research
- Postfix Standard Configuration Examples
- Postfix on a null client
- Postfix on a local network
- Postfix on hosts without a real Internet hostname
- full-on First Linux: Postfix 5: Postfix Null Client
- fatmin - Configure a Null Email Client
Install Gitlab virtualbox guest on vmhost
Unpack and initial setup
dhcp ip: 10.10.9.162
Pick a static IP
DNS for Gitlab
gitlab.gcsww.local 10.10.22.6
research
- Bitnami Gitlab
- GitLab Virtual Machines
- Bitnami Gitlam vm - Ubuntu 14.04 - GitLab 7.5.3-0 (64-bit)
- Virtual Appliances Quick Start Guide
- mechonomics.com - Configuring the BitNami GitLab Virtual Machine
- Geekwerks - Fixing Bitnami GitLab - ssh problem
- Radio Bitnami - gitlab interview
-
WhaleBlubber - Self-hosted GitLab Server for Private Revision Control
- DigitalOcean Guide
- Playing with Git? Use GitLab!
bitnami Review - 10/18/2014 - Easy to install and configure - By Nacho Sanchez
Installation takes 5 minutes, and configuration is very easy since they include links to FAQs and basic stuff you should know.
Configuring the email can get tricky, so here is the basic stuff:
Be careful with the host and port, since it sets the ones where the machine installs by default, but if you then assign a static IP you must change them manually.
09 December 2014 » Minimal install for i3wm on Debian Jessie
Hope to make Debian with i3wm my Linux home
apt-get install remmina remmina-plugin-rdp remmina-plugin-vnc
09 December 2014 » Setup up work Git server with Gogs
Setup up work Git server with Gogs
Install a Debian 7 virtualbox guest to host the company GIT repositories.
Use Debian stable wheezy
The current “stable” distribution of Debian is version 7, codenamed wheezy. It was initially released as version 7.0 on May 4th, 2013 and its latest update, version 7.7, was released on October 18th, 2014.
Base install
Hostname: gogs.gcsww.local
            Software Selection
            ---------------------
            remove Debian desktop environment
            leave Print server
            Add SSH server
            remove laptop
            apt-get update
            apt-get dist-upgrade

            apt-get install vim
            apt-get install tmux
            apt-get install git
            apt-get install sudo

            adduser craig sudo
Put local ssh public key on gogs server
Step 2: Copy the public key to remote-host using ssh-copy-id
            jsmith@local-host$ ssh-copy-id -i ~/.ssh/id_rsa.pub remote-host
            jsmith@remote-host's password:
            Now try logging into the machine, with "ssh 'remote-host'", and check in:

            .ssh/authorized_keys

            to make sure we haven't added extra keys that you weren't expecting.

            ssh-copy-id -i ~/.ssh/id_rsa.pub 192.168.88.183
            ssh 192.168.88.183
Note: ssh-copy-id appends the keys to the remote-host’s .ssh/authorized_key.
gogs Install Howto for Debian 7 Wheezy
Here is how to install the package on a Debian 7 Wheezy 64bits server:
ssh 192.168.88.183
https support was missing from apt-get after install
apt-get install apt-transport-https
Here is how to install the package on a Debian 7 Wheezy 64bits server:
            wget -qO - https://deb.packager.io/key | sudo apt-key add -
            echo "deb https://deb.packager.io/gh/pkgr/gogs wheezy pkgr" | sudo tee /etc/apt/sources.list.d/gogs.list
            sudo apt-get update
            sudo apt-get install gogs

            The following NEW packages will be installed:
              gogs libevent-core-2.0-5 libevent-extra-2.0-5 libmysqlclient18 libpq5 libreadline5 libxslt1.1 mysql-common

            Setting up gogs (0.5.8-1418206274.9ee80e3.wheezy) ...
            Scaling up...
            update-rc.d: using dependency based boot sequencing
            update-rc.d: using dependency based boot sequencing
            update-rc.d: using dependency based boot sequencing
            gogs-web-1 started.
            --> done.
            APP_NAME="gogs"
            MYSQL_PASSWORD="change_me"
            HOSTNAME="example.com"

            debconf-set-selections <<CONFIG
            mysql-server-5.5 mysql-server/root_password password ${MYSQL_PASSWORD}
            mysql-server-5.5 mysql-server/root_password_again password ${MYSQL_PASSWORD}
            CONFIG
            APP_NAME="gogs"
            MYSQL_PASSWORD="change_me"
            HOSTNAME="example.com"

            apt-get install -y --force-yes mysql-server

            The following NEW packages will be installed:
              libaio1 libdbd-mysql-perl libdbi-perl libhtml-template-perl mysql-client-5.5 mysql-server mysql-server-5.5 mysql-server-core-5.5
            APP_NAME="gogs"
            MYSQL_PASSWORD="change_me"
            HOSTNAME="example.com"

            mysql -uroot -p${MYSQL_PASSWORD} -e "create database if not exists ${APP_NAME};"
            apt-get install -y nginx

            The following NEW packages will be installed:
              nginx nginx-common nginx-full
            APP_NAME="gogs"
            MYSQL_PASSWORD="change_me"
            HOSTNAME="example.com"

            cat > /etc/nginx/sites-available/default <<EOF
            server {
              listen          80;
              server_name     ${HOSTNAME} "";
              location / {
                proxy_pass      http://localhost:6000;
              }
            }
            EOF
sudo service nginx restart
Now, access http://${HOSTNAME} and finish the installation process. Easy!
            http://10.10.9.186/craig/game_justin_craig_20141209

            git remote add origin http://localhost:6000/craig/game_justin_craig_20141209.git
            git push -u origin master
            was
            origin	/media/gcs3f/GIT/game_justin_craig_20141209.git

            git remote set-url origin http://10.10.9.186/craig/game_justin_craig_20141209


            ssh://[user@]host.xz[:port]/path/to/repo.git/
            gogs@localhost:craig/game_justin_craig_20141209.git

            git remote set-url origin craig@10.10.9.186:craig/game_justin_craig_20141209.git
On reboot gogs service not running
Some background on Debian boot up services
update-rc.d Cheat Sheet - James Coyle
            service --status-all
             ...
             [ ? ]  gogs
             [ ? ]  gogs-web
             [ - ]  gogs-web-1
             ...
- LSBInitScripts DependencyBasedBoot
- Chapter 3. The system initialization
- How to LSBize an Init Script
- Daemons in Debian
- 2.2.3. Dependency booting
insserv is a low level tool used by update-rc.d which enables an installed system init script (boot script) by reading the comment header of the script, e.g.:
The dependency-based boot sequencing introduced with Debian 6.0 is now always enabled, including for users of file-rc.
For optimal sequencing, all init.d scripts should declare their dependencies in an LSB header. This is already the case for scripts shipped in Debian, but users should check their local scripts and consider adding that information.
For more information on this feature refer to the information available in /usr/share/doc/insserv/README.Debian.
Starting with Debian 6.0, the insserv command is used instead, if dependency-based booting is enabled:
insserv mydaemon
Where mydaemon is an executable init script placed in /etc/init.d. insserv will produce no output if everything went OK. Examine the error code in $? if you want to be sure.
Both the old and the new way requires an init script to be present in /etc/init.d. For dependency-based booting, the script needs to be an LSB init script.
Let’s fix it
            /etc/init.d/gogs
            /etc/init.d/gogs-web
            /etc/init.d/gogs-web-1
To see all the files the package installed onto your system, do this:
            dpkg-query -L


            /opt/gogs/conf/app.ini


            ## migrate existing

            * [Moving A Git Repository To A New Server - Nik Sumeiko](http://www.smashingmagazine.com/2014/05/19/moving-git-repository-new-server/)
02 November 2014 » Firefox Phone Interest
Desired Features
- Affordable phone to use with Straighttalk month to month
- Able to configure just the apps I want
- Managing contact list.
- WiFi networking, but no cell data network.
- WiFi external keyboard/mouse
- External full size keyboard/mouse
- Use as sms modem
- Use as bluetooth controller for devices such as bluetooth radio Arduino
Internet Resources
- Google Group
-
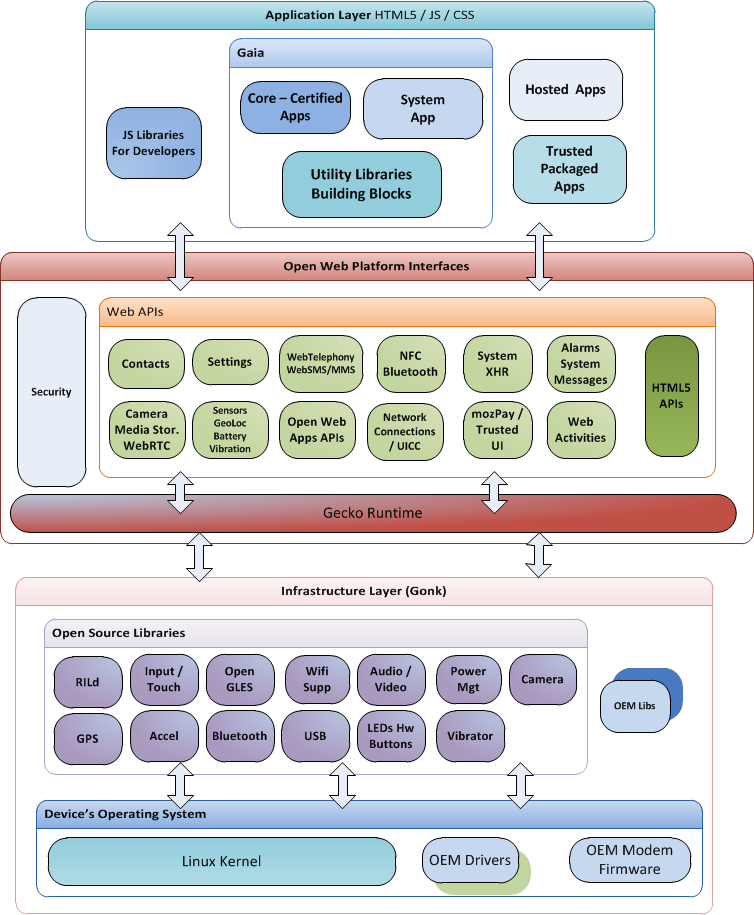
high-level overview of the architecture of the Firefox OS platform
- Architecture Diagram
11 September 2014 » PostgreSQL Notes
- PostgreSQL packages for Debian and Ubuntu
- How to Install PostgreSQL 9.3 on Debian 7 Wheezy
- PostgreSQL 9.3.5 Documentation
10 September 2014 » Debian Remote Dummy X on Virtual Box
07 September 2014 » Linux Tricks
Find OS version
debian
            $ lsb_release -a
            No LSB modules are available.
            Distributor ID:	Debian
            Description:	Debian GNU/Linux 7.6 (wheezy)
            Release:	7.6
            Codename:	wheezy
Scraping Web Sites
wget can get a local copy of a url.
            wget  --convert-links --adjust-extension --page-requisites --no-parent http://www.guitaralive.org/playlist_14_31.html

            wget  --convert-links --adjust-extension --page-requisites --no-parent http://www.cpr.org/classical/playlist
HTML Tidy can be used as part of editing the scraped HTML
Archive and Compression
7zip tar archives
            apt-get install p7zip-full
            7z a archive.tar.7z archive.tar
03 September 2014 » Using Debian 7 (Wheezy)
Overview - Switch from Lubuntu to Debian
Disruptive motivators:
- GCS workstations removed from server room
- GCS VM host running Debian / VirtualBox available
-
HP envy LUG damaged in speed bump incident
- Debian 7 Administrator’s Handbook
Netinstall - then …
BASIC DEV. TOOLS: COMPILER,VIM,TMUX,GIT
Compiler and build tools
sudo apt-get install build-essential checkinstall libtool automake uuid-dev
vim (or vim-gtk),tmux,git
sudo apt-get install vim tmux git
Personalize git
            git config --global user.name "Your Name Here"
             # Sets the default name for git to use when you commit

            git config --global user.email "your_email@example.com"
             # Sets the default email for git to use when you commit
Install the rsa public key on my github account
ssh-keygen
Then clone the vim config and install
            cd
            git clone git@github.com:CootCraig/dotfiles_again.git
            cd ~/dotfiles_again/linux
            bash install.sh
Look at /home/craig/dotfiles_again/windows/vimfiles/bundle/Readme.txt for setting up the vim bundles.
arrange for mounting windows shares
apt-get install cifs-utils winbind
Add the shares to mount. Sample entry in /etc/fstab
//gcs3/f$/GIT /media/gcsgit cifs rw,noauto,credentials=/home/craig/gcsww_canderson.txt,uid=craig 0 0
Template credentials file
            username=a_user
            password=a_password
            domain=gcsww
Java SE 8u20
Extracted jdk tar to /opt/java. Make external link.
/opt/java/jdk -> /opt/java/jdk1.8.0_20/
Modified /etc/profile
            if [ "`id -u`" -eq 0 ]; then
              PATH="/opt/java/jdk/bin:/usr/local/sbin:/usr/local/bin:/usr/sbin:/usr/bin:/sbin:/bin"
            else
              PATH="/opt/java/jdk/bin:/usr/local/bin:/usr/bin:/bin:/usr/local/games:/usr/games"
            fi
JRuby
Unpacked to /opt/jruby. Make symbolic link:
/opt/ruby/jruby -> /opt/ruby/jruby-1.7.15/
Added /opt/ruby/jruby/bin to path in /etc/profile
vm guest use xorg dummy driver
xfce desktop
sudo apt-get install xorg xfce4 gdm3 xfce4-goodies
Package: xserver-xorg-video-dummy (1:0.3.5-2 and others) X.Org X server – dummy display driver This package provides a ‘dummy’ display driver, which does not actually display anything.
http://xpra.org/xorg.conf
HOWTO: headless, custom xorg resolution/modeline with vnc access to display 0 console http://ubuntuforums.org/showthread.php?t=1832456
(This HOWTO will cover different aspects you might not need all of this, but if you need a) a custom resolution b) setup headless access c) access to the console (display :0)remotely part of this may be useful to you.)
So this was going to be a question but it turned into a HOWTO after spending hours on this.
PROBLEM #1: I needed remote access to the console (display :0) of a server from a laptop because I needed to access the audio hardware (though I’m sure there are different reasons one needs access to :0) so nx, tightvnc, xvnc were all out. PROBLEM #2: The server had no monitor attached PROBLEM #3: I was connecting with a laptop that had a resolution of 1280x800 but of course windows (and other OSes) have a task bar, so the actually workable area is less than that. I needed a resolution of 1224x685 (not your typical resolution). PROBLEM #4: need the vnc server to start at boot to allow login from the server (no monitor).
1) Install x11vnc (this seems to be the only vnc server I found that allows console access, nomachine 4 (coming soon) and nomachine 3 have some form of ‘physical screen’ access, but I had a hard time with managing the audio hardware with that so I needed to use vnc.
http://askubuntu.com/questions/390113/x11vnc-much-slower-than-xvnc-how-to-get-a-xubuntu-session-manually
http://www.arachnoid.com/modelines/index.html
Headless VNC-Server using xvfb http://gpio.kaltpost.de/?page_id=84
Xvfb on Debian 7 https://github.com/tansaku/LocalSupport/wiki/Xvfb-on-Debian-7
How to use RDP from Windows to connect to Debian or Ubuntu machine http://blog.technotesdesk.com/how-to-use-rdp-from-windows-to-connect-to-debian-or-ubuntu-machine/
JRuby
Desktop howto
XFCE desktop
Use xfce 4.10 on Debian 7
Config notes
multiple monitors
arandr to generate monitor set script
Windows netbios names
Virtual Box autostart guest
https://wiki.debian.org/VirtualBox#Kernel_driver_not_installed_.28rc.3D-1908.29
Debian service management
05 August 2014 » DIY Headphone Amp with Crossfeed
http://www.head-fi.org/t/112104/very-easy-to-follow-crossfeed-tutorial
http://phonoclone.com/diy-hclo.html
http://diyaudioprojects.com/Solid/IRF610-Class-A-Headphone-Amp/
27 July 2014 » Pueblo trash roll offs
==================== from yellow pages C&C Disposal 582-8940
C-Spicola’s Roll-Off Service 546-9488
A-Affordable Disposal 542-8757
==================== Waste Connections of Pueblo
$300.00 10 days 20 yards 7.5 x 4 x 22
10 yard 7.5 x 3.5 x 14 $300.00 10 days
end gate? yes for both
Waste Connections of Pueblo
http://wcpueblo.rtrk.com/?scid=3084219&kw=1933994:18209&pub_cr_id=37977018385
Dumpster Sizes
2 yard 3 yard 4 yard 6 yard 8 yard Roll-off Sizes
10 Yard Size: 14’ x 8’ x 3’ 20 Yard Size: 22’ x 8’ x 3’5” 30 Yard Size: 22’ x 8’ x 5’ 40 Yard Size: 22’ x 8’ x 7’
Copyright © 2014 Waste Connections of Colorado Inc. 28900 E Hwy 96 - Pueblo, Colorado 81001 Phone 719-423-6639 - Fax 719-948-3652
======================= http://www.ccdisposalco.com/RollOffs/tabid/1764/Default.aspx C&C Disposal 582-8940
Roll-Offs
Our locally owned business offers multiple dumpster sizes for large disposal rental to meet your needs. Roll off dumpster rental sizes are measured in cubic yards. We’ve included the dumpster dimensions for each of these roll off dumpster sizes below. If you have questions about renting or the size you might need, please call us at 719-647-9100.
Roll-Off and Large Dumpster Rental Terms 6 Yard Dumpster
A 6 yard dumpster can hold 6 cubic yards of waste. Dumpster dimensions for a 6 yard dumpster are: 6 ft. deep by 5 ft. 6 in. wide by 6ft. high. This dumpster is great for yard, garage, estate and remodel clean ups. If you have limited space for a container or a clean up that may take you several weekends this is the dumpster for you. Rental options ranging from one time pick up to monthly rental that includes a weekly pick up.
month 4 pickups - 280.
10 Yard Dumpster
A 10 yard dumpster can hold 10 cubic yards of waste. Dumpster dimensions for the 10 yard dumpster are: 12 ft. long by 8 ft. wide by 4 ft. high. There’s no perfect way to choose dumpster sizes, but a 10 yard dumpster may be appropriate for a small basement or garage cleanout; removing a 250 sq. ft deck; removing 1500 sq. ft. of single layer roof shingles; yard debris cleanup, or a small kitchen & bath remodeling job.
15 day - $280
20 Yard Dumpster
A 20 yard dumpster holds 20 cubic yards of waste. Dumpster dimensions for a 20 yard dumpster are: 20 ft. long by 8 ft. wide by 4 ft. high. A 20 yard dumpster may be the right dumpster size for a large basement, attic, or garage cleanup; flooring and carpet removal for a large house; 300 to 400 square feet of deck removal; or 2500 to 3000 sq. ft. of single layer roof shingle removal.
15 day - $300
30 Yard Dumpster
A 30 yard dumpster holds 30 cubic yards of waste. Dumpster dimensions for a 30 yard dumpster are: 22 ft. long by 8 ft. wide by 6 ft. high. A 30 yard dumpster may be the right dumpster size for a major home addition; construction of a new home; demolition of a garage; or entire house window or siding replacement for a small to medium size home.
40 Yard Dumpster
A 40 yard dumpster holds 40 cubic yards of waste. Dumpster dimensions for a 40 yard dumpster are: 22 ft. long by 8 ft. wide by 8 ft. high. A 40 yard dumpster may be appropriate for window or siding replacement for a large home; commercial roof tear off; commercial cleanout; new construction or major addition; large amount of trash, paper, or cardboard.
40 Yard Compactor Receiver
A 40 yard compacter receiver is ideal for businesses with an extremely high volume of waste. This compacter receiver requires a permanent installation of a stationary compactor that packs waste into a 40 yard receiver box.
=================================== C-Spicola’s Roll-Off Services ===================================
A-Affordable Disposal 542-8757
15 yard 17 x 8 x 5 $285 30 days. 1 pickup.
none Sept. 8.
13 July 2014 » Pacman on Arch Linux
Resource Links
12 July 2014 » Arch Linux On Cubox
Key Websites and Forums
- Solid Run (Cubox Mfgr) Forum
- Rune Audio Forum
- Arch Linux ARM Forum
- Arch Linux Forum
- Planet Arch Linux
- Arch Linux BBS
Log first install
First up is where to find the install and instructions.
Found the Cubox-I on this forum, ARMv7h
Install instructions here
See the Installation Tab
Zero out the first few MB of the card to remove any previous U-Boot environment:
dd if=/dev/zero of=/dev/sdc bs=1M count=4
Start fdisk to partition the SD card:
fdisk /dev/sdc
At the fdisk prompt, create the new partitions:
Type n, then p for primary, 1 for the first partition on the drive, 8192 for the starting sector, and +20M for the ending sector.
Type t to set the type, then c to set it to FAT.
Type n, then p for primary, 2 for the second partition, 49152 for the first sector, and press ENTER twice to accept default values.
Exit by typing w.
Create and mount the vfat filesystem:
            mkfs.vfat /dev/sdc1
            mkdir /tmp/boot
            mount /dev/sdc1 /tmp/boot
Create and mount the ext4 filesystem:
            mkfs.ext4 /dev/sdc2
            mkdir /tmp/root
            mount /dev/sdc2 /tmp/root
Download and extract the root filesystem:
            cd /mnt/disk2/linux_distros/
            wget http://archlinuxarm.org/os/ArchLinuxARM-imx6-cubox-latest.tar.gz
            tar -xf /mnt/disk2/linux_distros/ArchLinuxARM-imx6-cubox-latest.tar.gz -C /tmp/root
Move boot files to the boot partition:
mv /tmp/root/boot/* /tmp/boot
Install the U-Boot bootloader:
            dd if=/tmp/boot/SPL of=/dev/sdc bs=512 seek=2
            dd if=/tmp/boot/u-boot.img of=/dev/sdc bs=1K seek=42
Unmount the partitions
            sync
            umount /tmp/boot
            umount /tmp/root
Boot the Cubox-I
Insert the SD card into the Cubox-i contacts uppermost, connect ethernet, and apply 6-12V power.
Use the serial console (CN6 micro USB connector) or SSH to the IP address given to the board by your router. The default root password is ‘root’.
05 July 2014 » Used PC for OpenMediaVault
I give up on the Dell Optiplex GX260 P4. Time to get a better used PC for OpenMediaVault (NAS for Rune Audio MPD)
Research
MSI Hetis 965
04 July 2014 » OpenMediaVault NAS
OpenMediaVault
OpenMediaVault is the next generation network attached storage (NAS) solution based on Debian Linux. It contains services like SSH, (S)FTP, SMB/CIFS, DAAP media server, RSync, BitTorrent client and many more. Thanks to the modular design of the framework it can be enhanced via plugins.
OpenMediaVault is primarily designed to be used in home environments or small home offices, but is not limited to those scenarios. It is a simple and easy to use out-of-the-box solution that will allow everyone to install and administrate a Network Attached Storage without deeper knowledge.
Installation Wiki Page
Minimum Requirements
- i486 or amd64 platform
- 1 GiB RAM
- 2 GiB HDD/DOM/CF/USB Thumb Drive used as OpenMediaVault system drive.
- NOTE: The entire disk is used as system disk. The disk can not be used to store user data.
- 1 HDD for data storage
Services
- SSH
- FTP
- TFTP
- NFS (v3/v4)
- SMB/CIFS
- RSync
Login information
Once you have installed the system, these are the default access credentials.
WebGUI
- User: admin
- Password: openmediavault
Client (SSH, console)
- User: root
- Password: set during installation
Installation log
Back up external USB drive from previous FreeNAS
I was unable to read the FreeNAS ufs drive on Ubuntu and gave up.
Boot the install CD and proceed
- openmediavault_0.5.48_i386.iso
This fails to boot on the Dell Optiplex P4. Fix is to disable serial in Bios settings.
Use SystemRecueCd to wipe partitions on HD.
OpenMediaVault forum - found instruction on loading developer version
Config Details
Add my user to ssh group to allow ssh sessions.
# usermod -a -G ssh
Desktop side. Entry in /etc/fstab
//192.168.88.209/media /media/nas1 cifs rw,noperm,noauto,credentials=/home/craig/nas1_craig.txt,uid=craig,sec=ntlmv2 0 0
Desktop side. Contents of ~/nas1_craig.txt
             username=manager
             password=ThePassword
             domain=WORKGROUP
Server side
             # ls -l /media/6a0bb210-b0fe-46eb-bd64-d5ba0dfab140/
             drwxr-s--- 2 manager users  4096 Jul  7 14:09 Media
/etc/samba/smb.conf
              #======================= Global Settings =======================
              [global]
              workgroup = WORKGROUP
              server string = %h server
              dns proxy = no
              log level = 0
              syslog = 0
              log file = /var/log/samba/log.%m
              max log size = 1000
              syslog only = yes
              panic action = /usr/share/samba/panic-action %d
              encrypt passwords = true
              passdb backend = tdbsam
              obey pam restrictions = yes
              unix password sync = no
              passwd program = /usr/bin/passwd %u
              passwd chat = *Enter\snew\s*\spassword:* %n\n *Retype\snew\s*\spassword:* %n\n *password\supdated\ssuccessfully* .
              pam password change = yes
              socket options = TCP_NODELAY IPTOS_LOWDELAY
              guest account = nobody
              load printers = no
              disable spoolss = yes
              printing = bsd
              printcap name = /dev/null
              unix extensions = yes
              wide links = no
              create mask = 0777
              directory mask = 0777
              use sendfile = yes
              aio read size = 16384
              aio write size = 16384
              null passwords = no
              local master = yes
              time server = no
              wins support = no
              map untrusted to domain = yes

              #======================= Share Definitions =======================
              [Media]
              comment = Nas1 Media Share
              path = /media/6a0bb210-b0fe-46eb-bd64-d5ba0dfab140//Media
              guest ok = no
              read only = no
              browseable = yes
              inherit acls = yes
              inherit permissions = no
              ea support = no
              store dos attributes = no
              printable = no
              create mask = 0755
              force create mode = 0644
              directory mask = 0755
              force directory mode = 0755
              hide dot files = yes
              valid users = "manager","player",@"player"
              invalid users =
              read list = "player",@"player"
              write list = "manager"
15 May 2014 » Debian Virtualbox Host
A friend is selling his 2002 Chevrolet 1500 extended cab 4x4. It’s in great condition and I would like to use it with a slide in camper eventually. It comes with a matching truck cap that will get me started using it for off-pavement camping.
My desired uses are.
Mild weather (above freezing) on public land off-pavement roads.
Winter camping near ski areas. * Desire good insulation and furnace. * Prefer portable drinking water and grey water containers over winterized tanks.
Stealth camping in urban setting to visit family and friends. * My thinking is hard sides and no obvious indicators of people inside will minimize hassles.
Given the short bed and the relatively low weight capacity of the Chevy 1500 my thought is one of these models: Importer, Acapulco or Bayou.
Looking over this forum, I think the plans can adapted to fit this truck and my intended uses. I will do some looking at used campers to look for one that has suitable price/condition/features for me.
I welcome comments from the forum.
Thanks, Craig
09 May 2014 » Debian Virtualbox Host
Notes on setting up a Debian Virtualbox host for my employer
Overview
https://www.virtualbox.org/manual/
https://blogs.oracle.com/virtualization/entry/new_commercial_license_for_oracle
- Oracle VM VirtualBox Enterprise - Named User Plus - $50 per named user
- Oracle’s standard processor licensing, $1,000 per processor socket
Setting up the host box.
How to autostart vms
Good guide to setting up autostart
http://lifeofageekadmin.com/how-to-set-your-virtualbox-vm-to-automatically-startup/
Log
First you need to create the file /etc/default/virtualbox and add a few variables.
            VBOXAUTOSTART_DB=/etc/vbox
            VBOXAUTOSTART_CONFIG=/etc/vbox/vbox.cfg
Create the file /etc/vbox/vbox.cfg
root# mkdir /etc/vbox
With one line.
default_policy = allow
Set permissions on directory to the vboxuser group and make sure users can write to the directory as well as sticky bit.
            root# chgrp vboxusers /etc/vbox
            root# chmod 1775 /etc/vbox
Add administrator to the vboxusers group.
            root# groups administrator
            administrator : administrator sudo

            root# usermod -a -G vboxusers administrator

            root# groups administrator
            administrator : administrator sudo vboxusers
Every user who wants to enable autostart for individual machines has to set the path to the autostart database directory with
administrator$ VBoxManage setproperty autostartdbpath /etc/vbox
List the vms
            administrator$ VBoxManage list vms
            "craigdeb" {0e7bca8b-b552-4ebb-9e39-bb1f6fb19d5c}
administrator$ VBoxManage modifyvm craigdeb --autostart-enabled on
root# update-rc.d virtualbox defaults
After log place holder

code
24 April 2014 » Sql Coding Standards
Online Survey
http://stackoverflow.com/questions/7662/database-table-and-column-naming-conventions
http://www.nyx.net/~bwunder/dbChangeControl/standard.htm
http://selectinsql.blogspot.in/2012/08/sql-server-stored-procedure-coding.html
http://blog.sqlauthority.com/2007/06/04/sql-server-database-coding-standards-and-guidelines-part-1/
http://blog.sqlauthority.com/2007/06/05/sql-server-database-coding-standards-and-guidelines-part-2/
http://www.pinaldave.com/sql-download/SQLServerGuideLines.pdf
http://justinsomnia.org/2003/04/essential-database-naming-conventions-and-style/
Naming
Naming by Pinal Dave
Tables:
Rules: Pascal notation; end with an ‘s’
Examples: Products, Customers
Group related table names1
Stored Procs:
Rules: sp
Examples: spOrders_GetNewOrders, spProducts_UpdateProduct
Indexes:
Rules: IX_
Examples: IX_Products_ProductID
Primary Keys:
Rules: PK_
Examples: PK_Products
Foreign Keys:
Rules: FK_
Example: FK_Products_Orderss
Defaults:
Rules: DF_
Example: DF_Products_Quantity
Columns:
If a column references another table’s column, name it <table name>ID
Example: The Customers table has an ID column The Orders table should have a CustomerID column General Rules:
Do not use spaces in the name of database objects Do not use SQL keywords as the name of database objects In cases where this is necessary, surround the object name with brackets, such as [Year] Do not prefix stored procedures with ‘sp_’2 Prefix table names with the owner name3
Craig Document Version One
Naming
General
Do not use Sql reserved words for object names. If for some reason a Sql reserved word must be used enclose in square brackets. For example.
[user]
Tables Names
Pascal notation. Singular form.
Examples
- AgentDispo
- Dispo
- TZState
- JobDispo
This table name convetion is seen in current usage.
Stored Procedure Names
proc_camelCaseNameOfProcedure
For example
- proc_login
- proc_groupScore
Notes:
The prefix sp_ is reserved for system stored procedures that ship with SQL Server. Whenever SQL Server encounters a procedure name starting with sp, it first tries to locate the procedure in the master database, then it looks for any qualifiers (database, owner) provided, then it tries dbo as the owner. Time spent locating the stored procedure can be saved by avoiding the “sp” prefix.
Index Names
Rule:
IX_TableName_(columns separated by _)
Note that if the column name starts with the table name, omit the table name in the index name.
Examples:
- IX_AgentGroup_Agent_ID_Group_ID
- IX_Dispo_Code
Primary Key Column names:
Each table must have a primary key. In most cases it should be an IDENTITY column named
TableName_ID.
For instance.
- Quiz_ID in table Quiz.
- Dispo_ID in table Dispo.
- Group_ID in table Group.
Foreign Key Constraint Names:
Rules:
FK_(TableName1)_(TableName2)
Examples:
- FK_AgentGroup_Agent
- FK_AgentGroup_Group
Defaults:
Rules:
DF_(ColumnName)
Example:
DF_AgentGroup_Visible
Note our convention is that column names are prefixed with the table name.
Columns:
Column names will have the table name as a prefix. Use camel case notation after the table name prefix.
For example
- column Agent_lastLogin in table Agent
- column Dispo_name in table Dispo.
- column AgentGroup_visible in table AgentGroup
If a column references another table’s column, name it
(table name)_(primary key column)
For example, the Agent table has a primary key Agent_ID, the AgentGroup table would have a AgentGroup_Agent_ID column.
- AgentGroup_Agent_ID
Standard Abbreviations
It will be useful to have a list of GCS standard prefixes. The First one seen was TZ.
- TZ - timezone
Query Formatting Examples
TBD
20 April 2014 » Rune Audio and MPD
Network audio player - Rune Audio
About Rune Audio
AT THE HEART OF YOUR DIGITAL HI-FI SYSTEM
A RuneAudio device places itself in the heart of a digital music system.
It’s a streamer player: it can reproduce your digital music library from local USB drives or network mounts (NAS), and also plays any internet stream (web radios).
It’s an headless player: it can be remotely controlled by multiple clients running on different devices.
It’a a digital player, staying at the top of the audio signal flow chain. It offers perfect and gapless playback of common audio formats, and works best when connected to an asynchronous USB 2.0 DAC.

Music Player Daemon (MPD)
Music Player Daemon (MPD) is a free and open source music player server. It plays audio files, organizes playlists and maintains a music database. In order to interact with it, a separate client is needed.
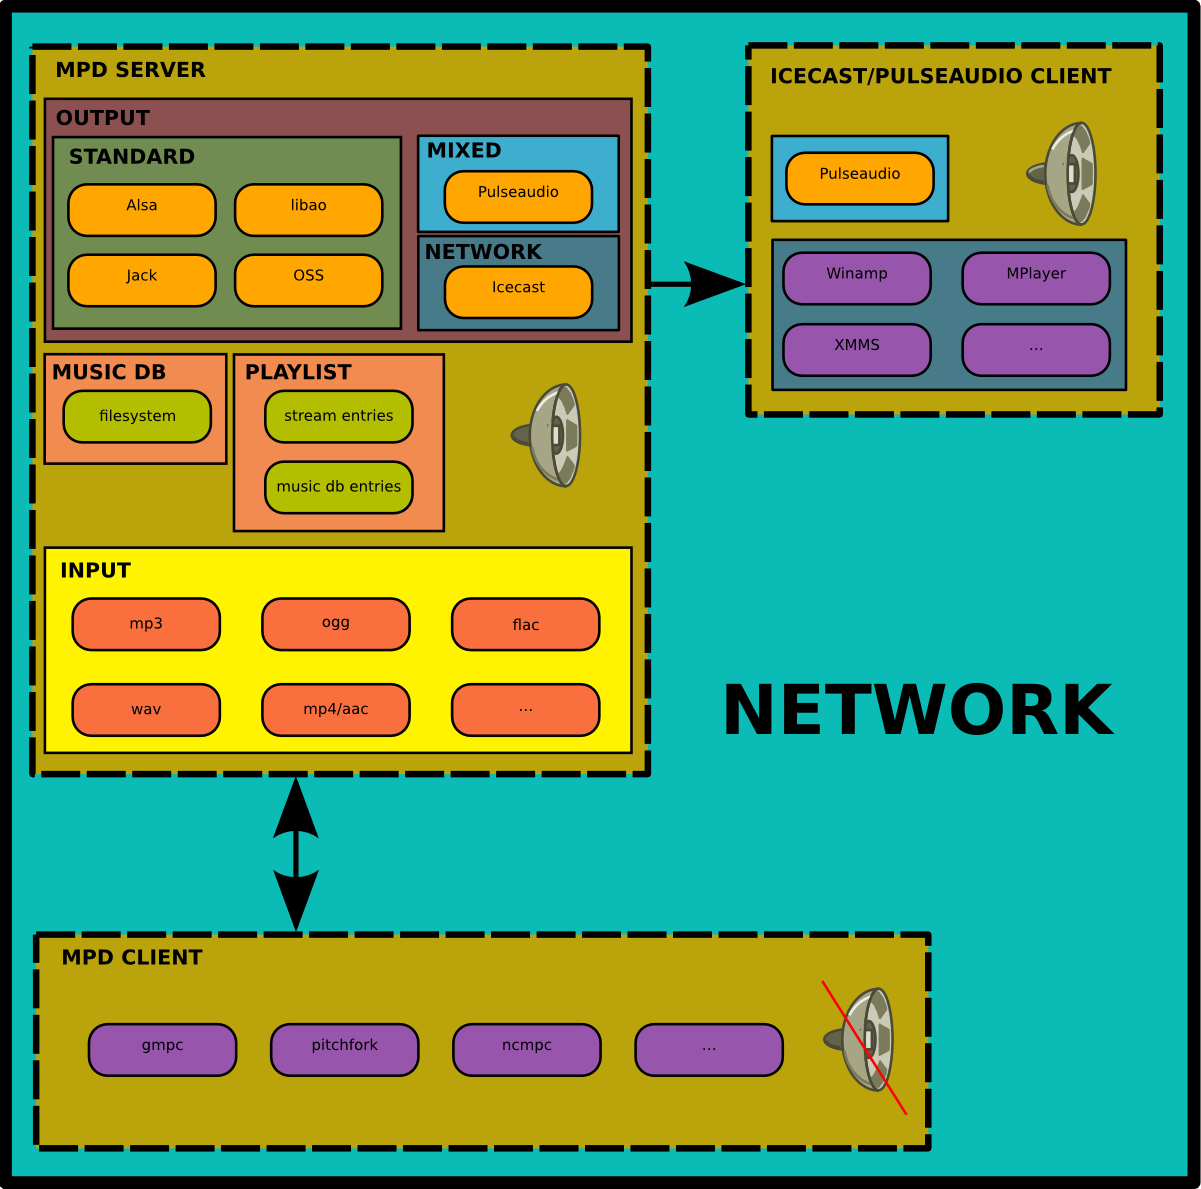
30 March 2014 » Arduino Hardware Notes
Power Supply parts
Pololu Adjustable Boost Regulator 2.5-9.5V
$11.95
Overview
The Pololu adjustable boost regulator is a very flexible switching regulator (also called a switched-mode power supply, SMPS, or DC-to-DC converter) that can generate voltages higher than its input voltage. We offer two adjustable ranges: approximately 2.5 V to 9.5 V and 4 V to 25 V. The output voltage can be set using the trimmer potentiometer in the upper-right corner of the board. The input voltage range is 1.5 V to 16 V (the input voltage should be kept below the output voltage). The integrated 2 A switch allows for output currents high enough to drive small motors, as in our 3pi robot, and allows large voltage gains, such as obtaining 24 V from two NiMH or NiCd cells.
Some example applications include:
- Powering 5 V or 3.3 V systems from lower-voltage batteries
- Powering 5 V subsystems (e.g. sensors) in lower-voltage (e.g. 3.3 V) systems
- Achieving consistent actuator operation when powered by fluctuating batteries
- Powering high-brightness LEDs or a large number of LEDs in series
Feature summary
- input voltage: 1.5 V to 16 V
- output adjustable from 2.5 V to 9.5 V or 4 V to 25 V
- 750 kHz switching frequency
- 2 A switch (and input) limit
- integrated over-temperature and over-current shutoff
- typical efficiency of 80-90% when doubling voltage and with 100-500 mA output
- small size: 10.7 x 22.4 x 5.8 mm (0.42″ x 0.88″ x 0.23″)
- weight without header pins: 1.6 g (0.06 oz)
Connections
The boost regulator has just three connections: the input voltage, ground, and the output voltage. These three connections are labeled on the back side of the PCB, and they are arranged with a 0.1″ spacing along the edge of the board for compatibility with standard solderless breadboards and perfboards and connectors that use a 0.1″ grid. You can solder wires directly to the board or solder in either the 3×1 straight male header strip or the 3×1 right-angle male header strip that is included.
Setting the output voltage
The output voltage can be adjusted using a meter and a light load (e.g. a 10 kΩ resistor). Turning the potentiometer clockwise increases the output voltage. The output voltage can be affected by a screwdriver touching the potentiometer, so the output measurement should be done with nothing touching the potentiometer.
Pololu 5V Step-Up Voltage Regulator U1V11F5
$4.95
This compact (0.45″×0.6″) U1V11F5 switching step-up (or boost) voltage regulator efficiently generates 5 V from input voltages as low as 0.5 V. Unlike most boost regulators, the U1V11F5 offers a true shutdown option that turns off power to the load, and it automatically switches to a linear down-regulation mode when the input voltage exceeds the output. The pins have a 0.1″ spacing, making this board compatible with standard solderless breadboards and perfboards.
Overview
This 5 V boost (step-up) voltage regulator generates higher output voltages from input voltages as low as 0.5 V, and it also automatically switches to a linear down-regulation mode when the input voltage exceeds the output. This makes it great for powering 5 V electronics projects from 1 to 3 NiMH, NiCd, or alkaline cells or from a single lithium-ion cell. Additionally, unlike most boost regulators, this unit offers a true shutdown option that turns off power to the load (with typical boost regulators, the input voltage will pass directly through to the output when they are disabled).
When boosting, this module acts as a switching regulator (also called switched-mode power supplies (SMPS) or DC-to-DC converters) and has a typical efficiency between 70% to 90%. The available output current is a function of the input voltage, output voltage, and efficiency (see Typical Efficiency and Output Current section below), but the input current can typically be as high as 1.2 A.
Features
- Input voltage: 0.5 V to 5.5 V
- Fixed 5 V output with 4% accuracy
- True shutdown option that turns off power to the load
- Automatic linear down-regulation when the input voltage is greater than the output voltage
- 1.2 A switch allows for input currents up to 1.2 A
- Good efficiency at light load: <1 mA typical no-load quiescent current, though it can exceed 1 mA for very low input voltages (<100 μA typical quiescent current with SHDN = LOW)
- Integrated over-temperature shutoff
- Small size: 0.45″ × 0.6″; × 0.1″ (12 × 15 × 3 mm)
Connections
The boost regulator has four connections: shutdown (SHDN), input voltage (VIN), ground (GND), and output voltage (VOUT).
The SHDN can be driven low (typically under 0.4 V) to power down the regulator and turn off power to the load (unlike most boost regulators, the input power does not pass through to the output when the board is disabled). This pin is internally pulled up to VIN through an 100 kΩ resistor, so it can be left disconnected or connected directly to VIN if you do not need to use the disable feature. The disable threshold is a function of the input voltage as follows:
- For VIN < 0.8 V, SHDN voltage must be below 0.1×VIN to disable the regulator and above 0.9×VIN to enable it.
- For 0.8 V ≤ VIN ≤ 1.5 V, SHDN voltage must be below 0.2×VIN to disable the regulator and above 0.8×VIN to enable it.
- For VIN > 1.5 V, SHDN voltage must be below 0.4 V to disable the regulator and above 1.2 V to enable it.
- The input voltage, VIN, must be at least 0.5 V for the regulator to turn on. However, once the regulator is on, the input voltage can drop as low as 0.3 V and the 5 V output voltage will be maintained on VOUT. Unlike standard boost regulators, this regulator has an additional linear down-regulation mode that allows it to convert input voltages as high as 5.5 V down to 5 V for small to moderate sized loads (for example, in our tests, the adjustable version of this regulator was able to supply 300 mA while converting an input of 5.5 V down to 1.8 V). When the input voltage exceeds 5 V, the regulator automatically switches to this down-regulation mode. The input voltage should not exceed 5.5 V. Please be wary of destructive LC spikes that might cause the input voltage to surpass 5.5 V (see below for more information).
28 March 2014 » Tools for Windows OS
Tools for Windows OS
- sshd
- rsync
- git
- vim
- ftp client
sshd
FreeSSHD
FreeSSHD Server Installation and Configure
How to install an SSH Server in Windows Server 2008
17 March 2014 » Proto Boards
Proto Boards
Jameco - 2,360 Hole General Purpose Prototyping Board Single Sided 4.5”x6.5”
Jameco SB300 Solderable PC Breadboard 1 Sided PCB Matches 300 Tie-Point Breadboards
Copper clad
2.4 x 3.4 inch
Prototype Builder 2.4” X3.4” PCB Epoxy Glass 0.062” Thick 0.1” Hole Spacing 0.08” Pad Size $8.00 http://www.jameco.com/webapp/wcs/stores/servlet/Product_10001_10001_105111_-1
3.6 x 7 inch
Prototype Builder 3.6” X7” PCB Epoxy Glass 0.062” Thick 0.1” Hole Spacing 0.08” Pad Size $14.00 http://www.jameco.com/webapp/wcs/stores/servlet/Product_10001_10001_105162_-1
- Jameco Part no. 105162
- Manufacturer JAMECO VALUEPRO
- Manufacturer no. 2852PCB-R
- PROTOBOARD
- No. of Mounting Holes x Dia. (in.) 4 x 0.140
- Thickness (mm) 1.6
- Size L x W (ins.) 7.0 x 3.6
- Hole Diameter (ins.) 0.035
- Specification Value
- Centers (in.) 0.1
- No. Of Holes 2225
- Power / Ground Busses 4
- Circuit Pattern Pad Per Hole
4.3 x 6.8 inch
Prototype Builder 4.3” X6.8” PCB Pre-Etched Drilled PCB Epoxy Glass 0.062” Thick 0.1” Hole Spacing 0.08” Pad Size $10.00 http://www.jameco.com/webapp/wcs/stores/servlet/Product_10001_10001_206587_-1
- Jameco Part no. 206587
- Manufacturer JAMECO VALUEPRO
- Manufacturer no. PCB-586-R
- PROTOBOARD
- No. of Mounting Holes x Dia. (in.) 4 x 0.140
- Thickness (mm) 1.6
- Size L x W (ins.) 6.8 x 4.3
- Hole Diameter (ins.) 0.042
- Centers (in.) 0.1
- No. Of Holes 2550
- Power / Ground Busses 5
- Circuit Pattern Power/Ground Perimeter Bus w/ Pad Per Hole
5.5 x 8.0 inch
Prototype Builder 5.5” X8.0” PCB Pre-etched Drilled PCB Epoxy Glass 0.062” Thick 0.1” Hole Spacing 0.08” Pad Size $12.00 http://www.jameco.com/webapp/wcs/stores/servlet/Product_10001_10001_206594_-1
- Jameco Part no. 206594
- Manufacturer JAMECO VALUEPRO
- Manufacturer no. PCB-594
- PROTOBOARD
- No. of Mounting Holes x Dia. (in.) 4 x 0.140
- Thickness (mm) 1.6
- Size L x W (ins.) 8.0 x 5.5
- Hole Diameter (ins.) 0.042
- Centers (in.) 0.1
- No. Of Holes 3906
- Power / Ground Busses 5
- Circuit Pattern Power/Ground Perimeter Bus w/ Pad Per Hole
Bare
6x4 inch bare Jameco
perforated bare phenolic prototype boards http://www.jameco.com/webapp/wcs/stores/servlet/Product_10001_10001_616690_-1
$6.00
- Jameco Part no. 616690
- Manufacturer GC ELECTRONICS
- Manufacturer no. 22-516
- PCB Thickness (mm) 1.6
- Size L x W (ins.) 6.0 x 4.5
- Hole Diameter (ins.) 0.042
- Centers (in.) 0.1
Slotted boxes and boards that Fit
3.3” x 2.3” Protoboard - Fits Hammond 1593L
http://www.mcmelectronics.com/product/21-12224
3.3” x 2.3” circuit board for use with Hammond 1593L project box. Constructed of FR-4 with one ounce copper. Holes are paired and .042” in diameter to accept leads from common components.
$6.29
ProtoBox Kit with Hammond 1593L Box and 3.3” x 2.3” Project Board http://www.mcmelectronics.com/product/21-12242 $12.99
Convenient project kit includes a Hammond 1593L project box and a circuit board to fit. Project box is made of ABS plastic with a recessed top and two removable end panels. Board is made of FR-4 with one ounce copper. Holes are paired and .042” in diameter to accept leads from common components.
#
http://www.abra-electronics.com/categories/Boards/Protoboard-with-Enclosure/
#
http://www.jameco.com/webapp/wcs/stores/servlet/Product_10001_10001_2123881_-1
Features: Box is black ABS plastic, secured with self tapping screws (included). 2 sets of removable end panels. Box Size 2.6 x 2.6 x 1.1 in. (66 x 66 x 28 mm) Single-sided high-quality FR4 glass-epoxy circuit board, 1oz/ft² copper with an anti-tarnish coating for easy soldering. Lead free and RoHS compatible. 0.042” holes are drilled on 0.1” (2.54mm) centers. 2 mounting holes. Screws provided. PCB Size 2.3 x 2.3 in (58 x 58 mm) $8.95 ## LPAD Box and PCB
http://www.mcmelectronics.com/product/28-977 1-3/8 X 2 X 3-1/4 Project Box $2.59
http://www.mcmelectronics.com/product/21-4577 2 X 2-3/8 Protype PCB Board 21-4577 2” x 2⅜” $0.79
16 March 2014 » Robot Rover Parts
Robot Rover Parts
Pololu Qik 2s9v1 Dual Serial Motor Controller
$24.95
Pololu Qik 2s9v1 Dual Serial Motor Controller
The qik 2s9v1 is Pololu’s second-generation dual serial motor controller. The compact module allows any microcontroller or computer with a serial port (external RS-232 level converter required) or USB-to-serial adapter to easily drive two small, brushed DC motors with full direction and speed control. It provides ultrasonic, 8-bit PWM speed control via an advanced, two-way serial protocol that features automatic baud rate detection up to 38.4 kbps and optional CRC error checking. Two status LEDs give visual feedback about the serial connection and any encountered error conditions, making debugging easy, and a demo mode allows easy verification of proper operation.
This small, inexpensive motor controller allows variable speed and direction control of two small, brushed DC motors using a simple serial interface, making it easy to add motors to your microcontroller- or computer-based project. The motor supply voltage range is 4.5 to 13.5 V; the continuous current per channel is up to 1 A (3 A peak). The logic supply can be as low as 2.7 V, allowing operation with modern microcontrollers running at 3.3 V.
Solarbotics GM2 224:1 Gear Motor Offset Output
Solarbotics GM2 224:1 Gear Motor Offset Output
Arduino Compatible Magician Chassis.
Arduino Compatible Magician Chassis.
Rover 5 Tracked Robot Chassis Without Encoder
$28.00
Rover 5 Tracked Robot Chassis Without Encoder
Tamiya 70100 Track and Wheel Set
Tamiya 70100 Track and Wheel Set
/assets/images/pololu_tamiya_70xxx_tank.png
Tamiya 70098 Universal Plate Set
Tamiya 70098 Universal Plate Set
Tamiya 70097 Twin-Motor Gearbox Kit
Tamiya 70097 Twin-Motor Gearbox Kit
Note that you can replace the motor in this kit with a lower-current, higher-voltage motor if you want to use this gearbox with controllers such as the qik 2s9v1 dual serial motor controller,
Brushed DC Motor: 130-Size, 6V, 11.5kRPM, 800mA Stall
Brushed DC Motor: 130-Size, 6V, 11.5kRPM, 800mA Stall
This motor works well with many of our lower-power motor controllers, such as the qik 2s9v1 dual serial motor controller,
Zumo Chassis Kit (No Motors)
13 March 2014 » Run socat for Arduino IO
Run socat for Arduino IO
A key element of using a Raspberry Pi for a moteino gateway is how to talk to /dev/ttyUSBX for the serial communication.
Problems
- /dev/ttyUSBX is only available if the USB/Serial connection is there.
- Need to guarantee that socat is running if /dev/ttyUSBX is available.
Survey of approaches.
- Run socat from inittab.
- Start socat at boot with /etc/rc.d
- Start socat at boot with supervisor.d
- Run socat from the JRuby gateway script.
Run socat from the JRuby gateway script.
Fork/exec management from JRuby seems to be best done with spoon
What do the JRuby experts say?
fork and exec on the JVM? JRuby to the Rescue!
JavaWorld - fork and exec on the JVM? JRuby to the Rescue!
- By Charles Nutter
-
JavaWorld May 13, 2009 11:01 PM
As you should know by now, JRuby ships with FFI, a library that allows you to bind any arbitrary C function in Ruby code. So getting fork+exec to work was a simple matter of writing a little Ruby code:
            require 'ffi'

            module Exec
             extend FFI::Library

             attach_function :my_exec, :execl, [:string, :string, :varargs], :int
             attach_function :fork, [], :int
            end

            vim1 = '/usr/bin/vim'
            vim2 = 'vim'
            if Exec.fork == 0
             Exec.my_exec vim1, vim2, :pointer, nil
            end

            Process.waitall
Update: The biggest problem with using fork+exec in this way is that you can’t guarantee nothing happens between the fork call and the exec call. If, for example, the JVM decides to GC or move memory around, you can have a fatal crash at the JVM process level. Because of that, I don’t recommend using fork + exec via FFI in JRuby, even though it’s pretty cool.
However, since this post I’ve learned of the “posix_spawn” function available on most Unix variants. It’s basically fork + exec in a single function, plus most of the typical security and IO tweaks you might do after forking and before execing. It’s definitely my recommended alternative to fork+exec for JRuby, and to make that easier I’ve bundled it up as the “spoon” gem (gem install spoon) which provides spawn and spawnp to JRuby users directly. Here’s an example session using Spoon to launch JRuby as a daemon. If you just need fork+exec on the JVM, posix_spawn or the Spoon gem are the best way to do it.
headius / daemonize.rb
             require 'rubygems'
             require 'spoon'

             Spoon.spawnp 'jruby', *ARGV
            ~/projects/jruby ➔ jruby daemonize.rb -e "puts 'starting'; while true; sleep 1; puts 'still going'; end"

            ~/projects/jruby ➔ starting
            still going
            still going
            still going
            still going


            ~/projects/jruby ➔ still going
            still going
            still going
            ps
              PID TTY           TIME CMD
              342 ttys000    0:00.06 -bash
              421 ttys000    0:00.49 /usr/bin/java -d32 -client -Djruby.memory.max=500m -Djruby.stack.max=1024k
              363 ttys001    0:00.02 -bash
            still going
            ~/projects/jruby ➔
            kistill going
            llstill going
            still going
             421still going


            ~/projects/jruby ➔
github gem - headius / spoon
A fork/exec replacement for FFI-capable implementations
Spoon is an FFI binding of the posix_spawn function (and Windows equivalent), providing fork+exec functionality in a single shot.
            Gem::Specification.new do |s|
              s.name = "spoon"
              s.version = "0.0.4"
              s.authors = ["Charles Oliver Nutter"]
              s.date = "2013-03-29"
              s.description = s.summary = "Spoon is an FFI binding of the posix_spawn function (and Windows equivalent), providing fork+exec functionality in a single shot."
              s.files = `git ls-files`.lines.map(&:chomp)
              s.require_paths = ["lib"]
              s.add_dependency('ffi')
              s.license = "Apache-2.0"
            end
/usr/bin/socat http://linux.die.net/man/3/posix_spawn http://ruby-doc.org/core-1.9.3/Signal.html
include
def self.posix_spawn(path, file_actions, spawn_attr, argv, env = ENV) int posix_spawn( pid_t *restrict pid, const char *restrict path, const posix_spawn_file_actions_t *file_actions, const posix_spawnattr_t *restrict attrp, char *const argv[restrict], char *const envp[restrict]);
int posix_spawnp( pid_t *restrict pid, const char *restrict file, const posix_spawn_file_actions_t *file_actions, const posix_spawnattr_t *restrict attrp, char *const argv[restrict], char * const envp[restrict]);
http://ruby-doc.org/core-1.9.3/Process.html#method-c-waitpid2
https://github.com/headius/spoon/blob/master/examples/ls.rb
require ‘spoon’
# # Do a recursive ls on the current directory, redirecting output to /tmp/ls.out #
file_actions = Spoon::FileActions.new file_actions.close(1) file_actions.open(1, “/tmp/ls.out”, File::WRONLY | File::TRUNC | File::CREAT, 0600) spawn_attr = Spoon::SpawnAttributes.new pid = Spoon.posix_spawn(‘/usr/bin/env’, file_actions, spawn_attr, %w(env ls -R))
Process.waitpid(pid)
https://github.com/ffi/ffi/issues/336 «««««««««««< wrong, should be issue on JRuby Fail on Raspberry Pi ARM linux JRuby. FFI not available
https://github.com/jruby/jruby/issues/1561 Fail on Raspberry Pi ARM linux JRuby. FFI not available
10 March 2014 » Arduino Coding Notes
Arduino Coding Notes
serialEvent()
Called when data is available. Use Serial.read() to capture this data.
Demonstrates use of the SerialEvent() function. SerialEvent() is called after a loop(), if there is serial data in the buffer.
String class
Data Structures and Algorithms
Data Structures and Algorithms
QueueArray
It is created to help adding FIFO (First In - First Out) Abstract Data Structure to a program for any use.
QueueList
Writing a Library for Arduino
alexanderbrevig - Simple templated FIFO class
alexanderbrevig - Simple templated FIFO class
Robin2 - Demonstration code for several things at the same time
forum.arduino.cc - Demonstration code for several things at the same time
Robin2 - March 04, 2014, 07:28:03 am
My sketch uses the concept in “blink without delay” to cause three LEDs to blink at different intervals, a fourth LED is controlled by a button and a servo sweeps back and forth at two different speeds. The idea is to demonstrate how different processes can be accommodated in the same general framework.
It also uses the “state machine” concept to manage the various activities and enable the different functions to determine what to do.
I have deliberately designed the sketch as a series of short functions. Short pieces of code are much easier to understand and debug and it will be an easy matter for a user to delete functions that they don’t need or to duplicate and modify functions if they need more of the same (for example to flash 5 LEDS at different intervals).
There is a case for saying there is too much in the sketch but I concluded that the larger number of activities is a better demonstration of the capabilities of this approach.
SeveralThingsAtTheSameTimeRev1.ino
arduino.cc tutorial - Blink Without Delay
Sometimes you need to do two things at once. For example you might want to blink an LED (or some other time-sensitive function) while reading a button press or other input. In this case, you can’t use delay(), or you’d stop everything else the program while the LED blinked. The program might miss the button press if it happens during the delay(). This sketch demonstrates how to blink the LED without using delay(). It keeps track of the last time the Arduino turned the LED on or off. Then, each time through loop(), it checks if a long enough interval has passed. If it has, it toggles the LED on or off.
SimpleTimer Library for Arduino
- SimpleTimer Library for Arduino
- Author: Marcello Romani
- Contact: mromani@ottotecnica.com
- License: GNU LGPL 2.1+
SimpleTimer Library for Arduino
This is (yet another) simple library to launch timed actions.
It’s based on millis(), thus it has 1 ms resolution.
It uses polling, so no guarantee can be made about the exact time when a callback is fired. For example, if you setup the library so that it calls a function every 2ms, but this function requires 5ms to complete, then you’ll have an invocation every 5ms.
For applications where non-strict timing is enough, not using interrupts avoids potential problems with global variables shared between the interrupt service routine and the main program, and doesn’t consune a hardware timer.
Nick Gammon - How to do multiple things at once … like cook bacon and eggs
Nick Gammon - How to do multiple things at once … like cook bacon and eggs
05 March 2014 » Raspbian netinst
Net Installer Image
Notes
To flash your SD card on Linux:
            xzcat /path/to/raspbian-ua-netinst-latest.img.xz > glop.img
            sudo dd bs=1M if= glop.img of=/dev/sdc
            rm glop.img
Boot with the SDHC and view the HDMI video to see install progress.
First boot
The system is almost completely unconfigured on first boot. Here are some tasks you most definitely want to do on first boot.
The default root password is raspbian.
Set new root password:
passwd
Configure your default locale:
dpkg-reconfigure locales
Configure your timezone:
dpkg-reconfigure tzdata
Install latest kernel and firmware package:
            apt-get update
            apt-get install linux-image-rpi-rpfv raspberrypi-bootloader-nokernel

             ...
            update-initramfs: Generating /boot/initrd.img-3.10-3-rpi
Replace old kernel.img with latest kernel:
cp /vmlinuz /boot/kernel.img
Reboot to new kernel and firmware:
reboot
Change the hostname
Edit /etc/hostname and /etc/hosts to have the hostname.
            root@pi:/etc# cat hostname
            pika
            root@pi:/etc# cat hosts
            127.0.0.1 localhost pika
Set up serial console
Edit /etc/inittab and add a line to enable the serial console.
            #T0:23:respawn:/sbin/getty -L ttyS0 9600 vt100
            T0:23:respawn:/sbin/getty -L ttyAMA0 115200 vt100
            #T1:23:respawn:/sbin/getty -L ttyS1 9600 vt100
After a reboot, check the serial console and hostname.
$ sudo screen /dev/ttyUSB0 115200
            root@pika:~# uname -a
            Linux pika 3.10-3-rpi #1 Debian 3.10.11-1+rpi4 (2014-01-24) armv6l GNU/Linux
ssh is working. This is the IP address assigned to eth0
ssh root@192.168.88.223
Archive the image so far
Check the size of file systems. Looks like the whole 8GB SDHC is used.
            root@pika:~# df -k
            Filesystem     1K-blocks   Used Available Use% Mounted on
            rootfs           7399324 302888   6697524   5% /
            /dev/root        7399324 302888   6697524   5% /
            devtmpfs          224292      0    224292   0% /dev
            tmpfs              44876    116     44760   1% /run
            tmpfs               5120      0      5120   0% /run/lock
            tmpfs              89740      0     89740   0% /run/shm
            /dev/mmcblk0p1     48742  22956     25786  48% /boot
            tmpfs              89740      0     89740   0% /tmp
            $ sudo dd bs=1M if=/dev/sdc of=pika_20140305_0958.img
            $ 7za a -t7z pika_20140305_0958.img.7z pika_20140305_0958.img
set up the wifi Edimax EW-7811UN
I had problems, but got help here.
Post on raspberrypi.org forum - Where to get help on wifi?
So I added 2 packages.
            apt-get install wpasupplicant
            apt-get install wireless-tools
Here is the trail Verify the Edimax EW-7811Un is seen.
            root@pika:~# lsusb
             ...
            Bus 001 Device 004: ID 7392:7811 Edimax Technology Co., Ltd EW-7811Un 802.11n Wireless Adapter [Realtek RTL8188CUS]
             ...
Note that the wpa-psk entry is not the passphrase. With the ssid and passphrase this site can give the psk.
Wireshark - WPA PSK (Raw Key) Generator
Here is the interfaces file.
            root@pika:~# cat /etc/network/interfaces
            auto lo
            iface lo inet loopback

            auto eth0
            iface eth0 inet dhcp

            auto wlan0
            allow-hotplug wlan0
            iface wlan0 inet dhcp
              wpa-ssid Pirates
              wpa-psk alonghexstringpsk
See if iwlist from wireless-tools finds the router.
            root@pika:~# iwlist wlan0 scan

            wlan0     Scan completed :
                      Cell 01 - Address: D4:CA:6D:56:86:59
                                ESSID:"Pirates"
                                Protocol:IEEE 802.11bgn
                                Mode:Master
                                Frequency:2.412 GHz (Channel 1)
                                Encryption key:on
                                Bit Rates:300 Mb/s
                                Extra:wpa_ie=dd1a0050f20101000050f20402000050f2040050f20201000050f202
                                IE: WPA Version 1
                                    Group Cipher : CCMP
                                    Pairwise Ciphers (2) : CCMP TKIP
                                    Authentication Suites (1) : PSK
                                Extra:rsn_ie=30160100000fac040200000fac04000fac020100000fac02
                                IE: IEEE 802.11i/WPA2 Version 1
                                    Group Cipher : CCMP
                                    Pairwise Ciphers (2) : CCMP TKIP
                                    Authentication Suites (1) : PSK
                                Quality=100/100  Signal level=100/100
For the wifi interface
$ ssh craig@192.168.88.218
For the wired interface
$ ssh root@192.168.88.223
add a user
pika# adduser craig
Generate a key pair for the new user
$ ssh-keygen
Install python, vim, tmux, git
            pika# apt-get install python
             ...
            The following NEW packages will be installed:
              file libmagic1 libsqlite3-0 mime-support python python-minimal python2.7 python2.7-minimal
             ...

            pika# apt-get install vim tmux git
             ...
            The following NEW packages will be installed:
              git git-man libclass-isa-perl libcurl3-gnutls liberror-perl libevent-2.0-5 libgpm2 libldap-2.4-2 libpopt0 librtmp0 libsasl2-2 libsasl2-modules libssh2-1 libswitch-perl patch perl perl-modules rsync tmux vim vim-runtime
             ...
Personalize git
            $ git config --global user.name "Your Name Here"
            Sets the default name for git to use when you commit

            $ git config --global user.email "your_email@example.com"
            Sets the default email for git to use when you commit
Set up the vim dotfiles and vundle.
            $ git clone git@github.com:CootCraig/dotfiles_again.git

            $ cd dotfiles_again/linux
            $ bash ./install.sh

            cd ~/dotfiles_again/windows/vimfiles/bundle
            git clone https://github.com/gmarik/vundle.git
There are some notes on using vundle in the file ~/.vim/bundle/Readme.txt The Raspbian vim does not have python support, so disable UltiSnips vim script. Comment out the following line in ~/.vimrc
            Bundle 'vim-scripts/UltiSnips'
              to
            "Bundle 'vim-scripts/UltiSnips'
And then run BundleInstall.
in vim. :BundleInstall
password less ssh
These instructions worked fine.
How to set up ssh so you aren’t asked for a password
Add the contents of the public key file into ~/.ssh/authorized_keys on the remote site (the file should be mode 600).
make user a sudoer
            pika# apt-get install sudo
            pika# adduser craig sudo
Install Compiler tools
            pika# apt-get install build-essential checkinstall libtool automake uuid-dev
             ...
            The following NEW packages will be installed:
              autoconf automake autotools-dev binutils build-essential bzip2 checkinstall cpp cpp-4.6 dpkg-dev fakeroot g++ g++-4.6 gcc gcc-4.6 gcc-4.6-base libalgorithm-diff-perl libalgorithm-diff-xs-perl libalgorithm-merge-perl libc-dev-bin
              libc6-dev libdpkg-perl libfile-fcntllock-perl libgmp10 libgomp1 libltdl-dev libltdl7 libmpc2 libmpfr4 libstdc++6-4.6-dev libtimedate-perl libtool linux-libc-dev m4 make manpages manpages-dev uuid-dev xz-utils
             ...
Zeromq build and install
Source for stable release 3.2.4
This is supported by ffi-rzmq, the JRuby library I plan to use. I unpacked for build at:
pika# cd /opt/zeromq/zeromq-3.2.4
The installation will be to /usr/local/
            pika# ./configure --help
            Installation directories:
              --prefix=PREFIX         install architecture-independent files in PREFIX
                                      [/usr/local]
              --exec-prefix=EPREFIX   install architecture-dependent files in EPREFIX
                                      [PREFIX]
            pika# ./configure
            pika# make
            pika# checkinstall
A debian package was left here:
/opt/zeromq/zeromq-3.2.4/zeromq_3.2.4-1_armhf.deb
install socat
pika# apt-get install socat
Install supervisor with python-pip
            pika# apt-get install python-pip
             ...
            The following NEW packages will be installed:
              python-pip python-pkg-resources python-setuptools python2.6 python2.6-minimal
             ...

            pika# pip install supervisor
             ...
              Downloading supervisor-3.0.tar.gz (459Kb): 459Kb downloaded
             ...
                Installing echo_supervisord_conf script to /usr/local/bin
                Installing pidproxy script to /usr/local/bin
                Installing supervisorctl script to /usr/local/bin
                Installing supervisord script to /usr/local/bin
             ...
install python-pip mentioned apt-utils not installed, so let’s install it.
            pika# apt-get install apt-utils
             ...
            The following NEW packages will be installed:
              apt-utils libapt-inst1.5
             ...
supervisor setup - run socat at boot
for copy and paste
Install Oracle jdk 8
extracted jdk-8-fcs-b129-linux-arm-vfp-hflt-06_feb_2014.tar.gz to /opt/java/jdk1.8.0
Made a symbolic link for /opt/java/jdk
            $ ls -l /opt/java/jdk
            lrwxrwxrwx 1 root root 9 Mar  5 22:06 /opt/java/jdk -> jdk1.8.0/
Add jdk to the path
- /etc/profile
- /etc/sudoers
- /etc/environment
- /etc/login.defs
Modify /etc/login.defs
            ENV_SUPATH      PATH=/opt/java/jdk/bin:/usr/local/sbin:/usr/local/bin:/usr/sbin:/usr/bin:/sbin:/bin
            ENV_PATH        PATH=/opt/java/jdk/bin:/usr/local/bin:/usr/bin:/bin:/usr/local/games:/usr/games
Modify /etc/profile
            if [ "`id -u`" -eq 0 ]; then
              PATH="/opt/java/jdk/bin:/usr/local/sbin:/usr/local/bin:/usr/sbin:/usr/bin:/sbin:/bin"
            else
              PATH="/opt/java/jdk/bin:/usr/local/bin:/usr/bin:/bin:/usr/local/games:/usr/games"
            fi
modify /etc/sudoers
Defaults secure_path="/opt/java/jdk/bin:/usr/local/sbin:/usr/local/bin:/usr/sbin:/usr/bin:/sbin:/bin"
/etc/environment was empty
Verify that java runs and the version.
            $ java -version
            java version "1.8.0"
            Java(TM) SE Runtime Environment (build 1.8.0-b129)
            Java HotSpot(TM) Client VM (build 25.0-b69, mixed mode)
install jruby
Unpack the latest jruby tarball to /opt/jruby/jruby-1.7.11
Make a symbolic to this version of jruby.
            $ ls -l /opt/jruby/jruby
            lrwxrwxrwx 1 root root 13 Mar  5 23:06 /opt/jruby/jruby -> jruby-1.7.11/
modify the path to add /opt/jruby/jruby/bin
Modify /etc/login.defs
            ENV_SUPATH      PATH=/opt/java/jdk/bin:/opt/jruby/jruby/bin:/usr/local/sbin:/usr/local/bin:/usr/sbin:/usr/bin:/sbin:/bin
            ENV_PATH        PATH=/opt/java/jdk/bin:/opt/jruby/jruby/bin:/usr/local/bin:/usr/bin:/bin:/usr/local/games:/usr/games
Modify /etc/profile
            if [ "`id -u`" -eq 0 ]; then
              PATH="/opt/java/jdk/bin:/opt/jruby/jruby/bin:/usr/local/sbin:/usr/local/bin:/usr/sbin:/usr/bin:/sbin:/bin"
            else
              PATH="/opt/java/jdk/bin:/opt/jruby/jruby/bin:/usr/local/bin:/usr/bin:/bin:/usr/local/games:/usr/games"
            fi
modify /etc/sudoers
Defaults secure_path="/opt/java/jdk/bin:/opt/jruby/jruby/bin:/usr/local/sbin:/usr/local/bin:/usr/sbin:/usr/bin:/sbin:/bin"
Define JAVA_HOME in the environment
Add to /etc/environment
JAVA_HOME=/opt/java/jdk
Verify that jruby runs.
            $ jruby -v
            jruby 1.7.11 (1.9.3p392) 2014-02-24 86339bb on Java HotSpot(TM) Client VM 1.8.0-b129 +indy [linux-arm]
Change permissions in jruby folder to allow user craig to add gems
            pika# adduser craig staff

            pika# cd /opt/jruby/jruby/lib/ruby/gems
            pika# sudo bash -c "find shared -type d |xargs chmod 775"
            pika# sudo bash -c "find shared |xargs chmod g+w"

            pika# cd /opt/jruby/jruby-1.7.11
            pika# sudo bash -c "find bin |xargs chmod g+w"
gem install bundler
            $ gem install bundler
            Fetching: bundler-1.5.3.gem (100%)
            /opt/jruby/jruby-1.7.11/lib/ruby/shared/rubygems/installer.rb:507 warning: executable? does not in this environment and will return a dummy value
            Successfully installed bundler-1.5.3
            1 gem installed
todo
done
- serial console
- wifi setup
- password less ssh
- make user a sudoer
- checkinstall and compile tools
- zeromq compile and install
- supervisor
- socat
- Oracle JVM
- JRuby
todo
- fixed IP address
- JRuby/Reel test
23 February 2014 » Electronics Chemicals
AudioAsylum - RE: Nothing special about Deoxit….
Posted by Michael Samra (D) on February 23, 2014 at 19:28:16
Stephen is dead on about Deoxit..AAMOF,I switched long ago to Mg Chemicals and Jiffy Bath,both older established names and you get more for the money and they are better products by far..Diamond Souled used to use Deoxit and I got him to try the Mg chems being he lives in Canada,he never switched back..
Part II - Clean Connections And Signal Transfer
Cyclo Quick-Dry Electronic Cleaner
CRC QD Electrical Contact Cleaner Aerosol
Arkay’s “Idiot’s Guide” (because it takes one to know one… ) to a DeOxit job:
INTRODUCTION:
You don’t need to know much about electronics, nor do you need to take much apart, to use DeOxit correctly on 90+ percent of receivers and other vintage gear. Basically, you need to unscrew the top and bottom covers, and PERHAPS (but often not) remove the front faceplate. It’s really pretty easy to do, if you can just use a screwdriver to unscrew (and screw back in) a screw, and point a spraycan, turn a knob back-and-forth, and wiggle a little Q-tip or mascara brush!
Although all this is a simple enough thing to do in real life, all written out in detail like this it gets a bit long. You might want to print this out on paper and read it through once or twice before beginning, perhaps even keeping it beside you as you do the work, and checking off the steps as you go.
MATERIALS:
*A screwdriver or two that will fit the screws holding on the covers. *A DeOxit kit, with both spray can (with little red straw) and little bottle of red DeOxit, and the same for the yellowish DeOxit Gold (formerly called ProLube). * Either a little mascara brush (or two) or a couple pipe cleaners and/or some Q-tips (the kind that don’t come apart easily). If you buy one of the DeOxit kits that comes with some little things like these, then that’s all you’ll need. You might also want a few paper towels. * If it turns out that you need to remove the faceplate (but you may not have to), then you might also need a very small allen wrench or jeweler’s screwdriver to remove the tiny set-screws that are sometimes used to secure larger knobs and maybe two rounded-bottomed spoons (regular kitchen spoons) to pry up knobs that are stuck tightly on the shafts, along with some cardboard, cloth or leather scraps to protect the faceplate while doing this.
STEPS:
Remove Top Cover: 1. Remove the screws that are holding on the top cover, and put them safely aside in a small paper cup or dish or something, as you remove them, so they won’t be lost. Label that container (“top cover screws”) and set it where you won’t spill it or lose it. Lift off the cover and set it aside in a safe place where it is out of your way but you can find it again.
Remove Bottom Cover: 2. Stand the receiver up vertically, so you can access the bottom of the receiver. [You may wish to put down a piece of cardboard or srap of linoleum or something like it underneath the receiver, to protect your table-top from scratches, and to facilitate turning the receiver around sometimes for easier access.] Repeat step 1 for the bottom cover. You might need to remove the feet, as well, in order to remove the bottom cover, but sometimes you don’t have to. Be sure to put the screws into their own receptable and label it (“bottom cover screws”).
Only Remove Faceplate if Necessary: 3. Look at the area behind the faceplate. Can you see the potentiometers and switches? Those are the things that the shafts of the knobs and such on the front panel go into. If you can see them, and access them at least with the little red straw tubes that come with DeOxit spray cans, then you don’t need to remove the faceplate. This is the case with most receivers.
Removing the Faceplate: 4. I won’t detail the process for removing the faceplate itself on a particular model, but give general instructions, as it will vary from model to model and usually isn’t necessary, anyway.
If you do have to remove the faceplate, study it carefully first, and take some digital pics and make notes, so that you can replace it properly afterwards. MOST of the time, though, it is very simple: just remove the knobs from the front, and unscrew a couple of screws holding it from the backside, and it will lift right off.
If there are a lot of knobs with different sizes, you might even want to make a diagram on a sheet of paper, and tape each knob where it belongs, on the diagram.
Dealing With (Removing) Stubborn Knobs… To remove stubborn knobs that don’t want to pull off by hand, use two rounded spoons: slip the spoons under opposite sides of the knob, bowls facing down and handles opposing each other, and push down on the spoon handles to “lever up” the knobs. Put protective cloth, cardboard or leather underneath the bowls of the spoons first, though, to protect the faceplate against possible scratches.
Some knobs, often the larger ones like the volume knob, have a tiny screw set down inside a small hole on their side, which anchors them to the shaft. With those, you need to use a tiny-sized allen wrench to loosen that, before the knob can be pulled off. Sometimes you’ll need a jeweller’s screwdriver (Phillips head), but almost all of the brands require allen wrenches instead. Usually these are about 1.5mm in size. Both sets of small allen wrenches and jeweller’s screwdrivers can be found cheaply at any good hardware store. Get a set of the really tiny ones, and one of them should fit.
Some knobs shafts may be anchored to the faceplate with hex nuts. If those are there, you can either loosen them with an appropriate-sized hollow-shaft hex-nut driver, if you have one, or else carefully get it started using needle-nosed pliers (be careful not to slip and scratch the faceplate: you may want to protect it first with a couple layers of masking tape to be safe). unscrew the nuts and any washers underneath, and set them aside in a safe place, labeled so you you’ll remember where to put them back when re-assembling.
Now Let’s Start Cleaning the Pots (Potentiometers)… 5. So, let’s assume you’ve already removed the top and bottom, and –only if necessary (which it probably wasn’t)– the faceplate, and you can see all the pots and switches. Potentiometers (“Pots” for short) are the little cylindrical can-like things with a shaft sticking out of them. There will be one (or else some kind of switch) at the end of each shaft leading in from a control knob.
There will be one or more small holes in the outer metal case of each Pot. These may be drilled holes, or just openings created where the metal cases had little tabs bent inwards to hold them on. It doesn’t matter; just find one or more small holes that give access to the inside of the pot.
Start with one, and direct the spray from the DeOxit spray can, using the straw, into the hole and give it a good spray or two into the interior. You don’t have to over-do it; the DeOxit will run all over inside, once you get it sprayed right in there, but use enough. Usually two blasts for about a second each will be enough. If there are multiple holes, shoot a blast through each hole, to ensure you get some into all the contact areas.
After spraying, immediately (a few seconds won’t matter, but don’t wait minutes or the DeOxit will have evaporated too much) work the corresponding knob back and forth (from left to right) a few dozen times, through its full range of motion.
Repeat the spray-and-turn process described in step 5 for each and every pot.
Clean the Switches, Too: 6. Also do the same cleaning process for every switch. You want to clean the surfaces where electrical contact is made, so spray those and work them back-and-forth.
Sometimes the switches are not enclosed in cases as the pots are, so you can see their contact surfaces. In these cases, spray (or brush) the DeOxit directly onto the contact surfaces. Some switches are covered in metal boxes like the pots are, though. SOMETIMES these boxes have little covers that easily lift off: if so, you can remove the cover and spray the contacts directly. Whatever form they are in, it doesn’t matter: just spray through any little holes or openings you can find in the case, or else directly on to the contacts, and then do the back-and-forth thing with the knob shaft, a few dozen times or more.
After Cleaning Each Time, Apply Lubricant/Protectant: 7. For EACH of the above things you’ve cleaned (pots and switches), AFTER cleaning them with the DeOxit red stuff, you’ll want to follow-up with a shot of DeOxit ProLube or DeOxit GOLD, to lubricate and protect the switches. Just spray it in there and work the knobs a couple times to spread it around. You don’t need to work the knob dozens of times for this step, since you aren’t trying to scrape off oxidation any more, just spread the lubricant.
Clean Jacks and Socket Contacts, Too: 8. After you have finished cleaning all the pots and switches along the faceplate, you still aren’t quite done. Look at the jacks where the headphones get inserted. There will be some springy metal strips there, that make contact with the headphone jack when it is inserted. Clean those off with the red DeOxit, using small mascara brushes (or Q-tips) inserted through the jack-hole, or even just reached in through the side if there is room for them. [Use DeOxit red stuff from the little bottles for this, not the spray. Clean them well, then add a layer of the ProLube/Gold stuff. Just apply it with a Q-tip or brush, same as the red stuff. Alternatively you can just put some of it on the headphone plug, and run it in and out of the jack a few times, turning it a little, as a means of application. Again, you don’t need to “work” the lube so hard: use the red stuff for the cleaning, and the gold as a final step, just to add a protective and lubricating film to your newly-cleaned surface.
Repeat this process for any other contacts that haven’t been cleaned, such as microphone jacks if there are any, in the faceplate area. At this point, you should have cleaned every pot, switch or jack in the faceplate area.
After the Front-side contacts, Clean the Back-side Ones, Too: 9. Now turn to the BACK of the receiver. There will be more contact points there, where RCA jacks are inserted for inputs and outputs. You’ll need to clean each one of the jacks. Don’t just clean the outside parts you see from the outside. It is critical that you clean the INSIDE parts, where the center shaft of the plug goes in. Use either pipe-cleaners or mascara brushes, with some DeOxit brushed on them from the little DeOxit bottles. Brush in-and-out with the DeOxit-ed mascara brushes or pipe cleaners, as if they were, uh… well, you know, “getting it on”! You’ll probably be able to see the contact surfaces from the inside, and can see that they are getting cleaned. When you think they’ve had enough and are fully clean, add a final dose of the ProLube/Gold stuff to lubricate and protect the newly-cleaned surfaces.
Make Sure You Clean ALL the Connector Surfaces: 10. Now, having cleaned all the RCA jacks, look at what else is on the back of the receiver. You probably have some more contact surfaces there, where electrical contact is made between two conductors, such as screw-connectors to attach antennae, and some form of speaker connectors. Clean each of those surfaces, too, following the same steps as above (a good scrubbing with red DeOxit, followed by a protective bit of the gold stuff). By this time, you should be able to do this “on autopilot”, while enjoying background music from your other system.
Don’t Forget to Clean the Fuses, too: 11. There is another type of contact surface that you shouldn’t forget: the fuses! There will probably be one power fuse, accessible from the back side of the receiver. Unscrew the cap that holds it in place. You may be able to do this with your fingers. Otherwise it will probably have a big “x” you can use a thin coin like a dime or a large phillips-head screwdriver to loosen it up with. Remove the fuse and clean both ends of it, as well as both ends of the fuse holder. You’ll probably need to stick a DeOxit-carrying Q-tip, mascara brush or pipe cleaner into the hole, to clean the inside contact surface. Again, you can follow-up with the Gold stuff (but you knew that already by now, huh?).
Now look at the inside areas of the receiver. There will probably be a few more fuses scattered around the circuit boards inside. One by one (so you don’t mix them up!), remove and clean the ends of the fuse itself, along with the little holders that it clamps into. Then replace the fuse, and move on to the next one. Repeat until you’ve cleaned up every fuse you can find.
You Are ALMOST Finished!… 12. At this point, you should have cleaned up every electrical contact surface –pots, switches, and jacks– in the front and back of the reciever, as well as all the fuses. Basically, you are FINISHED with the DeOxit cleaning process!
But the Relay Contacts May be Dirty, Too: BUT… there is one thing I should mention, just to be complete: There is one more non-permanent or intermittent contact type in your receiver, which can oxidize and affect function and sound. That is the contact surfaces in the relays.
These are usually semi-complex-looking thingies housed in clear plastic boxes, with black plastic bases. You can see the little contact points on metal leaf-spring things inside them. I would suggest just leaving them alone, unless you find they are causing a problem, as they can sometimes be tricky to open up (some cases aren’t made to be opened), and if you screw them up you’ll have to buy new ones.
But if you really want to be thorough, those surfaces should be cleaned, too. IF the case comes off, then you can just gently put a little strip of regular typing/photocopy paper between the contacts, gently close the contacts on the paper, and pull the paper out. You may see some dark streaks or smudge lines on the paper the first time you do this: that is the carbon/oxidation being removed. Do this about twice, or until the paper comes out completely clean. Be careful to do this gently, making sure you don’t twist or bend the metal strips: the contact surfaces need to make perfectly square face-to-face contact.
If the relay contacts are very dirty, you may need to try using a VERY fine sandpaper, like 1500 or 2000 grit, but try the regular paper alone first –scratches from sandpaper are more likely to create faster re-oxidation in the future. Frankly, if the contacts are that dirty that you need sandpaper, you might want to consider replacing the whole relays, but that is a task beyond the scope of this post.
MOST OF THE TIME, you’ll be fine just leaving the relays alone, so you may want to skip this if it intimidates you, but as long as you can get the case open easily, it is worth doing.
IMPORTANT REMINDER: You DO NOT USE DeOXIT OR ANY OTHER CLEANER ON RELAYS!!! Just dry clean them with paper (or very, very fine sandpaper/emery paper).
A Few Things to Consider Before We Are Done: 13. NOW you have cleaned every single contact surface in your receiver. The electrons should be able to flow freely through all their intended channels, pretty much as they did when the thing was brand new. YOU ARE ALMOST FINISHED!
Many people recommend waiting overnight, to be sure all the DeOxit has dried, before turning on the receiver. Just as many people (including myself) wait only ten minutes or so before turning the power back on, and never seem to have a problem. The choice is yours.
In any case, if you plan to do further troubleshooting, you may wish to plug in and turn on your receiver before re-attaching the casing, to try it out. I you do this, remember that there is dangerous live current inside it, and don’t touch anything inside, except the usual controls and such on the outside that you would touch anyway in normal use. Also, if you have the case off, make sure nothing foreign (like a screwdriver shaft, pipe cleaner, etc…) is touching anything inside the receiver. If you accidentally short anything out, you may not only hurt yourself, but you may easily “fry” parts of the receiver.
However, if you are a non-technical person who doesn’t know what they are doing and won’t want to start fiddling with further repairs, anyway, then I suggest you close it all back up, before testing it.
There is one reason why you might want to test it first, though: Sometimes one DeOxit treatment isn’t enough to fully clean really dirty contacts, and problems may remain or recur if they aren’t yet clean enough. If you test it at this stage and still get some crackling when operating one of the controls, you can blast it again with DeOxit and re-crank that control (i.e., repeat the whole cleaning process for that control) again. It is easier to do this before putting the case back on, than after!
Re-Assembly Time: But let’s assume that you are finally finished and ready to re-assemble things:
Start by re-attaching the faceplate and knobs, if you took them off (you probably didn’t, anyway). Then re-attach the bottom plate (including the feet, if you removed them). Last of all, replace the top cover.
If you set your knobs and screws and such all aside carefully, and kept the screws for each section in separate, marked containers as I suggested before, this should be very easy. If you kept the screws for each section separate, then if at any stage one screw is left over (a “proverbial” problem!), at least you’ll know which section it came from, which will considerably shorten the time and hassle it will take to find where it goes.
Once everything is all covered back up again, you should have a receiver that looks just like it did before, but now all the oxidation that acted like blockages in pipes have been cleared out, and the electrons have freedom to flow again where they are supposed to. Connect it back up, turn it on, and check the sound. Try all the functions and controls. Turn them all back and forth a little or operate them a few times. Everything should be quiet and right.
Some Simple Troubleshooting: If you still have crackling or dropouts, then one of two conditions exists:
(1) Some of the contacts (as mentioned above) may not be clean enough yet, so you may need to open it back up and clean those. Most of the time you can tell if this is the case, as the problem will come and go exactly when you fiddle with that particular contact, so you can tell which control needs re-cleaning. HOWEVER, if there are several contacts that are still dirty and are chopping in and out randomly, it can be a little confusing to identify which ones are the problem. [That is one reason why we don’t always bother to test the results after cleaning each separate control. It is better to clean them all first, and then test.] It is very unlikely this will happen, though, if you followed the above instructions properly.
OR
(2) If you are still having problems, there may be something else wrong, like failing components inside. That is for a tech to handle (or DIY, if you are willing to learn enough electronics repair), and beyond the scope of this post.
Most of the time, if you have followed the above process, your receiver will function fine, and sound markedly better than it has in many years.
What’s Next? I’d still recommend doing (or having done) a complete re-cap and check-over, setting of bias and DC offset, and tuner alignment, but that is way beyond this post. Even if you decide to take it to a tech and have all (or some) of this done, at least you may save some money by having done this much first, since otherwise your tech will do it first, himself, and charge you for his time doing it. Remember to tell the tech exactly what you did!
NOW You have FINISHED!
19 February 2014 » Raspberry Pi Radio Gateway Build
Overview
A Raspberry Pi based gateway to distributed Moteino radio connected Arduinos.
- Moteino USB attached as radio interface
- Raspberry Pi hosted gateway based on a JRuby/JVM/Reel based HTTP server
Looking for a minimal server install
Raspbian Wheezy armhf Raspberry Pi minimal image
After the Debian Wheezy armel image I made a new one based on Raspbian armhf. This one is compiled with hard float support, so basically floating point operations are MUCH faster because they are done in hardware instead of software emulation :)
Features include:
- A minimal Raspbian Wheezy installation (similar to a netinstall)
- Hard Float binaries: floating point operations are done in hardware instead of software emulation, that means higher performances
- Disabled incremental updates, means apt-get update is much faster
- Workaround for a kernel bug which hangs the Raspberry Pi under heavy network/disk loads
- 3.6.11+ hardfp kernel with latest raspberry pi patches
- Latest version of the firmwares
- Fits 1GB SD cards
- A very tiny 118MB image: even with a 2GB SD there is a lot of free space
- ssh starts by default
- The clock is automatically updated using ntp
- IPv6 support
- Just 14MB of ram usage after the boot
Other Linux images passed over
- Moebius v1.1.1 available
- Raspbian Server Edition Version 2.3
- raspbian-ua-netinst - Raspbian unattended netinstaller
The most interesting on here is the raspbian-ua-netinst. There is Github repo for it:
Github repo with raspbian-ua-netinst
I had previously used the Raspbian net installer here: RaspbianInstaller
But the notes now say: Currently we reccomend using hifi’s raspbian-ua-netinst instead if you want to use an installer rather than a pre-installed image.
Dark Basic install notes
Dark Basic Raspbian SDHC Boot image
Start with the Dark Basic install notes
You will have to extract the image with p7zip:
7za x raspbian_wheezy_20130923.img.7z
Then flash it to your SD with dd:
$ sudo dd bs=1M if=raspbian_wheezy_20130923.img of=/dev/sdc
Finally, if you have an sd larger than 1GB, grow the partition with gparted (first move the swap partition at the end).
$ sudo gparted /dev/sdc
At this point install the SDHC card on the RPI, plug in the ethernet cable, plug in the USB terminal cable which will power up the RPI.
Now use screen to watch the boot up messages.
Able to use screen to connect on laptop:
$ sudo screen /dev/ttyUSB0 115200
When connected check the stty values.
$ stty -a
Attempts to use socat instead of screen
             $ sudo socat - /dev/ttyUSB0,b115200
             $ sudo socat - /dev/ttyUSB0,b115200,raw # no
             $ sudo socat - /dev/ttyUSB0,b115200,cs7 # no
             $ sudo socat - /dev/ttyUSB0,b115200,parenb,cs7 # no
             $ sudo socat - /dev/ttyUSB0,b115200,parenb,cs8 # no
             $ sudo socat - /dev/ttyUSB0,b115200,raw,cs7 # no
             $ sudo socat - /dev/ttyusb0,b115200,raw,cs8,start=1,stop=1 # no
             $ sudo socat - /dev/ttyusb0,b115200,parenb=false,raw,cs8,start=1,stop=1 # no
             $ sudo socat - /dev/ttyUSB0,b115200,raw,cs8 # no
             $ sudo socat - /dev/ttyUSB0,b115200,raw,cs7 # no
             $ sudo socat - /dev/ttyUSB0,b115200,raw,cs8 # no
             $ sudo socat - /dev/ttyUSB0,b115200,cs8,parenb=0 # close, but not exact
             $ sudo socat - /dev/ttyUSB0,b115200,cs8,parenb=0,stop=0 # close
             $ sudo socat - /dev/ttyUSB0,cs8,parenb=0,stop=0,ixon=1,ixoff=1 # close
             $ sudo socat - /dev/ttyUSB0,cs8,parenb=0,stop=0,ixon=1,ixoff=1,echo=0

             $ sudo screen /dev/ttyUSB0 115200
             $ sudo socat /dev/ttyUSB0,raw,echo=0,crlf

             $ socat -d -d -d -d -x TCP:localhost:7758 FILE:/dev/ttyUSB0,b9600,raw
Found the IP address on the router: 192.168.88.223
ssh into the RPI and have a go. The root password is raspberry.
$ ssh root@192.168.88.223
Change the root password
passwd
You will have to reconfigure your timezone after the first boot:
# dpkg-reconfigure tzdata
The keyboard layout:
# dpkg-reconfigure console-data
And the localization:
# dpkg-reconfigure locales
Some docs
And proceed
Change the hostname
Edit /etc/hostname to have the hostname.
            $ cat /etc/hostname
            pika
Edit /etc/hosts and a line with the new hostname.
            $ cat /etc/hosts
            127.0.0.1	localhost
            127.0.0.1	pika       <<< added this line with hostname
             ...
Add a user
            # adduser craig

            Note that from now on:
            # prompt means run as root.
            $ prompt means run as user craig
# su - craig
Generate a key pair for the new user
$ ssh-keygen
Check the Debian version
            $ cat /etc/debian_version
            7.2
Update the system
            # apt-get update
            # apt-get dist-upgrade
Install python, vim, tmux, git
# apt-get install python
# apt-get install vim tmux git
Personalize git
            # git config --global user.name "Your Name Here"
            Sets the default name for git to use when you commit

            # git config --global user.email "your_email@example.com"
            Sets the default email for git to use when you commit
Set up the vim dotfiles and vundle.
            $ git clone git@github.com:CootCraig/dotfiles_again.git

            $ cd dotfiles_again/linux
            $ bash ./install.sh

            cd ~/dotfiles_again/windows/vimfiles/bundle
            git clone https://github.com/gmarik/vundle.git
There are some notes on using vundle in the file ~/.vim/bundle/Readme.txt The Raspbian vim does not have python support, so disable UltiSnips vim script. Comment out the following line in ~/.vimrc
            Bundle 'vim-scripts/UltiSnips'
              to
            "Bundle 'vim-scripts/UltiSnips'
And then run BundleInstall.
in vim. :BundleInstall
password less ssh
These instructions worked fine.
How to set up ssh so you aren’t asked for a password
Add the contents of the public key file into ~/.ssh/authorized_keys on the remote site (the file should be mode 600).
make user a sudoer
            # apt-get install sudo
            # adduser craig sudo
Pause and make a backup of the SDHC image
On the Ubuntu host.
            $ sudo dd bs=1M if=/dev/sdc of=pika_20140220_1441.img
            7519+0 records in
            7519+0 records out
            7884242944 bytes (7.9 GB) copied, 446.404 s, 17.7 MB/s

            $ 7za a -t7z pika_20140220_1441.img.7z pika_20140220_1441.img

            $ ls -l pika_2014*
            -rw-r--r-- 1 craig craig 7884242944 Feb 20 14:49 pika_20140220_1441.img
            -rw-r--r-- 1 craig craig  254215741 Feb 20 15:09 pika_20140220_1441.img.7z
Install Compiler tools
            # apt-get install build-essential checkinstall libtool automake uuid-dev

            The following extra packages will be installed:
              autoconf autotools-dev binutils bzip2 cpp cpp-4.6 dpkg-dev fakeroot g++ g++-4.6 gcc gcc-4.6 libalgorithm-diff-perl libalgorithm-diff-xs-perl libalgorithm-merge-perl libdpkg-perl libfile-fcntllock-perl libgmp10 libgomp1 libltdl-dev
              libltdl7 libmpc2 libmpfr4 libstdc++6-4.6-dev libtimedate-perl m4 make
            Suggested packages:
              autoconf2.13 autoconf-archive gnu-standards autoconf-doc gettext binutils-doc bzip2-doc cpp-doc gcc-4.6-locales debian-keyring gcc-4.6-doc libstdc++6-4.6-dbg gcc-multilib manpages-dev automake1.9 flex bison gdb gcc-doc
              libmudflap0-4.6-dev libgcc1-dbg libgomp1-dbg libquadmath-dbg libmudflap0-dbg binutils-gold libtool-doc libstdc++6-4.6-doc automaken gfortran fortran95-compiler gcj make-doc
            The following NEW packages will be installed:
              autoconf automake autotools-dev binutils build-essential bzip2 checkinstall cpp cpp-4.6 dpkg-dev fakeroot g++ g++-4.6 gcc gcc-4.6 libalgorithm-diff-perl libalgorithm-diff-xs-perl libalgorithm-merge-perl libdpkg-perl
              libfile-fcntllock-perl libgmp10 libgomp1 libltdl-dev libltdl7 libmpc2 libmpfr4 libstdc++6-4.6-dev libtimedate-perl libtool m4 make uuid-dev
            0 upgraded, 32 newly installed, 0 to remove and 0 not upgraded.
            Need to get 26.8 MB of archives.
            After this operation, 69.2 MB of additional disk space will be used.
Zeromq build and install
Source for stable release 3.2.4
This is supported by ffi-rzmq, the JRuby librar I plan to use. I unpacked for build at:
# cd /opt/zeromq/zeromq-3.2.4
The installation will be to /usr/local/
            # ./configure --help
            Installation directories:
              --prefix=PREFIX         install architecture-independent files in PREFIX
                                      [/usr/local]
              --exec-prefix=EPREFIX   install architecture-dependent files in EPREFIX
                                      [PREFIX]
Build and install.
            # ./configure
            # make
            # checkinstall
A debian package was left here:
/opt/zeromq/zeromq-3.2.4/zeromq_3.2.4-1_armhf.deb
Set up serial console
From /etc/inittab
            ...
            # Example how to put a getty on a serial line (for a terminal)
            #
            #T0:23:respawn:/sbin/getty -L ttyS0 9600 vt100
            #T1:23:respawn:/sbin/getty -L ttyS1 9600 vt100
            ...
However, this is the device file we see:
            $ ls -l /dev/ttyAMA0
            crw-rw---T 1 root dialout 204, 64 Dec 31  1969 /dev/ttyAMA0
So let’s add this line to /etc/inittab
            ...
            # Example how to put a getty on a serial line (for a terminal)
            #
            #T0:23:respawn:/sbin/getty -L ttyS0 9600 vt100
            T0:23:respawn:/sbin/getty -L ttyAMA0 115200 vt100
            #T1:23:respawn:/sbin/getty -L ttyS1 9600 vt100
            ...
Post to raspberrypi.org/forum about Edimax EW-7811UN
I have failed to get Wifi working and would like some help. I’m not sure how how to troubleshoot from here. Here are some details on my setup.
Using this OS image. I want a minimal install with no X.
Dark Basic Raspbian SDHC Boot image
With this USB wifi plug: Edimax EW-7811UN
Boot time messages include these related to the Edimax plug.
            [    3.232011] usb 1-1.2: new high-speed USB device number 4 using dwc_otg
            [    3.364155] usb 1-1.2: New USB device found, idVendor=7392, idProduct=7811
            [    3.380505] usb 1-1.2: New USB device strings: Mfr=1, Product=2, SerialNumber=3
            [    3.399033] usb 1-1.2: Product: 802.11n WLAN Adapter
            [    3.411807] usb 1-1.2: Manufacturer: Realtek
            [    3.417625] usb 1-1.2: SerialNumber: 00e04c000001
             ...
            [   15.826605] IPv6: ADDRCONF(NETDEV_UP): wlan0: link is not ready
System reports as.
            root@pika:~# uname -a
            Linux pika 3.6.11+ #545 PREEMPT Fri Sep 20 23:57:55 BST 2013 armv6l GNU/Linux
More evidence the Edimax Wifi is seen
            root@pika:~# lsusb
            Bus 001 Device 002: ID 0424:9512 Standard Microsystems Corp.
            Bus 001 Device 001: ID 1d6b:0002 Linux Foundation 2.0 root hub
            Bus 001 Device 003: ID 0424:ec00 Standard Microsystems Corp.
            Bus 001 Device 004: ID 7392:7811 Edimax Technology Co., Ltd EW-7811Un 802.11n Wireless Adapter [Realtek RTL8188CUS]
The wifi driver module is loaded
            root@pika:~# lsmod
            Module                  Size  Used by
             ...
            8192cu                490361  0
             ...
Output of iwconfig
            root@pika:~# iwconfig
            wlan0     unassociated  Nickname:"<WIFI@REALTEK>"
                      Mode:Auto  Frequency=2.412 GHz  Access Point: Not-Associated
                      Sensitivity:0/0
                      Retry:off   RTS thr:off   Fragment thr:off
                      Encryption key:off
                      Power Management:off
                      Link Quality:0  Signal level:0  Noise level:0
                      Rx invalid nwid:0  Rx invalid crypt:0  Rx invalid frag:0
                      Tx excessive retries:0  Invalid misc:0   Missed beacon:0
The MicroTik Router is seen.
            root@pika:~# iwlist wlan0 scan
            wlan0     Scan completed :
                      Cell 01 - Address: D4:CA:6D:56:86:59
                                ESSID:"Pirates"
                                Protocol:IEEE 802.11bgn
                                Mode:Master
                                Frequency:2.412 GHz (Channel 1)
                                Encryption key:on
                                Bit Rates:300 Mb/s
                                Extra:wpa_ie=dd160050f20101000050f20401000050f20401000050f202
                                IE: WPA Version 1
                                    Group Cipher : CCMP
                                    Pairwise Ciphers (1) : CCMP
                                    Authentication Suites (1) : PSK
                                Extra:rsn_ie=30120100000fac040100000fac040100000fac02
                                IE: IEEE 802.11i/WPA2 Version 1
                                    Group Cipher : CCMP
                                    Pairwise Ciphers (1) : CCMP
                                    Authentication Suites (1) : PSK
                                Quality=100/100  Signal level=100/100
Contents of /etc/network/interfaces.
            root@pika:/etc/network# cat /etc/network/interfaces
            # interfaces(5) file used by ifup(8) and ifdown(8)
            auto lo
            iface lo inet loopback

            allow-hotplug eth0
            iface eth0 inet dhcp

            allow-hotplug wlan0
            iface wlan0 inet dhcp
              wpa-ssid Pirates
              wpa-psk thepassword
But I have not been able to enable the Wifi.
            root@pika:~# ifup wlan0
            Internet Systems Consortium DHCP Client 4.2.2
            Copyright 2004-2011 Internet Systems Consortium.
            All rights reserved.
            For info, please visit https://www.isc.org/software/dhcp/

            [ 1389.028246] IPv6: ADDRCONF(NETDEV_UP): wlan0: link is not ready
            Listening on LPF/wlan0/80:1f:02:a2:df:94
            Sending on   LPF/wlan0/80:1f:02:a2:df:94
            Sending on   Socket/fallback
            DHCPDISCOVER on wlan0 to 255.255.255.255 port 67 interval 5
            DHCPDISCOVER on wlan0 to 255.255.255.255 port 67 interval 8
            DHCPDISCOVER on wlan0 to 255.255.255.255 port 67 interval 11
            DHCPDISCOVER on wlan0 to 255.255.255.255 port 67 interval 15
            DHCPDISCOVER on wlan0 to 255.255.255.255 port 67 interval 18
            DHCPDISCOVER on wlan0 to 255.255.255.255 port 67 interval 4
            No DHCPOFFERS received.
            No working leases in persistent database - sleeping.
Note, the MicroTik router Wifi is in use by all the laptops we have tried.
Set up wifi
- Installing the Edimax EW-7811UN wireless adapter on Raspberry Pi
- How to Setup Wi-Fi On Your Raspberry Pi via the Command Line
- savagehomeautomation - Raspberry Pi - Installing the Edimax EW-7811Un USB WiFi
- Debian - WiFi How to Use
- jeffskinnerbox - wifi-support-on-raspberry-pi
- Debian page - rtl819x
todo list
done
- password less ssh
- make user a sudoer
- checkinstall and compile tools
- zeromq compile and install
- serial console
todo
- wifi setup
- fixed IP address
- Oracle JVM
- JRuby
- JRuby/Reel test
09 February 2014 » Arduino IDE
Makefile alternative to Arduino IDE
I am goint to try out the Github Makefile project for Arduino from Sudar Muthu
A Makefile for Arduino Sketches - managed by Sudar Muthu
This is a very simple Makefile which knows how to build Arduino sketches. It defines entire workflows for compiling code, flashing it to Arduino and even communicating through Serial monitor. You don’t need to change anything in the Arduino sketches.
Installation Options
Through package
If you’re using FreeBSD, Debian or Ubuntu, you can find this in the arduino-mk package and can be installed using apt-get or aptitude.
From source
Download the latest release
Or clone it from Github using the command git clone Github Repo
Sudar Muthu
Night Dreaming (by Sudar) WordPress, JavaScript, Android, Arduino and some random stuff
Hello and Welcome
I am Sudar and this is my personal site. It serves as a starting point for most of the information I have put on the web. I started this site as a hobby so that I can return back what I can to this online world from where I have learned and still learning so many things. Have a nice sta
Features
- Very robust
- Highly customizable
- Supports all official AVR-based Arduino boards
- Supports chipKIT
- Works on all three major OS (Mac, Linux, Windows)
- Auto detects serial baud rate and libraries used
- Support for *.ino and *.pde sketches as well as raw *.c and *.cpp
- Support for Arduino Software versions 1.0.x as well as 0.x. Support for Arduino 1.5.x is still work in progress
- Automatic dependency tracking. Referred libraries are automatically included in the build process. Changes in *.h files lead to recompilation of sources which include them
Article / guide - Compiling Arduino sketches using Makefile
One of the main reasons why Arduino is very popular with beginners is that it is completely self-contained which makes it very easy to use. Once you have an Arduino board, all you have to do is to download the software and within minutes you can make your first led blink. The software has everything you need right from the IDE, to the compiler and even serial monitor to communicate with Arduino, all within one single package.
While the Arduino IDE is very good for beginners, you might start to feel its limitations, once you start working with it regularly. I use vim for everything and always wished writing Arduino sketches in vim.
I configured Arduino IDE, to use an external editor and started using vim to write code and then Arduino IDE to compile and upload. While this worked for sometime, I started to feel the need for a proper makefile so that I can do everything from vim itself.
My Setup and Use Log
Get the Linux tarball.
            lug$ cd /opt/Arduino
            log$ wget http://arduino.googlecode.com/files/arduino-1.0.5-linux64.tgz
            lug$ tar xzf arduino-1.0.5-linux64.tgz
            lug$ ln -s arduino-1.0.5 arduino
            lug$ ls -l
            lrwxrwxrwx 1 craig craig       13 Mar 23 14:45 arduino -> arduino-1.0.5
            drwxr-xr-x 8 craig craig     4096 May 17  2013 arduino-1.0.5
Install dependencies
The Makefile delegates resetting the board to a short Perl program. You’ll need to install Device::SerialPort and YAML library.
On Debian or Ubuntu:
            apt-get install libdevice-serialport-perl
            apt-get install libyaml-perl
Clone Arduino-Makefile from github
I forked Arduino-Makefile from sudar.
            $ mkdir /opt/sudar; cd /opt/sudar
            $ git clone git@github.com:CootCraig/Arduino-Makefile.git
            $ cd /opt/sudar/Arduino-Makefile
Pull in upstream changes
            $ git remote add upstream https://github.com/sudar/Arduino-Makefile.git
            $ git fetch upstream
            $ git merge upstream/master
Set up git branches for craig local working changes. Leave master as copy of upsteam.
             $ git checkout -b craig
             Switched to a new branch 'craig'
             craig@lug:/opt/sudar/Arduino-Makefile$ git branch
             * craig
               master
             $ git checkout -b craig-develop
             Switched to a new branch 'craig-develop'
             $ git branch
               craig
             * craig-develop
               master
Setup environment variables
What are the avr packages.
            $ dpkg --get-selections |grep avr
            avr-libc					install
            avrdude						install
            binutils-avr					install
            gcc-avr						install
Where are the avr files.
            /usr/bin/avr-g++
            /usr/bin/avrdude
            /usr/lib/avr/lib/libc.a
            /usr/lib/avr/bin/ar
            /usr/lib/gcc/avr/4.7.2/
~/.profile
            export ARDUINO_DIR=/opt/arduino/arduino
            export ARDMK_DIR=/opt/sudar/Arduino-Makefile
            export AVR_TOOLS_DIR=/usr
Example sketch Makefile
/opt/sudar/Arduino-Makefile/Arduino.mk
Per sketch variables
After the global settings, you will need to specify the following variables for each sketch
BOARD_TAG – The Arduino board that you are using. By default Uno is used ARDUINO_PORT – The serial port where Arduino is connected ARDUINO_LIBS – Space separated set of libraries that are used by your sketch
31 January 2014 » NP-100v12 - 12au7 / MosFET Headphone Amp
DIY 12AU7 (ECC82) Tube / IRF510 MOSFET Headphone Amplifier
The NP-100v12 is a simple headphone amplifier that allows an entry level builder to experience assembling and listening to their own creation. I use the term builder as electronic experience combined with innovation which allows the creation of a device, rather than simple board stuffing. This amplifier can take on many shapes and sizes; I especially like when builders reuse older devices as cases and even recycle some components from various discarded power supplies. I try to keep price at a minimum because this amplifier is very basic and allows the builder to seek out theory, and actually “listen” to their music, and grow to build more complex projects in the future.
27 January 2014 » USB Cables
Spartfun - USB Buying Guide
What Does USB Do?
USB cables replace the huge variety of connectors that used to be standard for computer peripherals: Parallel ports, DB9 Serial, keyboard and mouse ports, joystick and midi ports… Really, it was getting out of hand. USB simplifies the process of installing and replacing hardware by making all communications adhere to a serial standard which takes place on a twisted pair data cable and identifies the device that’s connected. When you add the power and ground connections, you’re left with a simple 4-conductor cable that’s inexpensive to make and easy to stow.

What Kinds of Cables are Out There?
99% of host controllers will have a USB-A receptacle, so when you’re looking for a USB cable, you’ll usually be looking for a “USB A-to-something” cable. A lot of the time the USB-A end is assumed, since that’s the connector on most PCs, and cables will be named after the connector on the opposite end. Some smaller hosts use a Mini or Micro receptacle but they usually supply a pigtail adapter to USB-A.
27 January 2014 » Arduino Parts
Arduino boards
FTDI cabling
FTDI Friend + extras - v1.0 $14.75
FTDI Basic Breakout - 3.3V $15.00
FTDI Basic Breakout - 5V $15.00
25 January 2014 » Jeenodes
I just received from Sparkfun a few RFM12B wireless modules to experiment with. They’re great little things – you get a FIFO in, a FIFO out, all the RF stuff is taken care of, and you have super flexibility with all the network layers above that. The best part is, the relatively low complexity compared to something like a ZigBee means both that there’s no extraneous fluff when your application doesn’t need it, and the cost is just right at $7/module in low quantities. But annoyingly, they can be had in a SMD module with 2mm pin pitch – not very 100mil breadboard friendly. Not wanting to deal with that. I whipped up a basic passive breakout board to have on hand. Inevitably, this will see updates as I do things like add regulators and level shifters for particular projects. For now, it just makes breadboarding easy. To get the files, head over to the Github repository at https://github.com/alexwhittemore/RFM12B-Breakout. I’ve ordered 6 from OSHPark, I’ll report back in a couple weeks how they turned out.
This board is the perfect way to interface traditional Arduinos (or other microcontrollers) to JeeNodes. While we like our JeeLink modules a lot, as an easy way to get going with wireless, this board is a quick and easy add-on to Arduinos, to leverage your current technology. The RFM12B Board is a compact breakout board for HopeRF’s RFM12B radio module, as featured on all JeeNode and JeeLink boards. If you are looking for an affordable way to add wireless communication to your Arduino (compatible) board, this is the board to get.
25 January 2014 » Step Light Control
Now looking at Modeino instead of JeeNodes
- Tutorial on MosFET PWM LED dimming
- joost - Dimming 12v LED dimming with MosFET
- instructables - Semiconductor totem-pole
- Adafruit - N-channel power MOSFET - 30V / 60A
- JeeNodes got me looking at arduino with radio
- JeeLabs - Dive into JeeNodes
- Modern Device is US seller of JeeLabs
Radios are available in 433 MHz & 915 MHz in the US, all unlicensed ISM (Industrial, Scientific, Medical) bands.
The JeeNode Kit contains all the parts needed to build a JeeNode v6 – including an ATmega328p processor and an RFM12B radio module. The processor chip is pre-flashed with the Arduino boot loader and the RF12demo sketch, so it works to talk to another JeeNode right out of the box.
- Modern Device - Jee Proto Board $4.75
- Modern Device - JeeLabs Lux Plug
- JeeLabs - Light detector
- Modern Device - JeeLabs Relay Plug $14.00
- Meet the Relay Plug
- Modern Device - JeeLabs MOSFET Plug Kit $14.00
- Modern Device - JeeLabs Dimmer Plug $12.50
- JeeLabs - Meet the LED Node
- Modern Device - JeeLabs LED Node v2 Kit $28.00
- Modern Device - Jee Labs battery power board
- Adafruit - 6 push buttons example
- Modern Device - Jeelabs memory plug
- Adafruit Assembled Data Logging shield for Arduino - ID: 1141
Hardware newbie project - Wireless exterior LED strip control.
Here is an introduction of my first attempt at an Arduino project.
I have installed
260 inches of this 12v LED strip into my front steps.
My estimate of maximum power consumed is 32W as shown here. Their rating is 24W for a 16.4 foot reel. So my power estimate is
260 in. X (24w / 197in) ~= 32W.
The strip is too bright by itself so I use a PWM dimmer from LEDWholesalers set about as low as it will go.
What I would like to do is use a JeeNode and LEDnode pair to make a remote controller for the lights.
- Main control: On / Off / Sunset timer
- Select sunset timer duration: 2 / 4 / 6 hours
- Restart timer momentary switch if in Sunset timer mode.
- Brightness control rotary dial
I’m hoping to get some help and encouragement here and to end up with a sweet controller for our LED step lighting.
Tinker Kit MosFET
This module switches a high current load using a high power transistor. Unlike a mechanical relay, this is capable of high speed switching for use with PWM.
Output: This module lets you control devices operating at a maximun of 24VDC with an Arduino pin. To wire the module, connect the power supply for your device (max 24 V) to the V+ and GND terminals. Connect the device to M+ and M-. Be aware of your circuit’s polarity, you could damage your components if it is not wired correctly.
Module Description: This module features an IRF520 power MOSFET transistor, a kick-back diode, a standard TinkerKit 3pin connector,a signal amplifier, a green LED that signals that the module is correctly powered and one yellow LED whose brightness depends on the input signal received by the module.
SparkFun Rotary Encoder COM-09117
Description: This is a 12-step rotary encoder with a nice ‘clicking’ feel. It’s breadboard friendly, and has a pretty handy select switch (by pushing in on the knob). The encoder is different from a potentiometer in that an encoder has full rotation without limits. The unit outputs gray code so that you can tell how much and in which direction the encoder has been turned.
JeeLabs - 16-channel input multiplexer
The Input Plug is a small board containing a CD4067 16-channel analog multiplexer plus a dedicated ATtiny microcontroller to take care of channel selection. It allows you to connect up to 16 analog inputs to a single AIO pin on any port. There is an “InputPlug” class in the Ports library to interface with this board and perform the channel selection.
This board can also be used as 16-channel digital input multiplexer, and even for digital outputs or PWM – with the restriction than a channel goes into high-impedance mode when not selected (there is no latching or buffering).
Sparkfun - Momentary Push Button Switch - 12mm Square
Description: This is a standard 12mm square momentary button. What we really like is the large button head and good tactile feel (it ‘clicks’ really well). This button is great for user input on a PCB or a good, big reset button on a breadboard. Breadboard friendly!
Sparkfun - TSL2561 Luminosity Sensor Breakout
The TSL2561 Luminosity Sensor Breakout is a sophisticated light sensor which has a flat response across most of the visible spectrum. Unlike simpler sensors, the TSL2561 measures both infrared and visible light to better approximate the response of the human eye. And because the TSL2561 is an integrating sensor (it soaks up light for a predetermined amount of time), it is capable of measuring both small and large amounts of light by changing the integration time.
The TSL2561 is capable of direct I2C communication and is able to conduct specific light ranges from 0.1 - 40k+ Lux easily. Additionally, the TSL12561 contains two integrating analog-to-digital converters (ADC) that integrate currents from two photodiodes, simultaneously. Each breakout requires a supply voltage of 3V and a low supply current max of 0.6mA.
TSL2561 Luminosity Sensor Hookup Guide
| TSL2561 label | Pin function | Arduino connection |
|---|---|---|
| SDA | I2C data | pin labeled A4/SDA |
| SCL | I2C clock | pin labeled A5/SCL |
| GND | Ground | GND |
| 3V3 | 3.3V power supply | 3.3V (NOT 5V) |
| INT | Interrupt | Optional, leave disconnected unless you're using interrupts. |
Adafruit tsl2561 Breakout - wiring Tsl2561 and RTC
Notes on using the Tsl2561 and the RTC both on I2c.
You may be wondering, how is it OK to connect a 3.3V chip like the TSL2561 to 5.0V data pins like the Arduino? Isn’t that bad? Well, in this specific case its OK. I2c uses pullup lines to the 3.3V power pin, so the data is actually being sent at 3.3V. As long as all the sensors/device on the i2c bus are running on 3.3V power, we’re fine. However, don’t use a 5.0v powered i2c device (like the DS1307) with pullups at the same time as a 3.3V device like the TSL2561! If you want to use this sensor with a datalogger that uses the DS1307, remove any/all of the pullup resistors from the DS1307 SDA/SCL pins. The pullups built into the TSL2561 will then be active and keep the voltage at 3.3V which is safe for both the RTC and the sensor.
You don’t need to connect the ADDR (i2c address change) or INT (interrupt output) pins.
The ADDR pin can be used if you have an i2c address conflict, to change the address. Connect it to ground to set the address to 0x29, connect it to 3.3V (vcc) to set the address to 0x49 or leave it floating (unconnected) to use address 0x39.
The INT pin is an ouput from the sensor used when you have the sensor configured to signal when the light level has changed. We don’t have that code written in this tutorial so you don’t have to use it. If you do end up using it, use a 10K-100K pullup from INT to 3.3V (vcc)
Changing the I2C address (ADDR) - default 0x29
Every component attached to an I2C bus has a fixed address from 0 to 127. You can theoretically have a maximum of 128 devices on a single bus, but in practice you are limited to the options available for each part.
The TSL2561 supports three possible addresses: 0x29, 0x39, or 0x49. Practically speaking, this means you can have up to three TSL2561s attached to a single I2C bus.
Which address the part uses is controlled by the solder jumper labeled “ADDR”. When there is no solder on this jumper, the TSL2561 will used the default address of 0x39.
To use one of the other addresses, add solder to bridge the center pad to ONE of the two side pads. If you bridge to the “0” side, the address will be 0x29. If you bridge to the “1” side, the address will be 0x49. Don’t bridge both sides.
Adafruit DS1307 RTC breakout
#define DS1307_ADDRESS 0x68
##
Using Solderable breadboards - Off-board Connections
BPS AN0002 Introducing Solderable PC BreadBoard
Here are some suggestions for connecting power and other off-board signal connections to a solderable PC breadboard:
- Use stranded 22 AWG wire for wire connections running off-board to other boards or devices. Solid 22 AWG wire will crack and break after being flexed many times. Stranded wire can be flexed more times.
- Use a strain relief to keep the wire from flexing at the point where it is soldered. Solder will wick up stranded wire when it is soldered, and make it stiff and susceptible to cracking. Using a strain relief causes the wire to flex away from the solder joint, where it is more flexible.
- Use headers or other connectors with removable plugs for off-board
9/12 to 5v Regulations
Jumptuck - Voltage regulation with our friend the 7805

Electrolytic smoothing caps
- input - 0.33uF
-
output - 0.1uF
- Digikey - 0.1uF. Nichicon UVR1H0R1MDD CAP ALUM 0.1UF 50V 20% RADIAL
- Digikey - 0.33uf. Nichicon UVR1HR33MDD CAP ALUM 0.33UF 50V 20% RADIA
JST PH connectors
Digikey - JST Sales America Inc B2B-PH-K-S(LF)(SN) CONN HEADER PH TOP 2POS 2MM
25 January 2014 » 12b4 Tube
Tube Stores
- vacuumtubesinc 12B4 / 12B4A 5.00
- thetubestore $7.95
- thetubecenter $4.00
- esrcvacuumtubes $4.00
- audiotubes $6.00
12B4 pre-amp recommendation
Audio Asylum - Tube DIY
Two Terminal Constant Current Source
K and K Audio
Low Voltage Power Supply
 After cobbling together untold numbers of small power supplies for
"auxiliary" functions in tube preamps and power amps, I decided to
design something with a regulator that is better than the ubiquitous
7800 series three terminal regulator and try it in places where it
powers something more than relay coils. In locations like low voltage
negative supplies and as power for a USB to SPDIF digital audio converter
I found this supply sonically superior to my previous slapdash efforts.
This power supply uses the LT3080 regulator, which is adjustable by
changing one resistor for output voltages between 1 and 24 volts DC in
this implementation. A charging slope lowering resistor and Schottky
rectifier diodes are provided to be kind to the power transformer and
reduce both supply noise and radiated magnetic field noise. Along with
plenty of output bypass capacitance, this compact package does a thorough
job of supplying up to 4 watts of power at low voltages. Resistors are
provided for 5, 6.3, 8, and 12VDC. You can obtain other 0.25w resistors
for other voltages. The supply can accommodate both 115V and 230V mains
voltage and has an on-board fuse holder for safety. With the standard
supplied 8+8 volt secondary power transformer, the maximum possible DC
current draws are approximately:
After cobbling together untold numbers of small power supplies for
"auxiliary" functions in tube preamps and power amps, I decided to
design something with a regulator that is better than the ubiquitous
7800 series three terminal regulator and try it in places where it
powers something more than relay coils. In locations like low voltage
negative supplies and as power for a USB to SPDIF digital audio converter
I found this supply sonically superior to my previous slapdash efforts.
This power supply uses the LT3080 regulator, which is adjustable by
changing one resistor for output voltages between 1 and 24 volts DC in
this implementation. A charging slope lowering resistor and Schottky
rectifier diodes are provided to be kind to the power transformer and
reduce both supply noise and radiated magnetic field noise. Along with
plenty of output bypass capacitance, this compact package does a thorough
job of supplying up to 4 watts of power at low voltages. Resistors are
provided for 5, 6.3, 8, and 12VDC. You can obtain other 0.25w resistors
for other voltages. The supply can accommodate both 115V and 230V mains
voltage and has an on-board fuse holder for safety. With the standard
supplied 8+8 volt secondary power transformer, the maximum possible DC
current draws are approximately:
- 5VDC 870mA
- 6.3VDC 700mA
- 8VDC 550mA
- 12VDC 470mA
The PC board is 2.75" (7cm) x 3.3" (8.4cm) and the height is 1.6" (4cm).
Low Voltage Power Supply Kit:$36
23 January 2014 » Classic Valve Moosefet
Classic Valve MooseFET Pre

diyaudioprojects MooseFET Preamplifier
| Pre. Part | Description | Geek Order | Coot Order |
|---|---|---|---|
| C1 | United Chemi-Con 3300uF 35V LXZ | 565-2001-ND | 565-1593-ND |
| C2 | United Chemi-Con 47uF 50V LXZ | 565-2004-ND | tbd |
| C3, C4, C102, C202 | United Chemi-Con 10uF 50V KZE | 565-1702-ND | tbd |
| C5 | Panasonic 0.1uF, ECQ Polyester film | EF1104-ND | P4725-ND |
| C103, C203 | Nichicon 47uF 25V Muse Cap KZ | 493-3189-ND | tbd |
| C101, C201 | Vishay/BC Components MKP .22uF 63VDC 2% | BC2062-ND | tbd |
|   | |||
| R1 | Yageo 220 ohm carbon film resistor | 220H-ND | tbd |
| R2 | Yageo 3.9K carbon film resistor | 3.9KH-ND | tbd |
| P1 | Bourns 200R Linear Single Turn Cermet Trimmer | 3362P-201LF-ND | tbd |
| R101, R201 | Yageo 82K carbon film resistor | 82KH-ND | tbd |
| R102, R202 | Matsushita (Panasonic) 470R, 2W Metal Oxide resistor | P470W-2BK-ND | tbd |
| R103, R203 (for IRF510) | Yageo 20K carbon film resistor | 20KH-ND | tbd |
| R103, R203 (for IRF710) | Yageo 22K carbon film resistor | 22KH-ND | tbd |
| R104, R204 | Matsushita (Panasonic) 120R, 2W Metal Oxide resistor | P120W-2BK-ND | tbd |
| R105, R205 | Yageo 220K carbon film resistor | 220KH-ND | tbd |
| R106, R206 | Yageo 150 ohm carbon film resistor | 150H-ND | tbd |
| R107, R207 | Matsushita (Panasonic) 18R, 2W Metal Oxide resistor | P18W-2BK-ND | tbd |
| R108, R208 | Yageo 100K carbon film resistor | 100KH-ND | tbd |
| P102, P202 | Bourns 5K Linear Single Turn Cermet Trimmer | 3362P-502LF-ND | tbd |
|   | |||
| D1, D2, D3, D4, D5 | 1N4007 Diode | 1N4007FSCT-ND | tbd |
| D101, D201 | 1N4739A, 9.1V Zener Diode | 1N4739ADICT-ND | tbd |
| Q101,Q201 | MOSFET N-CH 100V 5.6A TO-220AB | <IRF510PBF-ND/td> | IRF510PBF-ND |
| REG1 | ST Microelectronics LM317T Regulator | 497-1575-5-ND | tbd |
|   | |||
| FB101, FB201 | Ferrite Bead | M8702 | tbd |
| Heatsinks | Bolt on heatsink | HS104-2-ND | tbd |
| J1 | Use a clipped lead from another component | N/A | tbd |
16 January 2014 » Rails Code Sample Recommendation
Rails Code Sample Recommendation
Dan Pickett, Co-Founder at Launch Academy
We recommend to our students at Launch Academy (www.launchacademy.com) that they produce something they’re passionate about.
For some, it’s a nagging problem that they’ve wanted to solve for themselves. Examples from our current cohort include a distraction tracking application and a a responsively designed flash card app that helps you study, For others, it’s around a hobby or something that came up among friends. Someone in our current class is building a restroom finder app for their sister because of a particularly challenging time they had in Maine one weekend :-). For many others, apps originate as startup ideas or to satiate a need they had at their previous job. One student is building a really cool app that puts patients on a stand by list for doctors if there are cancellations.
The common denominator in all of the projects is that there is a story to tell where they’ve found a pain and built an application as a means to heal it. We find it creates a great dialog during the interview process that way.
Our students (Launchers) get particularly hung up if the idea has already been done. Remember the goal: it’s to showcase your coding abilities. Don’t get it confused with building an MVP that you can raise funding for. It doesn’t have to be a revolutionary idea - it just has to provide a challenging opportunity for you to show what you can do.
We call it a “breakable toy” because we aim for it to show a path of development and improvement. Having an interest in the domain is critical, because it encourages you to keep surmounting the technical challenges.
We recommend the following technical components be included:
- An ER diagram demonstrating an interesting or compelling data model
- API integration of some kind (can content be syndicated to facebook or twitter? Is there an interesting source of data you can tie in with?)
- Authentication and authorization
- Use of well tested service objects or Plain Old Ruby Objects (POROs) to demonstrate an understanding of ruby fundamentals
- Integration of some interesting third party code like state_machine, simple_form, or JQuery plugins for an appropriate reason
- A responsive or mobile-first design
- Some JavaScript that interacts with a JSON endpoint via AJAX (ideally with unit tests)
- A rich commit history that shows the evolution of the application and your learnings as a developer. Refactor commits are great for this type of thing!
06 January 2014 » Classic Valve Designs
05 January 2014 » CMoy Headphone amp
How to Build the CMoy Pocket Amplifier
05 January 2014 » DIY Cabling
Shrink Wrap
| Inch | Metric | Cable Organizer | Parts Express |
|---|---|---|---|
| 1/16 in | xxx mm (1.59) | $0.65/ft - black | |
| 2/16 in (1/8) | 3 mm (3.175) | $0.90/ft - Black, Clear, Red, White, Yellow | $2.95 for 8 x 6in - Black, Clear, Red, White, Yellow, Blue, Orange, Green |
| 3/16 in | xx mm (4.76) | $1.12/ft - Black, Clear, Red, White, Yellow | |
| 4/16 in (1/4) | 6 mm (6.35) | $1.38/ft - Black, Clear, Red, White, Yellow, Purple | $2.95 for 5 x 6 in. - Black, Blue, Clear, Green, Orange, Red, Yellow |
| 6/16 in (3/8) | xx mm (9.525) | $1.72/ft - Black, Clear, Red, White, Yellow, Gray, Blue, Purple, Orange | |
| 8/16 in (1/2) | 12 mm (12.7) | $2.03/ft - Black, Clear, Red, White, Yellow, Blue, Gray, Purple | $2.95 for 4 x 6 in. - Black, Blue, Clear, Green, Orange, Red, White, Yellow |
| 12/16 in (3/4) | 18 mm (19.05) | $2.78 - Black, Clear, Red, White, Yellow, Gray, Blue, Green, Purple, Orange | $2.95 for 3 x 6 in. - Black, Blue, Clear, Green, Orange, Red, White, Yellow |
| 16/16 in (1) | 24 mm (25.4) | $3.58 - Black, Clear, Red, White, Yellow, Blue, Green, Purple, Orange | $2.95 for 2 6 in. - Black, Red |
| 24/16 in (1 1/2) | xx mm (38.1) | $6.04/ft - Black, Clear, Red, White, Yellow |
Cable sleeving
05 January 2014 » Project Box Survey
ebay search terms
- extruded aluminum project case
-
aluminum heatsink
- zorotools
- zorotools
- mcmelectronics
- circuitspecialists 6.0” x 4.12” x 2.45” Split Body Aluminum Enclosure
- frontpanelexpress
Hammond
- 1402 Series - Instrument Enclosures - 12 gauge aluminum in contempra grey
- 1455 Series - Extruded Aluminum Enclosures - Metal End Panels
- 1591 “S” Series - Multipurpose Plastic Enclosures - Economical Version
- 1591XX “S” Series - Multipurpose Plastic Enclosures - Economical Version
- 1444 CWW & 1434 Series - Aluminum Chassis & Bottom Plates with Walnut Side Panels
- 1444 & 1434 Series - Aluminum Chassis & Bottom Plates
01 January 2014 » Chip Amp Survey
The safe way to building a Gainclone (chip amp) power supply for beginners.
Firstwatt F2 Build Log
Recently Nelson Pass released the schematic for the Firstwatt F2. It’s a current amplifier that can be used to power single driver speakers (eg, single driver speakers, AKG K1000 and possibly other headphones).
Penultimate Zen is the sum of several incremental improvements
The Penultimate Zen is the sum of several incremental improvements to the original Zen amplifier of 1994. Eight years just flies by, doesn’t it? These improvements are contained in parts 2 through 4 of the Zen Variations, and is likely the last version of this amp, although by no means the end of the variations on the theme of single stage amplification.
In part 2 we developed an improved active current source load for the single gain device which is at the heart of the amplifier. Originally designed for the Aleph amplifier series, this current source doubles the output current and significantly lowers the distortion of the circuit over the original constant current source. As the original Zen amplifier is limited in both power and fidelity, this is a welcome improvement.
The original Zen amp is also limited in its rejection of power supply noise, and benefits from having a quiet, stable power supply. In part 3 we discussed some possibilities for power supply regulation for this and other Zen amplifiers.
The final shortcoming we will address in the Penultimate Zen is the low input impedance. Depending on the version and the desired gain and distortion figures, the original Zen amp has an
build pictures


shine7_GCv2_inside.jpg shine7_reg_PS.gif shine7_RGC_heatsink.jpg shine7_RGC_LM3875.jpg shine7_RGC_regulator1.jpg
http://diyaudioprojects.com/Forum/viewtopic.php?f=10&t=3102&hilit=lm3875&start=0
![]()

ebay search for CPU heatsinks
- cpu passive heatsink
Parts Express Heat Sink
Aluminum Heat Sink Kit 218.44 x 58.42 x 18mm
Penn-Elcom R1196/100 Heat Sink Box 3.54” x 2.0” x 4” L
2U all purpose heat sink box. Suitable for electronic applications, PC mounts, DI boxes, etc.
Penn-Elcom R1199 End Plate For R1197 Heat Sink Box
Endplate for R1197 heat sink boxes. Aluminum construction.
Jameco - 2,360 Hole General Purpose Prototyping Board Single Sided 4.5”x6.5”
Jameco SB300 Solderable PC Breadboard 1 Sided PCB Matches 300 Tie-Point Breadboards
31 December 2013 » Preamp
Current choices
My hunch is a buffer will end up being the system preamp.
2 9v batteries for breadboard
Custom NiMH Battery Pack: 18V 3.8 Ah - $78
Multi-Current Universal Smart Charger for 9.6V - 18V NiMH/Nicd Battery Packs
Sparkfun - Power Connector Basics https://learn.sparkfun.com/tutorials/connector-basics/power-connectors
Boozhound Labs JFET Buffer kit
$19.70 2.1x5.5 plug Mouser Part #: 709-GSM40A24-P1J Manufacturer Part #: GSM40A24-P1J Manufacturer: Mean Well Description: Desktop AC Adapters 40W 24V 1.67A Medical Power Supply
- Requires external 12-24VDC power supply
- Assembled board dimensions (inches): 4.125 x 2.5 x 1.625 (height with standoffs)
$27.00 1000 mAh battery pack made of 20 pcs (2x10) NiCd AA cells
$78 http://www.batteryspace.com/Custom-NiMH-Battery-Pack-18V-3.8-Ah-15-x-4/3A-68.4-wh-Hump-pack.aspx Customized 18V 3.8Ah NiMH battery pack is made of 15 pcs High quality Powerizer brand NiMH 4/3A cells and in nested configuration Capacity: 3800 mAh
$27 http://www.batteryspace.com/Multi-Current-Universal-Smart-Charger-for-9.6V—18V-NiMH/Nicd-Battery-Pack.aspx Universal Fast Smart Charger is designed for charging any NiMH / NiCd Battery Pack from 9.6V - 18V, for 8 to 15 cells pack.
http://www.mouser.com/ProductDetail/Vishay-Semiconductors/TLLR5400/?qs=sGAEpiMZZMtmwHDZQCdlqS9Zeqr1KrsM5usDJZZF%252bjs%3d power indicator led http://www.vishay.com/product?docid=83030 TLLR540., TLLY540., TLLG540. product information Low Current LED in Ø 5 mm Tinted Diffused Package
Forward Current: 2 mA Forward Voltage: 1.9 V LED Size: T-1 3/4 Packaging: Bulk Lens Dimensions: 5 mm x 5 mm x 7.7 mm
http://led.linear1.org/1led.wiz
18v source. 8.2k 1/8w resistor. 1.9v@2ma
http://www.mouser.com/ProductDetail/VCC/CLB300RTP/?qs=%2fha2pyFaduit04BEGf7JTs%2fmxx%252bLC5g%2foRv8v%2fPTRiU%3d VCC CLB300RTP Description: LED Lenses Red Fresnel Lens Cliplite 5mm
MOUNTING: Mounts in a .250 .002 [ 6.35mm .05] panel hole on .375 [9.5mm] centers.
Panel thickness .031 [.8 mm] to .250 [6.35mm]. Panel hole should be deburred, but not chamfered.
ASSEMBLY: Insert lens through panel hole, (for thin panels less than .188 [4.75mm] thick, slide 2. SPC 125 spacer on back of lens), and insert LED into lens.
jBoZ parts
boozhoundlabs on ebay
- 2sk170 JFET transistors - Toshiba - matched quad - 1mA match - GR - 2SK170GR
- jsn@boozhoundlabs.com
- $11.98 including shipping
Parts Express
Dayton Audio DMPC-10 10uF 250V Polypropylene Capacitor 2 X $4.33
25K Audio Taper Potentiometer 1/4” Shaft 2 x $1.55 Part # 023-612
Neutrik NF2D-2 RCA Jack Connector D-Series Red/Nickel 2 x $3.59
Neutrik NF2D-9 RCA Jack Connector D-Series White/Nickel 2 x $3.59
Mouser
Mouser - Eagle Plastic Devices Battery Holders, Clips & Contacts “I” 4” 26 AWG 2 x $.40
Mouser - Eagle Plastic Devices Battery Holders, Clips & Contacts 9V BATTERY CLIP VERT
Sparkfun
Sparkfun - Wire Strippers 30AWG TOL-08696 $4.95
Description: These are good quality 6” wire strippers with 6 gauge settings. We really wanted to stock these because they strip 30AWG wire wrap wire nicely as well as the standard 22AWG hook up wire.
Features: 30, 28, 26, 24, 22, 20 AWG settings
Sparkfun - 30 AWG Wire Wrap Wire - Black $8.95
Bias and gain setting of jBoZ
Nelson Pass - situation with the gain, bias, and resistor values
Since the question has come up and not answered, the situation with the gain, bias, and resistor values is as follows.
The device is self biased, and we want the highest value of bias possible for lowest distortion which makes us want to use a low value Source resistor to ground.
At the same time, it would be nice to not have too much gain by virtue of that Source resistor value. The apparent resistance of the JFET is about 50 ohms, so the gain into a 10 K ohm load is about 1000 / 60 which is about 24 dB.
We can get lower gain, but the distortion will increase - it’s all a trade-off. I didn’t make any effort to exactly optimize these values - they were just thumbnail calculations.
Nelson Pass - best distortion numbers from a 16V supply
I measured the circuit this afternoon, and it came out mostly as expected, but the best distortion numbers came from a 16V supply value.
Preamp
MooseFET
Original MosFET Bride of Zen
Due to its extreme simplicity, the Zen amplifier’s interfaced needs to be indulged a bit, both at the output and also at the input. With respect to its output, it is designed for an 8 ohm load with an efficiency of 94 dB or greater. I have driven the Zen into Thiel 3.6 loudspeakers, 88 dB efficient at 2.3 ohms, but the result is not pretty. With a pair of Klipsch speakers it will throw off its mild mannered disguise and behave like a party animal.
The Zen amp input makes a preamp do a little more work than usual. Depending on the specific input values, its input impedance is typically 4.75 KOhm, and it needs about 2.5 volts input to drive it to full output. Its gain is about 15 dB, which is 10 dB less than most power amps and it requires more signal from the preamp for equivalent levels.
The point of a preamp circuit here is to function as a gain circuit with a high input impedance, a low output impedance, and a volume control. This preamp has a 50 KOhm input impedance, variable gain to about 15 dB, and will deliver the 2.5 volts at .1% distortion or less.
JFET Bride of Zen by Nelson Pass
BoZ thread on diyaudioprojects


Volume Control
We will place the volume control at the output of the circuit, giving us a higher output impedance than is typical. Depending on the position of the volume control, the output impedance will range from 0 to 1.5 KOhms.
Normally you see the volume control potentiometer at the input to the preamp circuit, and in this way you can insure that the input will not be overloaded. Placing the potentiometer at the output has two advantages, however, the first being that all circuit noise will be attenuated as the volume setting is reduced. Placing the volume control at the output allows the input of the gain stage to look directly at the source. This improves the bandwidth and distortion of the circuit by providing a lower RC figure for the input capacitance of the MOSFET. If you desire to place a potentiometer at the input of the circuit, feel free to do so before the input coupling capacitor in place of R107.
Because the input to the Zen amplifier is a resistor operating into a virtual ground summing junction, it is insensitive to a resistive source impedance. The gain of the amplifier will alter by the addition of the source resistance, but the distortion and bandwidth performance will not change appreciably. A circuit driving the Zen amplifier need not have a particularly low output impedance, as long as it is resistive in character.
Is a maximum 1.5 KOhm source impedance a problem? Not in my experience, as long as it is passive in character, as in the case of this circuit which has no feedback. You could conceivably see some rolloff at the top end, but even 1000 pF loading will only take the bandwidth down to 100 KHz.
Bride of Zen FET Preamplifier - Aren van Waarde
The Bride of Zen, designed by Nelson Pass and described in The Audio Amateur, 1994, is a very simple line-level preamplifier which contains just one medium-power MOSFET per channel. It is meant to be used together with the Zen (or Son of Zen) single-ended MOSFET power amp. A complete description of the BOZ can be found at http://www.passlabs.com.Mr.Pass has given a very lucid account of the design philosophy, construction and alignment (the only alignment consists of adjusting the quiescent current which should be 40 mA per channel at a supply voltage of +60V). The lay-out for a printed circuit board can be downloaded from Passlabs.
Zen Amp and Bride of Zen Preamp
Bride of Zen - SE preamplifier with only a single active device (MOSFET) per channel
- allelectronics - Solid Hook-Up Wire, 25 Foot Rolls
- jameco - Wire Wrap Kynar Red 100 Feet 30AWG
- allelectronics - 1-TERMINAL STRIP
- allelectronics - 1 LUG 1 GROUND TIE POINT
- allelectronics - 2 LUG 1 GROUND TIE POINT
- allelectronics - 8-LUG TIE POINT STRIP
- surplus-electronics-sales - 5 Lug Terminal Strip
- Surplus Sales - Terminal Strips: Phenolic Lug Type - Old Fashioned
Forums
31 December 2013 » VSPS MM Cartridge Phono Pre
VSPS MM Cartridge Phono Pre
diyaudio thread on phonoclone and vsps
31 December 2013 » Phonoclone Low Output MC pre
Phonoclone Low Output MC pre
Phonoclone 3 Dual-Mono MC Phono Stage with X-reg
Build A PhonoClone 3 on a PCB Powered by Batteries
Denon DL-103r
Denon DL-103R Specifications
- Output: 0.25 mV
- Output impedance: 14ohms
- Stylus: 16.5 Micron round tip
- Coils: copper (6N)
- Frequency range: 20Hz-45kHz
- Tracking force: 2.3-2.7g
- Compliance 5x10⁻⁶cm/dyne
- Weight: 8.5g
Phonoclone Gain Resistor Selection Utility
(c) 2009 RJM Audio
- Cartridge Impedance 14 Ohms * input fields in red, output in black
- Cartridge Output 0.25 mV * check units!
- Phonoclone R1 14 Ohms * optional
- Phonoclone R2 559.999999999999 Ohms * round off to nearest convenient value!
- Phonoclone Gain 62.0411998265592 dB * consider switching to OP37 in IC1 if Gain > 80 dB
results above will insure output is gain-matched to a typical CD player
30 December 2013 » Random Audio Parts
Random Audio Parts
C&K Brand Silver contact toggle switches
Switch types for home brew Cinemag SUT?
RE: Switch types for home brew Cinemag SUT?
Posted by steal2B (A) on December 22, 2013 at 12:29:12
In Reply to: RE: Switch types for home brew Cinemag SUT? posted by John Elison on December 22, 2013 at 11:42:24:
C&K Brand Silver contact toggle switches
RE: “C&K Brand Silver contact toggle switches”
Posted by 1973shovel (A) on December 23, 2013 at 01:48:49
In Reply to: RE: Switch types for home brew Cinemag SUT? posted by steal2B on December 22, 2013 at 12:29:12:
Yep, that’s what I used when I built my CineMags. They’re a quality switch, relatively inexpensive, and readily available at Mouser, etc.
30 December 2013 » Philips CDC-935 CD Player
##
Don Allen Audio Mods
DIY Audio Mods
DAC to RCA gain
CDR with test tone
Possible Audio Section
Hagerman Piccolo MC Headamp
$149 box 1/2 kit
The Piccolo is an active moving coil pre-preamplifier designed to step-up the cartridge signal from MC to MM levels. Adjustable loading and gain offers optimization for any MC cartridge. The discrete JFET circuit offers super-quiet and distortion-free operation. Compatible with any MM phonostage.
Power is provided by either 4 internal AA batteries or a 120Vac external supply. The circuit employs super low-noise matched JFETs in a differential configuration, but tapping only the non-inverting leg for the output buffer, which can drive long cable runs. Careful attention to layout and wiring eliminate ground loop problems.
The Piccolo is offered as a “box/2”, which is not a full kit, but includes a blank PCB with the JFETs already soldered in place, the metal blue case (silkscreened), and a few assorted hardware pieces. Basically, it is a half-kit plus box. This makes assembly very easy for DIYers.
JdsLabs CMOYBB DIY KIT $42
This kit contains all components required to electrically assemble a rechargeable cMoyBB v2.03R: all standard resistors, capacitors, jacks, connectors, ICs, and circuit board. No battery, knob, or enclosure. Soldering required.
The cMoyBB makes a great first time soldering project. This kit contains all default components necessary to build the rechargeable cMoyBB v2.03R.
OBJECTIVE2 DIY KIT $69
This kit contains all components necessary to build the Objective2 circuit board: all standard resistors, capacitors, jacks, connectors, ICs, and circuit board. No battery, knob, or enclosure. Parts arrive individually packaged and labeled for your convenience. Soldering is required.
26 December 2013 » Cubox Volumio
25 December 2013 » Volumio
Solidrun Cubox
toslink interface
DACs
- Tascam US-322
- Tascam US-366
17 December 2013 » TosLink Digital
Todd Krieger on Audio Asylum
Digital Audio Cables, Premium Quality Toslink connectors, 1.0 mm low loss POF fiber, 2.2 mm OD PE jacket - GH4001 http://www.i-fiberoptics.com/patchcord-series.php?summaryrow=8&series=700
TASCAM US-366 4-In/6-Out or 6-In/4-Out USB Audio Interface http://www.amazon.com/TASCAM-US-366-6-Out-4-Out-Interface/dp/B00BG6ZM8W/
17 December 2013 » New Phonograph system ideas
Technics DD turntable - mk2 sl 1200 or 1600 or 1700
Denon DL-103R MC cartridge http://usa.denon.com/us/product/pages/productdetail.aspx?catid=accessories(denonna)&catalog=denonna_us&pid=dl103r(denonna) $250 http://www.newaudiounited.com/index.php?route=product/product&product_id=828
“Piccolo” MC Headamp ($149 box/2) http://www.hagtech.com/piccolo.html
“Bugle2” Phono $189 http://www.hagtech.com/bugle2.html
TASCAM US-366 4-In/6-Out or 6-In/4-Out USB Audio Interface http://tascam.com/product/us-366/
http://www.alesis.com/masterlink
OPAMP based phono preamp with accurate RIAA EQ. Posted by mwhouston (A) on November 22, 2013 at 16:05:51 http://www.audioasylum.com/forums/amp/messages/19/190400.html
Inspired by parts of a system by John Elison on AudioAsylum
New turntable. Technics sl-1600 Mk2 or Technics sl-1700 Mk2
http://forum.audiogon.com/cgi-bin/fr.pl?eanlg&1284826376&read&keyw&zzblackbird+audio
http://www.audiokarma.org/forums/showthread.php?t=300402
http://forums.stevehoffman.tv/threads/what-cartridge-for-technics-sl-1200mkii.142415/
http://www.audioasylum.com/cgi/vt.mpl?f=vinyl&m=727493
texanater Audiophile Posts: 1189 Location: San Antonio, TX Joined: December 16, 2002
You do NOT need to further dampen the table. The table is waaaay over damped for use in clubs etc…
All you upgrade ideas are great except the isoplatmat and the stock feet. Get rid of the matt all together and use Olly’s cork/foam spot matts. Contact him via the website. He just gives them away, and as far as I can tell, really enjoys doing so. Just drop him a line with your address.
Second - get rid of the stock feet. Got to madisound and get some feet spikes. It’ll cost you less than $20. Make sure you get the right thread though. I think most use 6mm but mine is 1/4 20. go figure. Those two improvements alone will blow you away. I say forget trying to replace the tonearm, just rewire the stock one. This is the biggest single upgrade you can make in my opinion.
anumber1 Manufacturer Posts: 5834 Location: West Michigan Joined: June 4, 2001
The auxiliary counterweight is cheap ($7) and available from KAB.
I stuck a fender washer to my stock counterweight to get me going in the heat of the moment but installed the auxiliary weight about a week later when my order from KAB came in. Using the Technics auxiliary counterweight allows you to continue to use the Technics tone arm’s tracking force markings (which turn out to be surprisingly accurate in my experience).
The Sumiko HS-12 adds about 7 grams of mass over the stock Technics headshell and works great with the DL-103 on the Technics arm. Much better than using the stock Technics headshell! Save that stock one for running a MM cartridge.
Having interchangeable headshells and several spare cartridges all aligned and waiting is quite nice actually. I have three cartridges ready to play on my SL-1200 MkII, a Shure M97xE, an AT 140LC and the Denon DL-103 in a Sumiko HS-12 headshell.
It takes like five minutes to swap out a headshell and reset the tracking force, anti-skate and vertical tracking angle (I have the settings written down for each so my feeble mind can remember the optimal settings for each).
what
The Denon DL103R is a low-output moving coil type cartridge. It has .27mv output and an internal impedance of 14 ohms. The weight is 8.5 grams. It tracks at 2.4 - 2.8 grams. It has a spherical stylus with a surface hardness orientation toward the contact surfaces. The cantilever is double walled aluminum. The coils are wound of 99.9999%(6N) oxygen free copper. Compliance is 5 cu.
$400 at Amazon
$250 at http://www.newaudiounited.com/
MC Phono pre
Hagerman Bugle 2 http://www.hagtech.com/bugle2.html
http://theartofsound.net/forum/showthread.php?27458-Hagerman-Bugle-2 What attracted me to this phono preamp is the use of the LM4562 (an opamp I’ve been interested in for some time) and the very clever PSU to power everything.
RJM Audio Phonoclone 3 Dual-Mono MC Phono Stage with X-reg
http://herbiesaudiolab.net/ttmat.htm
K and K SUT
KAB Mods recommended
RE: Next upgrade? Posted by John Elison (A) on November 18, 2013 at 18:17:46 In Reply to: Next upgrade? posted by golgi on November 18, 2013 at 17:36:09:
I never heard my SL-1200 Mk2 without the Cardas rewire because I bought it from KAB with the mods already installed. I did however listen briefly without damping fluid in the KAB tonearm damper and when I added the fluid bass became tighter and clarity improved. Now, Kevin at KAB feels the Cardas rewire is the most significant upgrade ― I don’t know. I have always felt tonearm damping to be very important, too.
My SL-1200 is connected to a Bob’s Devices 1131 SUT into a Yaqin MS-22B phono stage and I am very impressed with the Yaqin tube phono stage. I don’t know that it would be any better sounding than your Cambridge 640P, but it’s the first inexpensive phono stage that I find enjoyable and very listenable.
Good luck, John Elison
LP cleaning
RE: “purpose designed cleaning brushes” Posted by JefferyK (A) on November 16, 2013 at 09:01:23 In Reply to: “purpose designed cleaning brushes” posted by Mike Porper on November 13, 2013 at 08:34:15:
I use a clothing lint brush, the kind you can get for a couple of bucks at just about any drug store: paddle shaped, fabric pad, plastic handle. The dye on the red ones can run if you use an cleaner with alcohol in it. If that’s a problem for you, look for a different color. I found a gray one at a Japanese “dollar” store for $1.50. Works perfectly.
RE: “purpose designed cleaning brushes” Posted by user510 (R) on November 14, 2013 at 15:02:24 In Reply to: “purpose designed cleaning brushes” posted by Mike Porper on November 13, 2013 at 08:34:15:
For the past several years I’ve been using the cleaning brushes offered by disc Doctor. I also use their cleaning solutions, fwiw. And I have learned to make efficient use of these. The Disc Doctor brushes have been copied by other companies. The Mo-Fi brush would be one example. And there may have been some litigation over that particular issue. Mo-Fi and Disc Doctor.
In any case, what makes the Disc Doctor brushes really work is the shape of the frame that holds the brush fabric. The fabric appears to be a dense velvet material. The frame is an extruded piece of hard rubber. When you buy a pair of brushes from Disc Doctor it will come with some extra velvet pads. These have a self adhesive backing. Any problem with the fabric, remove it and install a new piece.
The reason for two brushes is simple. One for detergent. The other for rinse. don’t mix these or you contaminate your rinse with more detergent. common sense alert.
Scrub with detergent and brush
Followed by a tap water rinse (how I use it) Yes, use running water to rinse the detergent from the record. Don’t soak the label while you’re at it.
The second brush / distilled water, (rinse). The process is to spread distilled water over the record, then sponge it up with the “rinse brush”. The distilled water is an important part of the process. It removes whatever impurities were left over from the tap water rinse.
And this would be my “kitchen sink method”. Although I haven’t yet mentioned that I use a spare turntable platter, with its rubber platter mat, placed on the kitchen counter top next to the sink. this is an important fixture for the process.
To buy the disc doctor brushes; these can be found at many audio retailers that sell his products, or you can buy directly from disc doctor. See link below.
http://www.mofi.com/product_p/mfslbrush.htm
12 December 2013 » Max 3232 IC for microcontroller RS232
codeandlife article on Raspberry PI, MAX3232 and warning
Raspberry Pi Serial Console With MAX3232CPE
In addition to the audio, video, network and USB connectors, the Raspberry Pi also has 26 GPIO pins. These pins also include an UART serial console, which can be used to log in to the Pi, and many other things. However, normal UART device communicate with -12V (logical “1″) and +12V (logical “0″), which may just fry something in the 3.3V Pi. Even “TTL level” serial at 5V runs the same risk.
So in this short tutorial, I’ll show you how to use a MAX3232CPE transceiver to safely convert the normal UART voltage levels to 3.3V accepted by Raspberry Pi, and connect to the Pi using Putty. This is what you’ll need:
Breadboard picture
Raspberry Pi Application picture
Sparkfun Max3232 breakout
Being a lazy sort, this $5.95 breakout looks like just the ticket. There are 2 ports so one can be used as a debug console, the other to connect an external RS232 device. This would fit nicely with Raspberry Pi and Arduino projects.
Description: The ‘must have’ IC for TTL/CMOS projects finally has its own breakout board! This is the RS232 converter IC that is capable of running at 3V and communicating with 5V logic.
We’ve taken the SOIC package MAX3232 and broken out all the pins you need to set up your RS232 to TTL connection. We’ve also included the necessary 0.1uF charge pump capacitors. Also remember that because the MAX3232 operates at a broader voltage range than the 232 (3 - 5.5V) you can use this on both your 3.3 and 5V projects!
Sparkfun Max3232 breakout top

Sparkfun Max3232 breakout bottom
11 December 2013 » Hardware Project - Wifi controlled LED panel
Strawman component list
- Raspberry Pi with USB WiFi
- Peggy 2LE Light Emitting Pegboard kit
- Sparkfun - MAX3232 Breakout
Components in hand
- Peggy 2LE Light Emitting Pegboard kit
- Raspberry Pi with USB WiFi
- Max232CPE
Components to consider
- Peggy 2LE Light Emitting Pegboard kit
- Spark Core for WiFi
- Sparkfun - MAX3232 Breakout
- JeeLabs UART Plug
Microcontroller platform
Peggy 2LE
Serial interface on Peggy 2LE
You can use it to send or stream data or images to the Peggy. (Note that the pins used to replace the serial port otherwise go to the I2C interface and to button b5 on the PCB. So, you’ll need to choose between I2C and Serial when you build it.)
Arduino and the I2C bus
JeeNode format microcontroller and interconnect
JeeNodes are a collaboration between Modern Device and a talented and energetic engineer, Jean-Claude Wippler.
The JeeNode Kit contains all the parts needed to build a JeeNode v6 – including an ATmega328p processor and an RFM12B radio module. The processor chip is pre-flashed with the Arduino boot loader and the RF12demo sketch, so it works to talk to another JeeNode right out of the box. Kits are shipped with the ISM-band 915 or 434 MHz radio module for orders within the Americas
I2C on JeeNodes
Flashback – Ports and I2C in JeeLib
JeeLabs UART Plug
The UART Plug contains a hardware serial port with 64-byte buffers for both sending and receiving. It can support baud rates up to 115200 baud, though this will probably tax the bus through which it is being accessed.
An I2C bus running at 3.3V is used as interconnect, with all the power and signal lines brought out to to both sides of the board to allow daisy-chaining with other I2C-conformant boards.
The two solder jumpers on the board allow up to four UART Plugs to be used together on the same I2C bus.
Beaglebone Black as platform
BeagleBone Black at Adafruit - $45
If you liked the BeagleBone, you will love the next gen BeagleBone Black! With a blistering 1GHz processor, 512MB onboard DDR3 RAM, built in 2GB storage with pre-installed Linux operating system (no microSD card required!), and best of all, the addition of a MicroHDMI connector for audio/video output. This is a ultra-powered embedded computer that can fit in a mint tin. Note: As of October 24, 2013, 11:15amET Adafruit is shipping Rev A6.
07 December 2013 » TI CC3000 WiFi chip
- TI SimpleLink CC3000 WiFi
- Spark Core WiFi KickStarter
- Adafruit CC3000 WiFi Breakout
- Spark Core Web Site
Competitors
- HI-LINK HLK-RM04 Serial Port-Ethernet-Wi-Fi Adapter Module
- OpenWrt Page on HLK-RM04
- Adafruit Electric Imp April prototype board
- Adafruit Electric Imp module
- TP-Link TL-WR703N
- Hackaday - Tiny WiFi modules, again
- jeelabs on Carambola 2 OpenWrt
- Nut and Bold on Carambola 2 OpenWrt
- Avians blog on Carambola 2 OpenWrt
07 December 2013 » DIY Li-Ion battery pack
DIY Li-Ion Battery Pack
07 December 2013 » DIY Subwoofer
Subwoofer
07 December 2013 » Coaxial Power Connectors
07 December 2013 » FM Stereo Transmitter for home audio
- SainSonic 0.5W Long Range Dual Mode Stereo Broadcast FM Radio Transmitter
- Page at SainSonic
- Rainbow FM transmitter
04 December 2013 » Vintage Receivers
Vintage Receivers
JVC JR-S501
RE: Receiver with a good tuner
Posted by Brian Levy (A) on October 27, 2009 at 07:41:32
In Reply to: Receiver with a good tuner posted by Mayflower on October 25, 2009 at 14:51:47:
McIntosh MAC4100 should do the trick and within your price range. Others:
JVC JR-S501 120 watts with a tuner that does well. What you lose in the difference if price between it and the MAC4100 is the refinement of the Mc plus the build quality but, the cost difference may be worth it.
Don Brian Levy, J.D. Toronto ON Canada
Vintage Integrated
### OT, but…seventies Japanese amps Posted by Munkie_NL (A) on November 20, 2013 at 03:08:34
Just scored this 70s vintage Akai AM-2200 stereo amp in a thrift. 15 euro grand total. 1 day warranty! So at home i immediately hooked it up. Lots of noise coming from the scratchy pots and switches but it worked on both channels.
The next day, the usual routine. Removed the case. Blew out the dust. Sprayed contact cleaner in the pots and switches and turned and switched them many times. Clened the alu front and the “wooden” case.
Always amazing how the sound cleans up after a bit of TLC. No hum. No scratchy pots anymore. Nice clean clear sound on my Rotel CD player (15 euro) and KEF Chorale III speakers(10 euro). Then i hooked up my Thorens Td145mk2(5 euro, OK ex VdH rewire…)/Pickering XV15. Spinning an old James Taylor record. Wow what a sound, wide deep stereo image.
Akai was a mainstream Japanese hifi brand back then, this was their BOTL stereo amp. This was affordable stuff. I see a big power trafo in there, big elco’s. Alu front, big metal case, wooden top. It screams quality. Now we stream MP3’s from our smartphones to our bluetooth boomboxes. I’m getting old and pessimistic…
#
RE: OT, but…seventies Japanese amps Posted by Biff (A) on November 20, 2013 at 11:10:45 In Reply to: OT, but…seventies Japanese amps posted by Munkie_NL on November 20, 2013 at 03:08:34:
I have a Toshiba “super receiver” (SA-7100) that weighs about 60 pounds and boy does it put out the sound. Great stuff.
04 December 2013 » Tuners of Interest
Tuners of Interest
Adcom Gft 1a
Affordable on ebay right now. Try this some time.
Marantz ST6000
Top choice right now.
Yamaha T-1
Affordable on ebay
- 1/2/2013 $41 2 bids
Harman/Kardon HK-930 Receiver
Posted by Todd Krieger (A) on October 25, 2009 at 23:19:45
In Reply to: Receiver with a good tuner posted by Mayflower on October 25, 2009 at 14:51:47:
If you can drop about 4 dB (40 wpc), I’d recommend the vintage Harman/Kardon HK-930…….. One of the best FM tuners I’ve heard, receiver or separate.
If you must have 100 wpc, I’d recommend either a used Onkyo TX-8500 (not Mk II) or Sansui G-901 DB (not G-9000 DB).
Kenwood KT-880D
The Kenwood KT-880D is an inexpensive AM/FM tuner with remarkable performance. It is sensitive. It is one of the few tuners immune to HD Radio self-noise without modification. Distortion is extremely low, and unlike many tuners, doesn’t rise for weak signals. Finally, resistance to front-end overload rivals that of tuners with balanced mixers. The KT-880D uses simple, straightforward circuitry that works so well you wonder why designers ever bother with fancier circuits.
Grundig S350DL
RE: Portable radio with line out?
Posted by Brian Levy (A) on August 20, 2009 at 16:47:12
In Reply to: Portable radio with line out? posted by dean_martin on August 20, 2009 at 14:32:35:
Grundig S350DL has line outputs. When using them the FM output is in stereo. Also, the radio allows a double set of batteries to be installed so if one set dies, just flip the switch and you are good to go though the D cell battery life is excellent. It is decent enough that it makes for a good system tuner on a budget. I liked them enough to buy a pair.
Don Brian Levy, J.D. Toronto ON Canada
Rotel RT-990BX
Rotel RT-990BX (1993, $750) search eBay The FM-only RT-990BX is almost as good as the very similar RHT10 at a much lower price, according to our panelist Bob (see Bob’s review of the RHT10 above). It is not as rare as the RHT10 and usually sells for $175-340 on eBay. It has a remote control, which is required to access the 16 presets, but Bob says the RT-990BX sounds so good that it is worth buying even without the remote. Other front-panel controls are stereo/mono switch, RF attenuator, wide/narrow bandwidth selector and signal-strength indicator. Our contributor David Rich notes that the RT-990BX has a double-tuned filter at the antenna and is double-tuned after the RF amp. Here’s Bob’s comparison of the RHT10 and RT-990BX: “The RHT10 and RT-990BX are essentially the same tuner, with major cosmetic and minor parts and circuit differences. They use the same remote control codes, although again, the remotes are different in appearance. They also use the same circuit board and parts designations on the board, although the boards are different in color. The RT-990BX is missing parts in one area, where the stereo blend circuit is implemented. They have the same RF front end and sine wave type stereo MPX circuit. Alignment procedure is the same for both. Here is a list of functional differences I’ve compiled:
Luxman T-117
The “sleeper” for me has been the
Posted by DKL (A) on April 23, 2009 at 13:23:36
In Reply to: Why expensive vintage tuners and ultra expensive modern ones? posted by Mercury Boy on April 14, 2009 at 00:21:23:
Luxman T-117 - this is a fabulous tuner for the money (available only used of course as it was produced in the 80’s). I’ve owned a couple of MD-102s from Magnum Dynalab and the Luxman comes very close to the sound quality of these units, which retail for over 2k. I even prefer the Luxman to the Classe Tuner-1 (but did love having the remote control) except in the bass department, where the Classe seemed to excel even over the more expensive MD-102…
Kenwood KT-990D or Sansui TU-D99X
Kenwood KT-990D or Sansui TU-D99X
RE: Help with Selection of Appropriate Tuner?
Posted by Neff on November 17, 2008 at 18:44:16
In Reply to: Help with Selection of Appropriate Tuner? posted by Jim Hodgson on November 17, 2008 at 12:11:28:
Many FM stations are also transmitting HD FM in NYC that interfers with analog FM. You also need good selectivity. I recommend Kenwood KT-990D or Sansui TU-D99X that will reject the HD part of the signal due to the Multiplexer design. Both tuners are quite sensitive & rated high for good sonics.
Kenwood KT-7500
RE: Suggestions for selective portable FM radios?
Posted by Jim in Blacksburg (A) on November 9, 2008 at 21:13:16
In Reply to: Suggestions for selective portable FM radios? posted by triamp on November 9, 2008 at 18:11:55:
Maybe a vintage tuner like a Kenwood KT-7500, when modified can provide some amazing selectivity. But of course, it’s the antenna that really brings home the bacon…if he doesn’t have a Yagi on a rotator, that’d be something to look in to. A big Yagi like an APS-14 does wonders for rejecting unwanted signals if the receiver’s front end is capable of dealing with the increased signal strength without overloading :)
Grundig Satillit 800 - Eton/Grundig S350DL
Grundig Satillit 800 - Eton/Grundig S350DL
RE: Suggestions for selective portable FM radios?
Posted by Brian Levy (A) on November 11, 2008 at 13:25:33
In Reply to: Suggestions for selective portable FM radios? posted by triamp on November 9, 2008 at 18:11:55:
I know this will get some hoots but if you want selectivity try a car radio. They are not the most senstive but excel in selectivity. Other than that possilby the Grundig Satillit 800. Also, I have a Eton/Grundig S350DL that seem quite decent and I’ve not experienced any issues with adjacent channel selectivity. The 800 has been discontinued but they are available used for reasonable dollars and the S350DL seems to be withdrawn quite recently but new ones should be around.
01 December 2013 » Kerosene Hurricane Lantern
Kirkman #2 Lantern
- W.T. Kirkman #2 “Champion” Cold Blast Lantern
- Lehmans - Champion Galvanized Lanterns
- Zombie Squad review
25 November 2013 » LP Storage
These units were custom made for an LP collector. Each unit weighs 7 pounds and is 12½” wide, 14” high and 13¼” deep. Each unit will hold 70 or more LPs.

![]()
22 November 2013 » LedWholesalers LED Strips
LED Sizes and Types
| LED Type SMD2833 |
| LED Type SMD3015 |
| LED Type SMD3528 3.5mm * 2.8mm. |
| LED Type SMD5050 5.0mm x 5.0mm |
Products
            http://www.ledwholesalers.com/store/index.php?act=viewProd&productId=723
            Bright LED Flexible Strip with 300xSMD5050 LED 16 Feet 5 Meter Nonwaterproof 12 Volt DC
            $42.00

            LED Quantity/Type	300xSMD5050
            Input Voltage	12VDC
            Power	72W
            View Angle	120 Degrees
            Available Colors	White 5000-6000K	Neutral White 4000-4500K	Warm White 3100-3400K
            Light Output (lumen)	3400	3230	3060
            Length	16.4ft (5m)
            Strip Width	10mm
            http://www.ledwholesalers.com/store/index.php?act=viewProd&productId=474
            16.4 ft / 5M Flexible LED Lighting Strip 300 SMD3528 with 3M Tape
            $15.99

            LED Type	SMD 3528
            Number of LEDs	300
            View Angle	120 Degrees
            Light Output
            900-1100 lumen
            Power	24W
            Input Voltage	12VDC
            Current	2A
            Strip Width	8mm
            http://www.ledwholesalers.com/store/index.php?act=viewProd&productId=755
            High Color Render Index 300 SMD3528 LED Lighting Strip 16.4ft with 3M Tape 3100K Warm White
            $38.00


            LED Type	SMD 3528
            Number of LEDs	300
            View Angle	120 Degrees
            Lumen	900-1100 Lumen
            Power	24W
            Input Voltage	12 VDC
            Current	2 Amps
            Strip Width	8mm
            http://www.ledwholesalers.com/store/index.php?act=viewProd&productId=619
            16 Feet Double Density Flexible Light Strip with 600xSMD3528 LED 12 Volt


            LED Quantity/Type	600xSMD3528
            Input Voltage	12VDC
            Power	48W
            View Angle	120 Degrees
            Available Colors	White 5000-6000K	Warm White 3100-3400K	Warm White 2700-3100K
            Light Output (lumen)	2200	1980	1870
            Length	16.4ft (5m)
            Strip Width	8mm
            http://www.ledwholesalers.com/store/index.php?act=viewProd&productId=563
            16.4 Feet 300xSMD3528 LED Flexible Strip with Waterproof Sleeve LED Ribbon 5 Meter Reel 12 Volt
            $19.99

            LED Quantity/Type	300xSMD3528
            Input Voltage	12VDC
            Power	24W
            Current	2A
            Lumens	900-1100
            Viewing Angle	120 degrees
            Length	16.4ft (5m)
            Width	8mm (10mm including sleeve)
            IP Rating	IP66
            http://www.ledwholesalers.com/store/index.php?act=viewProd&productId=843
            IP68 Fully Submersible Waterproof LED Flexible Strip with 300xSMD3528 5m Reel
            $36.00

            LED Quantity/Type	300xSMD3528
            Input Voltage	12 Volts DC
            Power	24W
            Light Output (lumen)
            900-1100
            IP Rating
            IP68
            Viewing Angle	120 degrees
            Length	5m (16.4ft)
            Strip Width	8mm (10mm including coating)

            Warm White (3100K - 3400K)
            White (5000K - 6500K)
            http://www.ledwholesalers.com/store/index.php?act=viewProd&productId=748
            Waterproof Decorative Side View LED Flexible Strip 16.4 Feet 300 SMD LED 12 Volt
            $65.00

            LED Type	SMD3015
            LED Quantity	300
            Input Voltage	12 Volts DC
            Power	15W
            Light Output (lumen)	400-600
            Viewing Angle	120 Degree
            Length	16.4ft
            Waterproof Rating	IP66

            Blue
            Warm White (3100K - 3400K)
            White (5000K - 6500K)
            http://www.ledwholesalers.com/store/index.php?act=viewProd&productId=887
            Waterproof Epoxy Gel 5m (16.4ft) 300xSMD3528 LED Flexible Strip with White Background
            $24.00

            Waterproof Rating
            IP65
            LED Type
            SMD 3528
            LED Quantity
            300
            Length
            5m (16.4ft)
            Width
            8mm
            View Angle
            120 degrees
            Light Output
            900-1100 lumen
            Power Consumption
            24W
            Input Voltage
            12VDC
            Input Current
            2A

            Warm White (3100K - 3400K)
            White (5000K - 6500K)
            http://www.ledwholesalers.com/store/index.php?act=viewProd&productId=847
            Brightest Waterproof Fully Water Submersible RGB Color Changing Flexible Strip with 300 5050 SMD LED 12 Volt, 16.4 Feet
            $75.00

            LED Type	SMD 5050 RGB
            Number of LEDs	300
            View Angle	120 Degrees
            Lumen	1600
            Watt	72 Watts
            Input Voltage	12 Volts DC
            Current	6 Amps
            Width	14mm
            http://www.ledwholesalers.com/store/index.php?act=viewProd&productId=996
            Water-Resistant IP65 Flexible LED Light Strip with 300xSMD2833 16.4 Ft and 3M Adhesive, White PCB Backing
            $48.00

            LED Quantity/Type	300xSMD2833
            Input Voltage	12VDC
            Power	28W
            View Angle	120 Degrees
            Available Color Temperatures	White
            5000-6500K	Warm White
            3100-3400K
            Light Output (Lumen)	2900	2700
            Width	10mm
            Length
            16ft
            PCB Color
            White
            Waterproof Rating
            IP65
            http://www.ledwholesalers.com/store/index.php?act=viewProd&productId=550
            Waterproof LED Driver Transformer 60 Watt 12V with 3-prong Plug
            $28.00
            http://www.ledwholesalers.com/store/index.php?act=viewProd&productId=603
            Waterproof LED Driver 150 Watt 3 Prong Plug, 12 Volt Dc
            $68.00
22 November 2013 » Tear Drop Trailers
Inspiration


Links
- MAKE: PROJECTS - By Werner - Teardrop Camper Trailer
- Instructables - Teardrop Trailer by e1ioan
- Kuffel Creek teardrop trailer plans
21 November 2013 » CCRadio EP portable
CCRadio-EP AM/FM Portable - A Bob Grove What’s New Review
Larry Van Horn, New Products Editor
While it may seem strange that we would be reviewing anything as plebian as an AM/FM portable radio, there is a method to our madness. For several years, GE offered their “Superadio” to the consumer market; it had good sound, sharp AM selectivity, and external antenna connections. The radio sold in the $50-$60 range, and was very popular with domestic AM broadcast DX- ers. When it was discontinued, we had a surge of inquiries for a replacement, but none was to be found. Will the new CCRadio-EP be the answer?
The radio has decent sound, good AM selec- tivity, wide/narrow FM selectivity, and external antenna connectors. It has the traditional, analog, slide-rule tuning dial which may be backlit for night viewing.
Its 4-inch, self-contained speaker delivers room-filling sound with notable bass and clean highs with minimal distortion. Separate bass and treble controls invite custom high/low roll-offs to suit the listener’s preference. If you have a set of stereo headphones, a stereo output jack provides that listening mode as well. There is also a line-in jack in case you have a personal MP3 or other player that you’d like to hear through a larger speaker.
The radio runs on either four D cells (not included) or a 120 VAC/6 VDC wall adapter (included). A snap-up/snap-down carrying handle facilitates transport.
The CCRadio-EP is simple to operate and should appeal to techie types with its unique “Twin Coil Ferrite” AM fine tuning knob. This is an RF peaking adjustment for the antenna input, depending on the frequency being received. It works with both the internal and external antenna.
It appears that the choice of external an- tenna is rather critical, and experimenting with optimum length and placement may be necessary to avoid “swamping” that tuning circuit, as well as avoiding common mode (ground loop) hum. I suspect that a shorter outdoor wire antenna would be better than a long one.
The internal ferrite loop antenna remains in service with the external antenna attached. If you were experiencing electrical noise interfer- ence, it will still be there, hopefully attenuated somewhat by stronger signal strengths brought in by the outdoor wire. It is advisable to attach a ground wire to that respective terminal as well to avoid AC hum and other electrical line noise. If such interference persists, battery operation and/ or relocation of the radio are recommended.
An FM internal/external switch allows selection of an outdoor antenna via a TV-style F connector. The benefits and disadvantages of high sensitivity become immediately apparent when switching between antennas. With the radio’s telescoping whip, distances of up to 100 miles are readily received at my location; switching to an external beam, strong signal overload clouds reception of weaker signals.
The AM wide/narrow IF filter selection is appropriately labeled “Music” and”Voice.” The wide bandpass allows more highs for in- creased music fidelity, while the low bandpass restricts the bandwidth to reject the frequencies not required for speech reception. Additionally, the independent bass and treble controls have a profound effect on emphasizing or attenuating the high and low audio frequencies.
The accuracy of the printed frequency dial on our particular sample was excellent for FM, but rather arbitrary for AM. Of course with any analog-dial AM/FM radio, you tune for best reception, not for what the print on the dial says.
The CCrane Radio-EP has good sensitivity and the 4-inch speaker delivers credible sound, enhanced by the separate treble and bass controls. Its AM selectivity switch is very effective for reducing adjacent channel interference. FM sen- sitivity is excellent, providing distant reception through its telescoping antenna.
With so many off-the-shelf AM/FM radios now readily available from chain stores and at widely disparate prices, it’s hard to compare them fairly. Taking the radio at its face value – an AM/ FM portable with good sound and sensitivity – the CCrane Radio-EP does its job well.
| CCrane Radio-EP lists for $69.95 from |
| C. Crane Company, Inc., |
| 1001 Main Street, Fortuna |
| CA 95540, (800) 522-8863 |
| http://www.ccrane.com/radios/am-fm-radios/ccradio-ep.aspx |
21 November 2013 » Tuned Loop AM Antenna
Parts
- amateurradiosupplies Copper Antenna Wire - 100 Feet - $26
- amateurradiosupplies Budwig End Insulator
- amateurradiosupplies Dogbone Insulator
- amateurradiosupplies No. 18 AWG CopperWeld Antenna Wire - 50 FT
- Wireman - 501 - 18 AWG solid copper-clad steel
- Wireman - 890 PULLEY, 3/4” - marine type, swivel - for 3/32” - 3/16” rope
- Wireman - 810 Budwig brand end insulators, HQ-2. Fiberglass-reinforced ABS plastic
- Wireman - 813 End insulator (pair), 3” mineral filled acrylic
- Parts Express - magnet wire
Modify that AM antenna by Bruce Carter
Modify that AM antenna by Bruce Carter
Nice article, with # loops vs. area table.
Tune your antenna for better DX - Construction of random length wire AM antenna
Tune your antenna for better DX
by Roy A. Walton (adapted by Bruce Carter)
If you use a “Pi-Section Coupler”, your antenna can be as short as 30 feet or as long as 100 feet. The combination can be made to work efficiently at all frequencies between 500 and 6800 kHz.
A MAGNETIC LOOP ANTENNA FOR SHORTWAVE LISTENING (SWL)
A MAGNETIC LOOP ANTENNA FOR SHORTWAVE LISTENING (SWL)
The PVC Loop Overall Article
Article
How to build a tuned loop antenna
http://www.iw5edi.com/ham-radio/?how-to-build-a-tuned-loop-antenna,118
Chris Ridley - BUILD A TUNED LOOP
How can you vastly improve your Medium Wave reception? its quite simple really, all you need is 120 foot of wire, a few lengths of timber and an old tuning capacitor with which you can build the answer to every DX’ers prayers, a tuned loop antenna.
MTM Scientific, Inc… AM Radio Loop Antenna
Our AM RADIO DX LOOP ANTENNA converts your portable transistor radio into a long distance receiver
Pickup Loop for AM Loop Antenna
The coupling from the antenna to the radio is through the ferrite loop antenna inside most portable AM radios. We have received several inquries about the possibility of conneting the antenna to a regular component receiver. Although every situation is different, it is generally easy to do.
Review - MTM Scientific AM Loop Antenna
The MTM Scientific AM Loop Antenna is quite a different animal from all of those however for a few reasons. First it is a large square wood frame loop measuring slightly over 17” per side which makes it at least twice the size of the other passive AM loops I mentioned. This seemed like an exciting prospect as it seemed likely it would be able to capture more signal than the smaller loops.
Loop Antennas
A loop antenna is a small multi turn loop of less than 1/10th wavelength in length. The loop is wound on a form, which may be either box (solenoid), or spiral (pancake) wound. The core material can either be air, or a powdered iron compound (Ferrite). The gain of a loop is much less than a longwire, but it has much less noise pickup. A properly designed Loop primarily responds to the magnetic component of the radio wave. Note that noise resides primarily in the electrical component. A vertical antenna responds mainly to the electrical component.
Photos of PVC Loop antennas
A loop antenna is an antenna primarily for the AM broadcast and the Longwave bands.
Loading Inductors
The Radio Board - Loop antenna questions
exray
I think the generalization about ‘how many feet’ is more of a ballpark consideration. If you’re using a typical BCB range tuning cap like 365-400pf you’re going to fall into the 50-75 ft range almost inherently for most practical sizes and thats never been a bad thing.
Now if you want to use something like 200 feet of wire (a la some of these wacky broomstick or liter-coke bottle ideas) and find a cap to tune it with you’ll immediately see the uh-oh at 1700 kcs. And the other extreme…20 feet of wire at 550kc.
That said, you’ll run into the unavailability of standard parts and having to multi-bandswitch the thing to cover BCB probably before you will encounter the differences in actual peformance.
If you are building a 2-3’ size loop with a typical BCB cap you can tune the entire range without tapping it. The difference in wire length should not be noticeable.
Medium Wave One Tube Loop Radio
I am proud to introduce you to my first loop tube radio. I had this in mind for a while and it took me a long time to get started. The radio design was simple, but how was I to make this into another show piece radio? Do I make it into a 1920’s look, or a rock n’ roll 50’s radio? This one is both. The design, and parts are something that you might have seen in a 1950’s Poptronics magazine. Then there are some hints that have that definite roaring 20’s look. The loop itself is an example as well as the art deco Garolite® front panel. The wood base gives this radio a breadboard look. I sure did it all. This puppy kept me up nights thinking how I was going to build her. I like that curve that decorates the front panel. I used a large pizza pan as a guide.
The radio is a simple regenerative type using a 6418 subminiature tube. This is a pentode tube that has a 30 volt plate maximum rating. The filament runs on 1.25 volts at 10ma. With 18 volts on the plate and a low current filament, the batteries will last a long time.
20 November 2013 » Turntable Search on Ebay
ebay search terms
current interest
- technics 1600 mk
- technics 1700 mk
- Denon DP-30L II
- pioneer pl-400
consider
- JVC QL-7
rejected or inactive interest
Ebay listings
| Turntable Model | Ebay Listing | Selling Price | Sell Date |
| Technics SL-1600 MK2 TURNTABLE | 271299494979 | 350.00 | Oct 29, 2013 13:45:44 PDT |
| TECHNICS SL 1600 MARK 2 | 251362297565 | 208 + 109 shipping | Oct 27, 2013 18:29:58 PDT |
| SL 1600 with AT96E cartridge | 281182870809 | 250 + 35 shipping | Oct 11, 2013 20:53:57 PDT |
| Technics SL-1600 - Shure cart? | 121219798724 | $199.95 + $35 shipping | Nov 26, 2013 18:00:24 PST |
| Technics SL-Q2 w/ Shure VN35MR | 181261064764 | $125 + $24.25 shipping | Nov 20, 2013 08:19:26 PST |
| Technics SL-Q2 - No cart. or headshell | 251373692355 | $79.95 + $25.86 shipping | Nov 12, 2013 18:45:00 PST |
| Technics SL-Q2 w/ cartridge | 380762438153 | $56.00 + $21.91 shipping | Nov 11, 2013 11:00:23 PST |
| TECHNICS SL-Q2 WITH ADCOM CARTRIDGE | 121202932974 | $66.00 + $49.35 Shipping | Nov 03, 2013 08:23:45 PST |
| Technics SL-Q2 - no headshell or cartridge | 321240830150 | $129.00 + $35.00 Shipping | Ended: Nov 01, 2013 16:28:26 PDT |
| Technics SL-Q2 w/ cartridge | 390674041010 | $125.00 + $24.00 Shipping | Oct 06, 2013 14:13:14 PDT |
| Technics SL 1200 M3D Turntable | 281218250234 | $525 + $49 shipping | Dec 03, 2013 12:08:47 PST |
Listing Details
281182870809
Up for sale, is an excellent condition, one owner, automatic Technics SL 1600 Direct Drive System Turntable, with very low hours, that I’ve purchased when it was brand new.
It is nearly pristine cosmetically. Dust cover has couple scratches (see pictures).
No cracks, or chips anywhere on dust cover, or on the TT, hinges work as new, nice and snug.
Tone arm starts and returns to the correct point of record every time, and all functions work perfectly, as they should.
Turntable comes with Audio Tech. Stereo Cartridge AT96E
This SL 1600 has audiophile level performance, sounds amazing, it is a heavy and sturdy turntable, has superior accuracy, warm clean sound, and all in perfect working condition.
251362297565 VINTAGE-TECHNICS-SL-1600-MARK-2-QUARTZ-DIRECT-DRIVE-AUTOMATIC-TURNTABLE
Up for sale this week is this RARE vintage Technics SL 1600 Mark 2 Quartz Direct drive automatic turntable. It comes with an original V15 type III Super Track Plus Sure Cartridge.
Faint, barely visible scuffs on the dust cover. The base of the turntable is scuff free and very clean.
The turntable works, I have used it to play my vinyls but the queue button, the pop-up light and the start stop button does not work either. The green quartz lock light does not come on but keeps perfect RPM.
Information on the Technics SL 1600
AudioAsylum Post
I almost bought another 1200 awhile back but went for the 1600 MK2
Posted by matt67bianco (A) on December 3, 2008 at 21:51:49
In Reply to: Best vintage technics direct drive turntable? posted by audionewbie27 on December 3, 2008 at 18:02:26:
…Don’t get me wrong, I love the 1200—it’s a ‘fun’ table—but the 1600 MK2 is a ‘different animal’ or flavor in the best way possible. The 1600 MK2 to me sonically represents why I thoroughly enjoy playing records; The music sounds very much alive on one of these decks!
It’s a turntable and an investment you will not regret—but, if you opt not to go with the 1600 MK2, keep your eye open for these solidly built,reliable models that are just a few steps beneath the hierarchy of the 1600 MK2 and the 1200 MK2—–Technics SL Q2, SL Q3, SL Q202, SL Q 303.—I own two of these models and am very happy with them and ZERO mechanical or electronic issues with them.None whatsoever, and they are circa 1980-81.
Technics SL 1600 / 1700 Mk2
AudioAsylum - Need Technics SL-1700 mkII information
Opus 104 - MK II versions are Quartz-Lock
All Technics MK II versions are Quartz-Lock, not servo., posted on July 20, 2011 at 17:04:01
Opus 104
Yes, the arms in the MKIIs are similar. Plus, IIRC, it has a suspended subchasis holding the platter and arm. My SL-1600 MKII had this, too, and it was on a par, performance wise, with my SL-1200 MK2. There is a source for the small belt that operates the cueing system. Try www.electronicplus.com. The part number is 1407-52, and the cost as of 11/27/03 excluding shipping is $4.00.
matt67bianco - The 1700 MK2 is the semi-auto model
The 1700 MK2 is the semi-auto model of the 1600 MK2 that I have…, posted on July 20, 2011 at 18:11:02
matt67bianco
Location: Phoenix, AZ
Except the 1600 MK2 is a full-auto/start-stop ‘table, but can be used as a semi-auto, as well.
The 1700 MK 2 has:
A servo-motorized arm using a belt(independent from any linkages,gears,etc. connected to the platter motor). You manually cue it up but the arm will return by itself at the end of play to the resting position(hence, semi-auto).
The top plinth is die-cast aluminum(no plastic).Double suspension system/isolators/shocks/springs.Inner base is TNRC material(Technics Non Resonance Compound,rubber, like the 1200 MK2).
The motor(even specs),platter,mat,arm(sans auto feature) are exactly the same as the 1200.It’s a brushless DC,Quartz speed controlled motor for better(more accurate) pitch,wow & flutter specs than if it was just a regular servo motor used on their lower end models.
Now, this is what I found out about the differences between the playback sound characteristics and anti-resonant plinth damping qualities between the 1600 MK2/1700 MK2 versus the 1200 MK2.— I currently own a 1200 MK2 and a 1600 MK2 for several years,now( I actually had a 1200 M3D(MK2) model,but, sold it years ago and just a month ago bought a 1200 MK2)… Don’t be fooled by the 1700 MK2 weighing less than the 1200 MK2. Its iso-sprung suspension does the job that it is intended to do—and VERY well indeed, I might add;Keeps any external unwanted vibrations from speakers,footfalls,etc. isolated or at bay.
While the 1200 is heftier than the 1700/1600 MK2, if you finger tap test the top plinth on the 1200, you can still hear a light ‘thud’ out the speakers(though,compared to lighter tables I’ve owned, it’s still obviously well damped). Finger tap the top of a 1700/1600MK2 and nothing!No ‘thud’ sound. Nada. I was really impressed and taken aback by how well the 1700/1600 MK2 were well made back in the day and outperformed a 1200 MK2 in that respect!
Sound and music-wise,the stock 1200 MK2 does come across very pleasing and GOOD to these ears(my ears, my experience). Yes, it does have what some call a somewhat “dark” or slightly heavy sonic characteristic and presentation with the music—the louder you crank your system it becomes more evident(the TNRC plinth doing its job).
In contrast, the 1700 MK2/1600 MK2 does NOT have this same sonic or musical playback characteristic. Music comes across as more lively. The louder I crank my system, I detect no “heavy solid” sound as I do with the 1200. There is something to be said for some suspended turntable plinths when that design is executed very well(Technics definitely knew what they were doing with the 1600 and 1700 MK2’s).
Going from your SL D2 to the 1700 MK2 is night and day—I had an SL D2,also.What you have to look out for is the tonearm belt needing to be replaced(as the automated servo arm cueing belts are known to malfunction from age). On the 1700 MK2, you do not have a cueing mechanical arm lever like on the 1200, only a button on the front control bezel; It’s done with the arm servo belt motor.If the belt goes, you have no arm lifting or lowering function.
I can tell you that others I’ve talked to over the years who own the 1700 MK2 and 1600 MK2(including myself)absolutely enjoy what these particular Technics models can do; Both automatically and sonically!!They were the sleeper cousins to the 1200 MK2.Also, when these vintage ‘tables are modified,tweaked,customized,the results take them to a whole ‘nother level of great performance. Over the years, I’ve heard more comments about the(stock) 1200 not being musical enough, or detailed,or well imaged versus what I’ve heard and experienced with the other MK2 models.The 1200 MK2 and 1700MK2,despite sharing a lot in common, except for suspension design and automation, are two different flavors IMHO and experience; One’s vanilla and one’s chocolate—I like both.
(Btw, VA inmate, Scott Thompson—and I am ever so grateful to the man—introduced me to what the 1600 MK2 is capable of doing as I own one of his 1600 MK2 models).
I hope this helps.
Cheers,
Matt
Information on the Technics SL-Q2 and SL-Q3
Audio Asylum - Technics SL Q2 and Q3….
Technics SL Q2(Quartz speed accurate,heavy,well damped die-cast metal plinth)—Simple,reliable,easy to use, semi-auto return(manual start u
A couple of SL Q3’s (Full auto, Quartz speed accuracy,memo-repeat, can be used as a semi-manual by cueing tonearm yourself instead of letting autofunction take over)…
Q2 is semi-auto (arm returns at end of play), BUT you can still use as partial manual since you have to cue it up yourself…The SL Q3 is the one I have (I have two of them)…I know you said full manual.However, again, you can maually cue up the tonearm if you want, overriding the auto-start… Very solid and underrated decks from Technics…They do have some of the 1200 heritage in them—The motor may not be as torquey as the 1200’s but same direct drive AND Quartz speed accurate design… My Q3’s are from 1979 and they still are FULLY operational in 2009(30 year old ‘tables !)—NEVER has the full auto mechanism posed a problem or breakdown…The die-cast metal plinth itself is heavy (not as heavy as the 1200’s) and very well damped from unwanted vibrations…It’s practically a plug n’ play……..The Q2 is also a VERY simple and straightforward deck to use.For EASY and extremely low maintenance, I add 1 or 2 drops of spindle bearing oil every year or couple of years.
What the Q2/Q3 lack are pitch control(cannot override or play with the quartz accurate function)and no adjustable tonearm VTA height adjustment as on the 1200 MK2.—So, if you are looking for those features, these Technics don’t have them.
The Q2/3 are very reliable and economical solid turntables.—Super smooth damped cueing as well.Soundwise,they are also clean sounding decks(clean presentable bass,mids,highs,decent detail).I have also NEVER modded,tweaked,repaired, or have done anything to these fine underrated decks—Again, I do stress their great and super dependable reliability factor from my experience of owning them for years;They are no-nonsense decks that perform admirably…
The Q2 and Q3 are like the ‘younger’ or smaller siblings of the 1200 MK2 and 1600 MK2 (bear a closer resemblance to the 1600 MK2)…
Audio Asylum - Welcome to the VA!….Whatever you do,DO NOT…
…get rid of that Technics SL Q2—-I have two Q3’s that have a few more automated features than the Q2…Both the Q2 and Q3 are VERY reliable and sharp looking decks as I’m sure you know already.I’m a fan of those ‘tables.My SL Q3’s have been performing flawlessy since 1979-(30 years and going strong).I just apply a drop or two of spindle bearing oil once a year.According to the Vintage Technics site, the Q2 was $200 with the Q3 at $240(MSRP prices).
Denon
AudioAsylum - reelsmith - In the day of the DP-52F …
straight-forward table called the DP-30L
In the day of the DP-52F …
Posted by reelsmith. (A) on April 2, 2009 at 13:21:53
In Reply to: Denon DP 1200 vs. Denon DP-52F posted by scottier1 on April 2, 2009 at 12:25:51:
…Denon also sold a very straight-forward table called the DP-30L. It was essentially the base, motor and platter of the 50 series, but with a plain-Jane S-shaped arm …rather than the arm of the 52F with its electronic resonance control. I worked in a hi-fi shop at the time and it was very hard to sell the 52F if folks listened to the 30L. The 30L was less expensive and better sounding.
Recommends
- Technics sl1200
- Technics sl1600
- Akai AP 206/207
- Philips 800 series. 212, 312, late 70s models like 777, 829
- Pioneer Pl-12D, PL-120
- Technics SQ DD. 1300/1400/1500
- Technics SL 1600mk2, 1700mk2
- Dual 500 series. 700 series, 505, 1249, 1019
- Sansui SR222, 525
- Russco/Rek-O-Kut (US inmates)
- Denon DP-30L II
I hardly ever see a good 70’s TT anymore in the thrifts. Online there is less supply and the prices have gone up. Sellers want 200 euro for a Thorens TD160 with the heavy arm. There are still vintage TT’s flying under the radar so to speak, Akai AP 206/207, Philips 800 series, Pioneer Pl-12D, Technics SQ DD, Dual 500 series.
Sympathy for the Bottom Feeder - a new FAQ?
Posted by plantsman (A) on September 5, 2006 at 05:12:57
I’ve been trying to help a poster on the Record Collectors Guild Forum who is trying to get into vinyl for dirt cheap. My thought is that there are probably quite a number of people out there for whom the $400+ for a decent new turntable is really a huge amount of money. Maybe we ought to combine our expertise to put together a buyers guide to inexpensive used turntables: which ones are worth looking for and which ones to avoid plus notes on how to check for serious problems. I’m talking about tables that someone has a realistic chance of finding used in good condition for less than $200, ideally less than $100. There probably should be a parallel FAQ about cheap cartridges.
My nomination: the Denon DP-30L II - this is a competitor for the Technics SL-1200 series but it has a lower mass arm (dynamically balanced/no servo) better suited to high compliance moving magnet or moving iron cartridges.
I’ll let the Thorens, Technics and Dual experts fill in their nominations in those lines. JVC? Pioneer? Kenwood? Yamaha?
I would avoid the Philips GA-212/312 series - in my experience the arm “bearings” (I think they may actually be delrin bushings) don’t age very gracefully. IMO No P-Mounts!
Saves me from posting the same post every time!
Posted by Munkie_NL (A) on September 5, 2006 at 05:54:48
In Reply to: Sympathy for the Bottom Feeder - a new FAQ? posted by plantsman on September 5, 2006 at 05:12:57:
- Pioneer Pl-12D, Pl-120
- Sansui SR222, 525
- Dual 700 series, 505, 1249, 1019
- Thorens : almost any model except 105, 110 and post the year 2000
- Philips 212, 312, late 70s models like 777, 829
- Luxman 70s/early 80s (tends to be expensive though)
- Garrard SP25mk4
- Technics 1300/1400/1500
- Lenco L75/76/78 (when you’re living in UK/Europe)
- Russco/Rek-O-Kut (US inmates)
cartridges: Shure M75/95/97/V15III, AT95/110/120, Ortofon (super) OM20, ADC XLM mk2, Stanton 681EEE, Pickering V15
RE: Best Choice for Used Table $200
Posted by caligari (A) on July 22, 2011 at 22:12:01
In Reply to: Best Choice for Used Table $200 posted by DrD on July 22, 2011 at 16:45:25:
All used direct drive turntables mostly under $200 with integrated tonearm. Some might cost a little more but if you play your card right, you can still get them in the $200 range. In that range, I usually look for ones with a coreless motor for my personal sonic taste.
- JVC QL-7
- JVC QL-A7
- JVC QL-F6
- JVC QL-Y55F
- JVC QL-Y3F
- Kenwood KD-770D
- Pioneer PL-570
- Pioneer PL-550
- Pioneer PL-600
- Pioneer PL-500
- Pioneer PL-L1000
- Sony PS-X50
- Sony PS-X60
- Technics SL-150Mk2 (no arm)
- Technics SL-M2
- Yamaha YP-D71
How To Find ebay Best Offer Sold For Prices
Youtube Instructions using WatchCount web site
Get the listing number anto browse to
Enter the listing number into the Keywords entry

19 November 2013 » Hardware Hackers
19 November 2013 » Cable Making Skills
Videos
- TubeDepotTV - How To Build A Better Instrument Cable
- TubeDepotTV - How To Build a Better Speaker Cable
- TubeDepotTV - How to Solder
- How to Make A Custom Audio Cable - Quarter Inch to RCA
- Proaudio Stash - How to Build a Microphone Lead Using Neutrik XLR’s 2011
- MDR Electronics - How to make your own RCA Cable
- DIY Mike How To Make an Audio Interconnect I/C for under $10
- Parts Express - How to make a 1/4” Speaker Cable
- Mike Spreitzer’s Gear Geek - Soldering Guitar Cables Part 1
- Allied Wire & Cable - Heat Shrink Tubing Sizes: How-to Measure for the Right Size
- NJprepper321 - How To Solder - Intro/Joining Stranded Wires - Part 1
- How To Solder Wires Together (Sort of) - EricTheCarGuy
- ilektronx - How to solder wires together, easily and professionally
- 4Diyers - DIY: Soldering Wire
- Flite Test : Solder Thick Gauge Wire - FAST TIP
- How to Solder : Soldering Connectors to Instrument Cable
- ThePureMixTutorials - Soldering a Guitar Cable
- Ric Wallace - Soldering 101: Audio Cabling & Shielding
- Ric Wallace - Cable Wrapping: A Detailed Explanation
- Techflex Sleeving at Parts Express
- wirecareTV - How To Use a Hot Knife To Cut Braided Expandable Sleeving
- How to build a Guitar Lead with Neutrik Jacks - Proaudio Stash
Forum / Blog Cable making
- AVSforum - DIY Speaker cable tutorial guide
- DIY Audio Projects - Shielded RCA Interconnect Cables
- DIY Audio Projects - Low-Inductance DIY Hi-Fi Speaker Cables
- DIY Audio Projects - RG-59 DIY RCA Interconnect Cables
Wire
Seen on ebay - 5 feet stranded 30 AWG Silver Teflon Wire Yellow White
Hobby Engineering
- H04425-01Y
- Hook-Up Wire 26 AWG
- Stranded Gray
- (25’ Spool)
- $2.79
Stranded copper hookup wire for general wiring that may be subject to repeated vibration or flexing that can lead to breaks in solid wire. The wire consists of 7 strands of 34ga wire. Each strand is individually tinned to minimize oxidation and ease soldering without reducing flexibility. PVC insulation rated to 300v. Maximum recommended current 2.2A. UL style 1007. Outside diameter .051”.
MicronMeters
- UAA3201
- Insulated Wire 32 AWG
- 1x32 AWG
-
$0.30 / ft
- UBA3219
- Insulated Wire 32 AWG
- 19x44 AWG
- $0.42 / ft
Priced Per Foot. Weight:0.00 Regular Price: $0.44 Micron’s Web Price: $0.42
- UAA3401
- Insulated Wire 34 AWG
- 1x34 AWG
-
$0.29 / ft
- UAA3407
- Insulated Wire 34 AWG
- 7x42 AWG
- $0.34 / ft
digikey
Digikey - Alpha Wire - 5851 RD005
- $72.00 / 100 ft.
- Wire Gauge 30 AWG
- Conductor Strand 7/38
- Conductor Material Copper, Silver Coated
- Jacket (Insulation) Material Polytetrafluoroethylene (PTFE)
- Jacket (Insulation) Diameter 0.032” (0.81mm)
- Jacket (Insulation) Thickness 0.010” (0.25mm)
- Length 100’ (30.5m)
Digikey - Alpha Wire - 3047 BK005 - 30awg PTFE insulation - 100ft.
$37.44 / 100 ft
jameco
- Jameco - Wire Wrap Kynar Black 100 Feet 30AWG (100 Foot Rolls) $11.95
- Jameco - Ul1007-1569 28 Awg Stranded Hook Up Wire 100 Feet Black $6.95
AdaFruit
Perfect for bread-boarding, free wiring, etc. This box contains 6 spools of solid-core wire. The wire is easy to solder to and when bent it keeps its shape pretty well. We like to have a few spools of this stuff around which is why this set is quite nice! We suggest picking up wire strippers to match. Wire gauge is 22 AWG which we’ve found is the best all-around gauge, it works best with breadboards and perfboards but also fits in terminal blocks nicely
This box has a wooden dowel rod to hold the spools in place and let them spin, and there are little punch-outs you can pass the wire through so its it’ll stay nice organized.
MCM Electronics
- MCM Electronics - 22awg Hookup Wire NTE Electronics WH22-09-100 $11.99
- MCM Electronics - Hookup Wire -300vhu 100ft Stranded 26ga-blk NTE Electronics WH26-00-100 $10.49
comments seen
For TS I use Gepco GLC20, and for TRS I use Gepco X-Band XB201M. Can’t forget the switchcraft 280 and 297 connectors either!
Belden 8410 for TS, Belden 8412 for TRS/XLR
Canare L4E6S and Neutrik connectors for for internal rack wiring.
Galco has nice wire lookup
Canare Star Quad Microphone Cable (L-4E6S / L-4E5C)
L-4E6S The premier Star Quad cable for all handheld microphone applications. Flexible, satin smooth to the touch and extra strong, this standard diameter, 21 AWG cable fits perfectly in all XLR-type audio connectors. Forty separate strands in each conductor eliminate breakage due to flexing. Available in 10 beautiful matte finish color jackets.
L-4E5C A narrow profile version of L-4E6S. Specifically designed to save space and reduce weight during remote field expeditions or confining installations.
$0.55 / ft
Highest signal isolation, unbelievable flexibility and durability. Special no-glare cable jacket. Used by America’s leading soundmen and audio engineers. The first choice for hand-held microphones.
Flexible, smooth to the touch, extra-strong standard diameter (21 AWG) STAR QUAD cable that fits perfectly in all XLR-type connectors. With 40 separate strands in each conductor, breakage due to flexing is all but eliminated. Available Colors: Black, Blue, Brown, Grey, Green, Purple, Orange, Red, Yellow, White. Sold Per Foot or by the roll. Quantity Discounts Apply, Please Call For Pricing !!
Applications:
- Microphones
- Portable Applications
- Audio Rack Wiring
- PA Systems
- Audio Patch Cords
Features:
- Braided Copper Shield
- Flexible in Extreme Cold Weather
- Cross Linked PE Insulation
- Reduced Handling Noise
- Rejects EMI and RFI
- 10 Matte Color Jacket Selections
Canare GS-4 Instrument Cable
- Guitar / Keyboard / Instrument Cable
- Model Number
- GS-4
Miniature size 22 AWG version of GS-6. Good choice for short run unbalanced audio interconnects and general instrumentation cables.
Canare GS-4 Guitar / Keyboard / instrument Cable
Canare L-2B2AT
- Two-Conductor Shielded Cables (Single) Aluminum Foil Shield (L-2B2AT)
L-2B2AT Canare’s thinnest profile audio hookup wire. Amazingly flexible, with 100% foil shield, drain wire and PVC jacket that strips easily for rapid assembly. Suitable for large cable harness bundles, mixing consoles, tape machines and inner-rack wiring.
Mogami W2330 Interconnect Wire
$0.59 / ft.
The Mogami name is synonymous with high quality and is used worldwide in the best recording studios. With a diameter of only 3mm / 0.118 inches, this cable was designed for excellent sound in a compact package. Using high purity copper shielding ensures very low noise, while the high purity copper center conductor conveys ultimate tone. Special nylon tensile strengtheners inside the conductor yield mechanical strength that is much higher than any comparable diameter cable. The cross-linked polyethylene dielectric is heat resistant and will not shrink as quickly as pvc. If you want the best wire to go from your front panel controls to your preamp tubes, then this is it. Another cool aspect of this cable is it uses low noise cross link poly insulation, so is relatively non microphonic in high impedance circuits…like tube amps.
- Part No.: W2330
- No. of Conductor: 1
- Conductor Size(mm2): 0.08mm2(#28 AWG)
- Insulation Material: LNXLPE (Low Noise Cross - Linked polyethylene)
- Insulation Color: Clear
- Jacket Ov. Dia.(mm): 3.0Ø (0.118”)
- Jacket Material: Flexible PVC
- Jacket Color: Black
Gepco - Single & Dual-pair: 22 Gage
Industry standard balanced audio cable for permanent installation. Stranded tinned-copper conductors are easy to solder or punch-down. A high grade polyethylene dielectric is used to minimize high frequency attenuation, while excellent process control and tight pair twisting achieves superior noise rejection. Foil shield with same gage drain wire facilitates quick shield termination. Twentytwo gage conductors offer the lowest DCR available in any Gepco single-pair product. Ideal for punch-down, rack wiring, and extended distance runs of mic level signals.
Gepco - Single & Dual-pair: 24 Gage
72401EZ 1 24 AWG (7X32) Stranded
Thin profile, balanced audio cable for applications that require a reduced diameter and/or weight. Stranded tinned-copper conductors are easy to solder or punch-down. A high-quality polyethylene insulation minimizes cable capacitance in conjunction with excellent process control and tight twisting for superior noise rejection. Foil shield with same gage drain wire facilitates quick shield termination. Twenty-four gage conductors are easier to terminate while still maintaining low DCR. Ideal for patchbay wiring or mobile production trucks.
Plugs
Try out Calrad soon
- Calrad connectors
- Markertek - Calrad 3.5mm stereo connector
- Markertek - Gold RCA Plug black or red ring
Try out Connectronics soon
- Markertek - Connectronics Stereo 3.5mm Mini Plug Connector
- Markertek - Connectronics Deluxe RCA Connector Red or Black ring
- Markertek - Connectronics Premium Gold RCA Male Solder Connector red or black ring
Amphenol T Series 1/4” plugs
- TubeDepot - Amphenol TM2PNJ 1/4” Straight Audio Plug
- TubeDepot - Amphenol TM2PJ 1/4” Straight Audio Plug
- Parts Express - Amphenol TM2PB 1/4” Mono
Switchcraft 3.5mm plugs
Amphenol 3.5mm Plug
Amphenol RCA plug
http://www.amphenolaudio.com/Amphenol_RCA.html
| Parts Express has colors: red | black | white | yellow |
Switchcraft 2 conductor 1/4” commercial plugs
Switchcraft 3 conductor 1/4” commercial plugs
Switchcraft straight RCA plugs
- Markertek has Switchcraft long body RCA
- TubeDepot has Switchcraft 3502A RCA Plug
- Parts Express - Switchcraft 3502A RCA Plug Nickel $2.29
Neutrik PX Series 1/4 inch plugs
The heavy duty professional phone plug series improves on the design of the existing C series by offering the thinnest available A-gauge 1/4” plug with unique Neutrik chuck type strain relief on the market. The slimline shell with a width of 14.5 mm meets the most recent requirements for highest density jackfields (15.88mm jack pitch).
The precise machined one-piece tip contact without rivets makes it unique and avoids hook up in a socket or break off the tip.
The Plug X Series serves all applications such as guitar applications, audio cables, snakes, speakers, amplifiers and mixing desks.
PartsExpress - Neutrik NP2X Plug 1/4” Mono Nickel/Silver - $2.95 http://www.parts-express.com/neutrik-np2x-plug-1-4-mono-nickel-silver–092-316
PartsExpress - Neutrik NP2X-BAG Plug 1/4” Mono Black/Silver - $2.95 http://www.parts-express.com/neutrik-np2x-bag-plug-1-4-mono-black-silver–092-318
PartsExpress - Neutrik NP2X-B Plug 1/4” Mono Black/Gold - $3.29 http://www.parts-express.com/neutrik-np2x-b-plug-1-4-mono-black-gold–092-317
PartsExpress - Neutrik NP2C/B 1/4” Mono Plug Black with Gold Plug - $3.58 http://www.parts-express.com/neutrik-np2c-b-1-4-mono-plug-black-with-gold-plug–092-107
See TubeDepot, Markertek, PartsExpress, …
18 November 2013 » LED Lighting on Porch Steps
Skills
- Eco Light - LED Tutorials
- Flexible LED Light Strip - Cut and Connect DIY
- Super Bright LEDs - How to Solder and Seal Weatherproof LED Light Strips
Parts
Ordered 2 16.4 foot reels of Waterproof Gel LED Strips - $48.00
Waterproof Epoxy Gel 5m (16.4ft) 300xSMD3528 LED Flexible Strip with White Background

- Waterproof – entire LED strip covered in epoxy gel.
- Cuttable and linkable – mix and match lengths and sizes to your choosing.
- Easy installation – peel off paper on back of LED strip and stick to clean, flat surface.
- Flexible – fits just about any space you can imagine.
- 3M double sided tape on back of LED strip.
- Eco friendly – uses very little energy, without harmful radiations.
- DC jack on one end, and wires on other end.
Inline 12v power plug and jack
- Parts Express - DC power connector. 2.1 mm x 5.5 mm x 14 mm plug.
- Parts Express - 2.1mm Center Pin In-Line DC Jack
- 5.5mm x 2.1mm Barrel Plug MCM Part #: 27-130
Coaxial power connector
A coaxial power connector is an electrical power connector used for attaching extra-low voltage devices such as consumer electronics to external electricity. Also known as barrel connectors, concentric barrel connectors or tip connectors, these small cylindrical connectors come in an enormous variety of sizes.
LED Wholesalers - 12 Volt 12 Amp 144 Watt AC Power Adapter Transformer Power Supply
- Output Voltage 12VDC
- Output Current 12A
- Power 144W
- DC Jack Outer Diameter 5.5mm
- DC Jack Inner Diameter 2.5mm
- DC Jack Polarity Center Positive
LED Wholesalers - AC Power Adapter 5V with 5mm DC Jack
- Output Voltage 5 Volts DC
- Power 30W
- Current Output 6A
- DC Jack 5.5x2.1mm
PWM Dimming Controller For LED Lights or Ribbon, 12 Volt 8 Amp
Product Code: 3301
LED Wholesalers - Dimmer with 5.5mm barrel power connector
Universal single color LED dimmer can dim any 12VDC LED products from 0 to 100 percent using Pulse Width Modulation (PWM) circuit. Knob control for full intensity adjustment range. Maximum Load is 2 Amps, has Male and Female 5.5mm barrel power connector for connecting in-line with our CPS series Power Supplies.
Ordered Power Supply - $28.00
Waterproof LED Driver Transformer 60 Watt 12V with 3-prong Plug

Colored Heat shrink for power wire id and splicing
Cable Organizer dot com 3:1 Heat Shring tubing
- HS3-0063FT 1/16” to 1/48” Black - $0.65 / ft
- HS3-0125FT 1/8” to 1/24” Black, Clear, Red, White, Yellow - $0.90 / foot
- HS3-0188FT 3/16” to 1/16” Black, Clear, Red, White, Yellow - $1.12 / foot
- HS3-025FT 1/4” to 1/12” Black, Clear, Red, White, Yellow, Purple - $1.38 / ft
- HS3-0375FT 3/8” to 1/8” Black, Clear, Red, White, Yellow, Gray, Blue, Purple, Orange - $1.72 / ft
- HS3-050FT 1/2” to 1/6” Black, Clear, Red, White, Yellow, Blue, Gray, Purple - $2.03 / ft
See also
Techflex F6 Split Sleeving for power cords to supply - $20.01
Amazon - Techflex 1/2 F6 Split Sleeving 25 feet Black - $20.01

Hot Knife for woven Sleeving - $33.71
Amazon - Seasense Rope Cutting Gun - $33.71

17 November 2013 » Tang Band Full Range Speaker
Tang Band W5-1611SAF 5” Full Range Speaker
$50.32
OPTIMUM CABINET SIZE
            OPTIMUM CABINET SIZE *
            Sealed Volume 0.17 ft.³ Sealed F3109 Hz
            Vented Volume 0.44 ft.³ Vented F356 Hz
            * Enclosure volume/F3s based on BassBox "optimum" calculations-
17 November 2013 » Tuner Dial Cord Stringing
merrylander - 04-01-2005, 04:39 PM
If there is a Michael’s craft store in your area pick up some #6 bead stringing cord it makes a perfect dial cord replacement.
Rob
oldhifiguy - 04-02-2005, 11:59 AM
when I get the stringing diagram and get it all together I’ll let ywall know the results. It’s not just ‘hobbyshop’ string. It’s used for stringing beads and is VERY strong and I’m sure will work great. I may beezwax it first to be sure it’s ‘stiky’ around the tunning shaft and pullys just so’s it won’t slip..
oldhifiguy - 04-07-2005, 10:40 AM
the 1st bead string didn’t work out too well so got some more, waxed and abit thicker from a craft store, after hitting an old electronics parts store that no longer gets dial cord, the GC brand. The waxed stuff was easier to work with and I got it all strung and it works fine.
17 November 2013 » Groovmaster DIY Record Clenaing
DIY Groovmaster Label Protector to Clean Vinyl Records
DIY Groovmaster Label Protector to Clean Vinyl Records

16 November 2013 » Tubelab DIY Amps
Simple Push-Pull (SPP) Board
Why have I done “yet another version of this common design?” I have breadboarded countless variations of small P-P amps. Some used the 6AQ5 tube, and some used the 6BQ5 / EL84 tube. Every amp was evaluated for performance, simplicity, and most important, the ability to be assembled by builders of varying skill levels and work the first time. One of the main requirements was for a stable design that didn’t require any component tweaking to make it work. This design worked out to be the best. I chose the 6BQ5 / EL84 tube mostly because that is what was requested in the email that I received. The 6AQ5 is cheaper but produces slightly less power, and a slightly different sound. I may produce a 6AQ5 version of this board if there are enough requests for it.
As usual the board can be wired for triode, UL and pentode mode. Provision for global negative feedback is available. It can be used if needed, and it is needed in pentode mode.
![]()
16 November 2013 » Random Length AM Antenna
Freq. / Wavelength
            λ1 = 3*10^8 m/s/1.6*10^6 Hz = 187.5 m shortest wl
            λ2 = 3*10^8 m/s/5.5*10^5 Hz = 545.5 m longest wl
| Frequency | Wavelength Meters | Wavelength Feet |
| 550k | 545m | 1788ft |
| 1600k | 187m | 614ft |
Links
Info
Parts
- amateurradiosupplies Copper Antenna Wire - 100 Feet - $26
- amateurradiosupplies Budwig End Insulator
- amateurradiosupplies Dogbone Insulator
- amateurradiosupplies No. 18 AWG CopperWeld Antenna Wire - 50 FT
- Wireman - 501 - 18 AWG solid copper-clad steel
- Wireman - 890 PULLEY, 3/4” - marine type, swivel - for 3/32” - 3/16” rope
- Wireman - 810 Budwig brand end insulators, HQ-2. Fiberglass-reinforced ABS plastic
- Wireman - 813 End insulator (pair), 3” mineral filled acrylic
- Parts Express - magnet wire
Collected Posts
Instructions for Putting up a Long-Wire Antenna
Instructions for Putting up a Long-Wire Antenna
Can you hang a random length wire outside? - Timbo in Oz
Posted by Timbo in Oz (A) on November 15, 2007 at 14:21:35
In Reply to: Antennae loop posted by sown gi on November 15, 2007 at 13:12:51:
use one side of some twisted 300 ohm ribbon as the down lead into the house and to the tuner, connect that side to the AM post and t’other to the gnd post.
then report back. the 1500 IIRC has a decent AM stage.
And one other thing, IF it did originally came with a very small loop, then you may NEED one connected to make the longish random work! OFTEN stated in the manual and true IME
most audio repair shope should have a few Small AM loops lying about.
You realy do still need an aerial as well, this is just a good ground
You realy do still need an aerial as well, this is just a good ground
Posted by Timbo in Oz (A) on November 16, 2012 at 13:57:34
In Reply to: That IS interesting, thanks! posted by 1973shovel on November 10, 2012 at 06:54:24:
A random wire (with a good ground) tuned - by a cap and a tapped coil - to each station - or broadly tuned to cover the ones you want (like mine is) will be a good deal better than just a good ground.
MUCH quieter as the AM stage’s own AGC will cope with the higher input.
A multi-use Antenna Tuner
Antenna Tuning Unit
MDS975 - ATUs - ANTENNA TUNING UNITS
Below is the circuit diagram for my preferred choice of a T type circuit which includes a variable attenuator and which could not be simpler to construct. This circuit, with the coil described, covers from 500kHz medium wave to 30MHz short wave. Tuning capacitor VC1 is adjusted to match the aerial side while tuning capacitor VC2 is adjusted to match the receiver side. This circuit is often referred to as a TRANSMATCH, particularly in the USA.
My rooftop AM antenna - youtube
My rooftop AM antenna - youtube
Midnight Science Catalog - Capacitor, 365 air variable
Capacitor, 365 air variable
As the surplus for 365pf caps has dried up, these little beauties were getting harder and harder to find. Not anymore! The Society now has a plentiful supply; we have them manufactured. They are brand new caps, 31 blade, .010-air-gap, 1/4” tuning shaft, and CW rotation decreases capacitance. Testing indicates a capacity range of 390 (fully meshed) to 16 pf (fully open). Shaft accommodates the point knob shown (sold separately), and a reduction drive for slower tuning (also sold separately).
![]()
AM BAND ANTENNA TUNER KIT
This AM Band Tuner will work with most any crystal radio set. Tuners are attached to the antenna and inductively couple the signal captured into your crystal radio set. By adding the tuner to your station, selectivity and volume can generally be improved.
The backside of the tuner is shown at right. A dual-gang 365 pf capacitor is used to resonate the tuner coil and the antenna system as a whole. The result is an increase in the signal gleaned from the antenna and coupled to the set magnetically. The tuner uses a 6 by 5 inch front panel and a 6 by 8 in chassis. Two switches are used to configure the tuner. In addition, a nylon shaft is added to the tuning capacitor to reduce “hand capacity” while tuning. Kit time is less than one hour experienced builder and should add performance to your crystal radio station.

Variable Capacitors & Reduction Drives: Using, Mounting & Wiring.
Variable Capacitor Use Article
T-MATCH ATU
The T-Network Antenna Matching Unit
Homebrew Antenna Tuner - Steve Yates - AA5TB
12 November 2013 » Job Skill Catalog
Job Skill Catalog
12 November 2013 » CMS Survey
CMS Survey
- Nesta CMS - Ruby CMS for developers and designers. Extended using the Sinatra web framework.
- Refinery CMS is an awesome Rails-based CMS.
- Radiant is a no-fluff, open source content management system designed for small teams.
- BrowserCMS - Rails based
12 November 2013 » Ajax
12 November 2013 » Developers to Watch
Developers to Watch
- Hi, I’m Josh Symonds - I blog about Ruby on Rails, coding, and servers
- Joel Turnbull at Gaslight Blog
- Sara Chipps - Female JavaScript Developer
- Jim Weirich on Github
- Adactio is the online home of Jeremy Keith, a web developer
- i am dustin diaz - JavaScript Expert
- $script.js - Async JavaScript loader and dependency manager - Dustin Diaz
07 November 2013 » SQL Tricks
            select CONVERT(CHAR(8), getdate(), 112)
            20131107
            select CONVERT(CHAR(8), READ_AT, 112),count(*)
            FROM extract.dbo.CVLAN_CALL_EVENTS
            group by CONVERT(CHAR(8), READ_AT, 112)
            order by CONVERT(CHAR(8), READ_AT, 112)
Drop foreign key constraints and recreate them
06 November 2013 » Survival Ideas
This video was inspirational
Some books
- Tom Brown’s Field Guide to Wilderness Survival
- Primitive Wilderness Living & Survival Skills: Naked into the Wilderness by John McPherson
- Bushcraft: Outdoor Skills and Wilderness Survival by Mors Kochanski
- Outdoor Survival Skills by Larry Dean Olsen
28 October 2013 » Rhombic FM Antenna
Find the Rhombic FM Antenna
Diagram showing angle
Plot Optimum angle by wavelength

Plot Gain by wavelength

Rhombic antenna wiring illustration

26 October 2013 » Nuclear Energy Positives
People and Links
- Rod Adams - Atomic Insights Blog
- Dr. Barry W. Brook - Brave New Climate
- Steve Hedges - Nuclear Townhall
- William Tucker - America’s Last Nuclear Hope
- William Tucker - Pass the Plutonium
- William Tucker - Nuclear Since Fukushima
- William Tucker - Nuclear’s Dilemma: Few Jobs, Just Energy
26 October 2013 » Friend on Nuclear Reactor Safety
Online Exchange
Post by Friend
I know this is down-beat stuff (sorry), but people really need to know how criminal regulatory decision making has become. We used to use much, much, much safer pressurized light water cooled and moderated thermal reactors. Use of these plutonium producing sodium-cooled fast reactors is way, way, way too dangerous for any vulnerable area on earth. We need immediate international control of any and all significant reactor meltdown risk situations; Japan has proved States will gamble (and lose) Worldwide environmental health in the selfish hopes of saving some repair costs. The present meltdown of all three cores was completely avoidable ! Those criminals gambled our children’s health away to save Yen :
Question
What are the good reactors in use now, if there are any?
Response
Tim Rude I’ve learned that i have grown out of touch since my reactor operator days (go figure), but i doubt there’s any nuclear reactor type that is safer than the pressurized light water cooled and moderated thermal nuclear reactor (for several physics reasons). I’m sure those much safer reactors are presently in use. Those reactors do not transmute fertile material into more fuel however, and that’s why they have gone to the much, much, much more dangerous sodium-cooled fast reactor (SFR) type reactors (SFRs make valuable plutonium fuel as a byproduct). SFRs should certainly never be located in vulnerable places. If they don’t have a very safe, sparsely populated, geologically stable, flood and tsunami proof area, they should be required to use the much safer pressurized light water cooled and moderated thermal nuclear reactors (unless there’s something better, which i doubt). I am amazed at the stupidity building those SFRs at Fukushima. I am also amazed at the stupidity of locating the emergency cooling pumps in a location where they could be (and were) flooded and rendered inoperative by seawater; kids can understand how stupid that is.
25 October 2013 » TV and FM Antennas
Installed a new TV antenna - Winegard 7694P

winegarddirect - Winegard 7694P
The Winegard 7694P antenna has been specifically tuned for channels 7-69. This antenna has a range for 30 miles for VHF and 25 miles for UHF signals. It is primarily an outdoor antenna and is not intended to be installed indoors.
- Active Elements: 28
- Includes hardware for mounting to a mast; antenna has a 75 ohm coax connection
- Estimated Range: 35 miles on the VHF band and 25 miles on the UHF band
- Made in America!
- Great small range directional antenna that picks up about 30 degrees wide
- *Note: This antenna can receive stations 2-6 in most areas due to the fact they are generally broadcast on higher unused UHF or VHF frequency numbers in the area. Our techs can verify this with your zip code information.
- UHF Elements: 17
- VHF Elements: 11
- Boom Length: 65"
- Width: 35"
- Element Diamter: 3/8"
- Turning Radius 43.25
- Shipping Weight 7 lbs.
|
CHANNEL |
CH 7 |
CH 9 |
CH 11 |
CH 13 |
CH 14 |
CH 32 |
CH 50 |
CH 69 |
|
dB gain over reference dipole |
8.3 | 9.6 | 8 | 9.9 | 11.5 | 10.4 | 10.7 | 9.7 |
|
Beam width at half power points |
37° | 38° | 39° | 37° | 61° | 54° | 46° | 34° |
|
Front-to-back ratio |
13dB | 16dB | 15dB | 16dB | 16dB | >20dB | 19dB | 18dB |
Other FM Antenna
Other TV Antenna
- Antennas Direct - 91XG Uni-Directional Ultra Long Range DTV Antenna
- Channel Master CM-5018 Masterpiece Antenna Series Fringe 80 Mile Antenna
- Winegard HD7084
- Solidsignal - Channel Master 4228HD 8-bay HDTV High VHF/UHF TV Antenna (4228-HD)
- Antennacraft by RadioShack MXU59
TV Antenna Forums
TV / Radio Spectrum
United States Frequency Allocations: The Radio Spectrum Chart (Poster)

Our home coordinates are:
            38.319631, -104.591637
            +38° 19' 10.67", -104° 35' 29.89"
FM stations of interest
| Frequency | Azimuth | Call Letters | Network | Notes |
### by received power
kpht 99.5 -18.3db 3.7mi 309magn - Pueblo’s greatest hits
ktsc 89.5 -25.3db 1.0mi 123magn - CSUP Rev89
ktpl 88.3 -28.0db 34.1mi 213 magn - Power88 Moody bible network
kgft 100.7 -28.1db 32.8mi 325magn - Christian talk
kkfm 98.1 -28.2db 32.7mi 325magn - Rock
kkpk 92.9 -28.5db 32.8mi 325magn -Peak
kilo 93.2 -28.7db 32.8mi 325magn -
katc 95.1 -28.8db 32.8mi 325magn - Cat Country
kccy 96.9 -29.9db 32.8mi 325magn - New Country
kkmg 98.9 -23.2db 32.8mi 325magn - Magic top 40
kvuu 99.9 -29.3db 32.8mi 325magn - My hit music
kbiq 102.7 -29.2db 32.8mi 325magn - Christian
kcfp 91.9 -31.7db 4mi. 15magn - CPR classical
kdza 107.9 –32.6db 32.8mi 325magn - legends of class rock
ktlf 90.5 -33.0db 32.8mi 325magn - christian
krye 104.9 -34.7db 34.1mi 213magn - spanish
kfez 101.3 -35.7db 37mi 163magn - easy favorits 70’s, 80’s
kfvr 94.7 -35.9db 36.5mi 205magn - classic rock
kcme 88.7 -36.3db 32.8mi 325magn - classical
krwa 90.9 -36.4db 34.1mi 213magn - christian
kjqy 103.3 -40.8db 37.3mi 167magn - sports talk
krcc 91.5 -43.1db 32.8mi 325magn - Colorado College
krxp 103.9 -44.8db 32.8mi 325magn - alternative
ksty 104.5 -44.9db 33.7mi 261magn - Canon City country
krdo 105.5 -45.3db 32.8mi 325magn -
kkli 106.3 -45.4db 32.8mi 325magn - klite
by azimuth
kcfp 91.9 -31.7db 4mi. 15magn - CPR classical
ktsc 89.5 -25.3db 1.0mi 123magn - CSUP Rev89
kfez 101.3 -35.7db 37mi 163magn - easy favorits 70’s, 80’s
kjqy 103.3 -40.8db 37.3mi 167magn - sports talk
kfvr 94.7 -35.9db 36.5mi 205magn - classic rock
ktpl 88.3 -28.0db 34.1mi 213 magn - Power88 Moody bible network
krye 104.9 -34.7db 34.1mi 213magn - spanish
krwa 90.9 -36.4db 34.1mi 213magn - christian
ksty 104.5 -44.9db 33.7mi 261magn - Canon City country
kpht 99.5 -18.3db 3.7mi 309magn - Pueblo’s greatest hits
kgft 100.7 -28.1db 32.8mi 325magn - Christian talk
kkfm 98.1 -28.2db 32.7mi 325magn - Rock
kkpk 92.9 -28.5db 32.8mi 325magn -Peak
kilo 93.2 -28.7db 32.8mi 325magn -
katc 95.1 -28.8db 32.8mi 325magn - Cat Country
kccy 96.9 -29.9db 32.8mi 325magn - New Country
kkmg 98.9 -23.2db 32.8mi 325magn - Magic top 40
kvuu 99.9 -29.3db 32.8mi 325magn - My hit music
kbiq 102.7 -29.2db 32.8mi 325magn - Christian
kdza 107.9 –32.6db 32.8mi 325magn - legends of class rock
ktlf 90.5 -33.0db 32.8mi 325magn - christian
kcme 88.7 -36.3db 32.8mi 325magn - classical
krcc 91.5 -43.1db 32.8mi 325magn - Colorado College
krxp 103.9 -44.8db 32.8mi 325magn - alternative
krdo 105.5 -45.3db 32.8mi 325magn -
kkli 106.3 -45.4db 32.8mi 325magn - klite
TV stations of interest
| Channel | Azimuth | CallLetters | Network | Notes |
| 42 (5.1) | 334 (325) | KOAA-DT | NBC | Notes |
| 8 (8.1) | 334 (325) | KTSC-DT | PBS | Notes |
| 49 (11.1) | 334 (325) | KKTV | CBS | Notes |
| 24 (13.1) | 334 (325) | KRDO | ABC | Notes |
| 22 (21.1) | 334 (325) | KXRM | Fox | Notes |
| 23 | 333 (325) | KZCS | Azteca | Notes |
| 27 | 24 (16) | KGHB | Univision | Low power |
| 48.1 | 334 (325) | KVSN | Univision | Notes |
TV Stations at 325 magnetic
| 8 | 22 | 23 | 24 | 42 | 48 | 49 |
TVFool
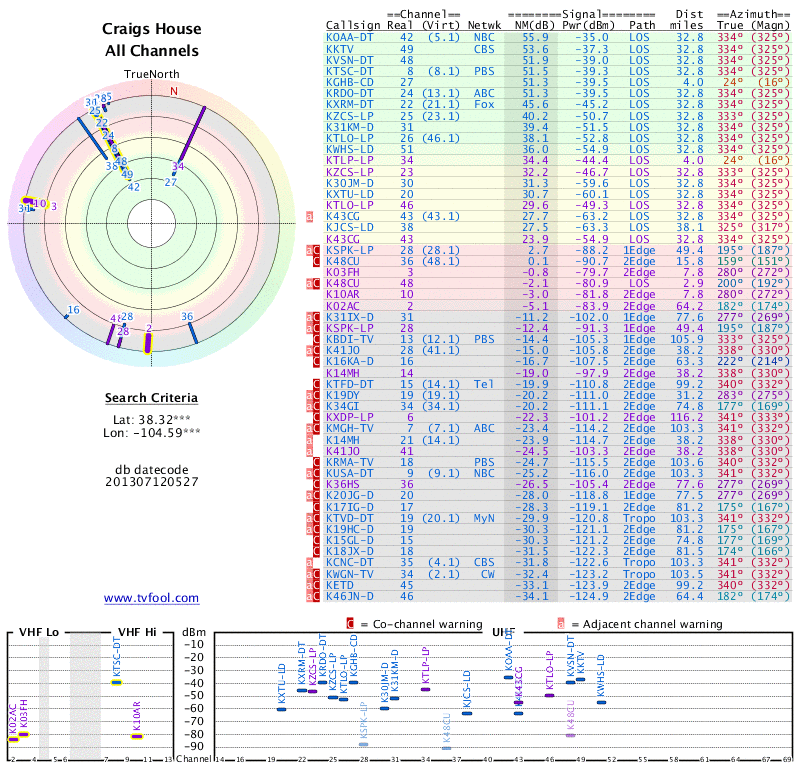
FMFool

TV frequencies 14 - 83
            CH #   FREQUENCY        CH #   FREQUENCY        CH #   FREQUENCY

             14   470-476 MHz        38   614-620 MHz        62    758-764 MHz

             15   476-482 MHz        39   620-626 MHz        63    764-770 MHz

             16   482-488 MHz        40   626-632 MHz        64    770-776 MHz

             17   488-494 MHz        41   632-638 MHz        65    776-782 MHz

             18   494-500 MHz        42   638-644 MHz        66    782-788 MHz

             19   500-506 MHz        43   644-650 MHz        67    788-794 MHz

             20   506-512 MHz        44   650-656 MHz        68    794-800 MHz

             21   512-518 MHz        45   656-662 MHz        69    800-806 MHz

             22   518-524 MHz        46   662-668 MHz        70    806-812 MHz

             23   524-530 MHz        47   668-674 MHz        71    812-818 MHz

             24   530-536 MHz        48   674-680 MHz        72    818-824 MHz

             25   536-542 MHz        49   680-686 MHz        73    824-830 MHz

             26   542-548 MHz        50   686-692 MHz        74    830-836 MHz

             27   548-554 MHz        51   692-698 MHz        75    836-842 MHz

             28   554-560 MHz        52   698-704 MHz        76    842-848 MHz

             29   560-566 MHz        53   704-710 MHz        77    848-854 MHz

             30   566-572 MHz        54   710-716 MHz        78    854-860 MHz

             31   572-578 MHz        55   716-722 MHz        79    860-866 MHz

             32   578-584 MHz        56   722-728 MHz        80    866-872 MHz

             33   584-590 MHz        57   728-734 MHz        81    872-878 MHz

             34   590-596 MHz        58   734-740 MHz        82    878-884 MHz

             35   596-602 MHz        59   740-746 MHz        83    884-890 MHz

             36   602-608 MHz        60   746-752 MHz

             37   608-614 MHz        61   752-758 MHz
The North American broadcast television frequencies are on designated television channels numbered 2 through 69, approximately between 54 and 806 MHz.
| Channel | Lower edge | Video carrier | ATSC pilot | Audio carrier | Upper edge |
|---|---|---|---|---|---|
| 2 | 54 | 55.25 | 54.31 | 59.75 | 60 |
| 3 | 60 | 61.25 | 60.31 | 65.75 | 66 |
| 4 | 66 | 67.25 | 66.31 | 71.75 | 72 |
| 5 | 76 | 77.25 | 76.31 | 81.75 | 82 |
| 6 | 82 | 83.25 | 82.31 | 87.75 | 88 |
| Channel | Lower edge | Video carrier | ATSC pilot | Audio carrier | Upper edge |
|---|---|---|---|---|---|
| 7 | 174 | 175.25 | 174.31 | 179.75 | 180 |
| 8 | 180 | 181.25 | 180.31 | 185.75 | 186 |
| 9 | 186 | 187.25 | 186.31 | 191.75 | 192 |
| 10 | 192 | 193.25 | 192.31 | 197.75 | 198 |
| 11 | 198 | 199.25 | 198.31 | 203.75 | 204 |
| 12 | 204 | 205.25 | 204.31 | 209.75 | 210 |
| 13 | 210 | 211.25 | 210.31 | 215.75 | 216 |
| Channel | Lower edge | Video carrier | ATSC pilot | Audio carrier | Upper edge |
|---|---|---|---|---|---|
| 14 | 470 | 471.25 | 470.31 | 475.75 | 476 |
| 15 | 476 | 477.25 | 476.31 | 481.75 | 482 |
| 16 | 482 | 483.25 | 482.31 | 487.75 | 488 |
| 17 | 488 | 489.25 | 488.31 | 493.75 | 494 |
| 18 | 494 | 495.25 | 494.31 | 499.75 | 500 |
| 19 | 500 | 501.25 | 500.31 | 505.75 | 506 |
| 20 | 506 | 507.25 | 506.31 | 511.75 | 512 |
| 21 | 512 | 513.25 | 512.31 | 517.75 | 518 |
| 22 | 518 | 519.25 | 518.31 | 523.75 | 524 |
| 23 | 524 | 525.25 | 524.31 | 529.75 | 530 |
| 24 | 530 | 531.25 | 530.31 | 535.75 | 536 |
| 25 | 536 | 537.25 | 536.31 | 541.75 | 542 |
| 26 | 542 | 543.25 | 542.31 | 547.75 | 548 |
| 27 | 548 | 549.25 | 548.31 | 553.75 | 554 |
| 28 | 554 | 555.25 | 554.31 | 559.75 | 560 |
| 29 | 560 | 561.25 | 560.31 | 565.75 | 566 |
| 30 | 566 | 567.25 | 566.31 | 571.75 | 572 |
| 31 | 572 | 573.25 | 572.31 | 577.75 | 578 |
| 32 | 578 | 579.25 | 578.31 | 583.75 | 584 |
| 33 | 584 | 585.25 | 584.31 | 589.75 | 590 |
| 34 | 590 | 591.25 | 590.31 | 595.75 | 596 |
| 35 | 596 | 597.25 | 596.31 | 601.75 | 602 |
| 36 | 602 | 603.25 | 602.31 | 607.75 | 608 |
| 37 | 608 | 609.25 | - | 613.75 | 614 |
| 38 | 614 | 615.25 | 614.31 | 619.75 | 620 |
| 39 | 620 | 621.25 | 620.31 | 625.75 | 626 |
| 40 | 626 | 627.25 | 626.31 | 631.75 | 632 |
| 41 | 632 | 633.25 | 632.31 | 637.75 | 638 |
| 42 | 638 | 639.25 | 638.31 | 643.75 | 644 |
| 43 | 644 | 645.25 | 644.31 | 649.75 | 650 |
| 44 | 650 | 651.25 | 650.31 | 655.75 | 656 |
| 45 | 656 | 657.25 | 656.31 | 661.75 | 662 |
| 46 | 662 | 663.25 | 662.31 | 667.75 | 668 |
| 47 | 668 | 669.25 | 668.31 | 673.75 | 674 |
| 48 | 674 | 675.25 | 674.31 | 679.75 | 680 |
| 49 | 680 | 681.25 | 680.31 | 685.75 | 686 |
| 50 | 686 | 687.25 | 686.31 | 691.75 | 692 |
| 51 | 692 | 693.25 | 692.31 | 697.75 | 698[3][4] |
| Channel | Lower edge | Video carrier | ATSC carrier | Audio carrier | Upper edge |
| 52 | 698 | 699.25 | 698.31 | 703.75 | 704 |
| 53 | 704 | 705.25 | 704.31 | 709.75 | 710 |
| 54 | 710 | 711.25 | 710.31 | 715.75 | 716 |
| 55 | 716 | 717.25 | 716.31 | 721.75 | 722 |
| 56 | 722 | 723.25 | 722.31 | 727.75 | 728 |
| 57 | 728 | 729.25 | 728.31 | 733.75 | 734 |
| 58 | 734 | 735.25 | 734.31 | 739.75 | 740 |
| 59 | 740 | 741.25 | 740.31 | 745.75 | 746 |
| 60 | 746 | 747.25 | 746.31 | 751.75 | 752 |
| 61 | 752 | 753.25 | 752.31 | 757.75 | 758 |
| 62 | 758 | 759.25 | 758.31 | 763.75 | 764 |
| 63 | 764 | 765.25 | 764.31 | 769.75 | 770 |
| 64 | 770 | 771.25 | 770.31 | 775.75 | 776 |
| 65 | 776 | 777.25 | 776.31 | 781.75 | 782 |
| 66 | 782 | 783.25 | 782.31 | 787.75 | 788 |
| 67 | 788 | 789.25 | 788.31 | 793.75 | 794 |
| 68 | 794 | 795.25 | 794.31 | 799.75 | 800 |
| 69 | 800 | 801.25 | 800.31 | 805.75 | 806 |
| Channel | Lower edge | Video carrier | ATSC carrier | Audio carrier | Upper edge |
| 70 | 806 | 807.25 | - | 811.75 | 812 |
| 71 | 812 | 813.25 | - | 817.75 | 818 |
| 72 | 818 | 819.25 | - | 823.75 | 824 |
| 73 | 824 | 825.25 | - | 829.75 | 830 |
| 74 | 830 | 831.25 | - | 835.75 | 836 |
| 75 | 836 | 837.25 | - | 841.75 | 842 |
| 76 | 842 | 843.25 | - | 847.75 | 848 |
| 77 | 848 | 849.25 | - | 853.75 | 854 |
| 78 | 854 | 855.25 | - | 859.75 | 860 |
| 79 | 860 | 861.25 | - | 865.75 | 866 |
| 80 | 866 | 867.25 | - | 871.75 | 872 |
| 81 | 872 | 873.25 | - | 877.75 | 878 |
| 82 | 878 | 879.25 | - | 883.75 | 884 |
| 83 | 884 | 885.25 | - | 889.75 | 890 |
20 October 2013 » Bluetooth Programming on Linux
Why do I care?
- Latest cellphone is non-android but with bluetooth
- gammu software gives access to cellphones by bluetooth
- Sadly my new Sumsung g404t cell phone is not supported by gammu
BlueZ Official Linux Bluetooth protocol stack
About
bluetooth
The Bluetooth wireless technology is a worldwide specification for a small-form factor, low-cost radio solution that provides links between mobile computers, mobile phones, other portable handheld devices, and connectivity to the Internet. The specification is developed, published and promoted by the Bluetooth Special Interest Group (SIG).
features
BlueZ provides support for the core Bluetooth layers and protocols. It is flexible, efficient and uses a modular implementation. It has many interesting features:
- Complete modular implementation
- Symmetric multi processing safe
- Multithreaded data processing
- Support for multiple Bluetooth devices
- Real hardware abstraction
- Standard socket interface to all layers
- Device and service level security support
http://jamesbond3142.no-ip.org/blog/?viewDetailed=00031
http://padovan.org/blog/2013/02/the-big-changes-of-bluez-5/
http://www.bluez.org/bluez-5-api-introduction-and-porting-guide/
https://code.google.com/p/bluez-tools/
19 October 2013 » Samsung T404G Cellphone
Ring Tones
Sources
Collected Ring Tones
- bells-chromatic
- bike-bell
- black_rotary
- church-bell
- CTU24
- deep-chime
- mechanical-chime
- oldbell1
- oldbell3
- oldphone1
- OldPhone
- our_man_flint_austin_powers
- sleighbells
- Taxi-Horn1
- Taxi-Horn2
- Taxi-Horn3
- Taxi-Horn4
- Taxi-Horn5
- Taxi-Horn6
- UK_Phone
- vintage2
18 October 2013 » Using Gammu to Interact With Cell Phone
Gammu
Gammu is the name of the project as well as name of command line utility, which you can use to control your phone. It is written in C and built on top of libGammu
Gammu command line utility provides access to wide range of phone features, however support level differs from phone to phone and you might want to check the Gammu Phone Database for user experiences with various phones. Generally following features are supported:
- Call listing, initiating and handling
- SMS retrieval, backup and sending
- MMS retrieval
- Phonebook listing, export and import (also from standard formats such as vCard)
- Calendar and tasks listing, export and import (also from standard formats such as vCalendar or iCalendar)
- Retrieval of phone and network information
- Access to phone file system (note that some phones work also as USB storage devices and those are not accessible through Gammu)
This project has originally forked from Gnokii and up to version 0.58 has been named MyGnokii2. Then need for better name arrived and Gammu was chosen as an acronym for Gammu All Mobile Management Utilities, without knowing that Gammu from the “Heretics of Dune” book written by Frank Herbert exists.
Ubuntu will connect to bluetooth on the t404g
18 October 2013 » Pick a Bluetooth Headset for Cellphone
The 10 Best Bluetooth Headsets
Top Stereo Bluetooth Headsets

Plantronics BackBeat Go 2
![]()

$79.99
The Plantronics BackBeat Go is a comfortable, extremely unobtrusive, wireless stereo Bluetooth earphone set that works equally well for voice calls and music.

Jabra Clipper
![]()
$59.99
The Jabra Clipper is a versatile stereo Bluetooth headset that can handle calls on the go or even stream music to your home stereo system.

Sony Stereo Bluetooth Headset SBH20
![]()
$49.99
The Sony SBH20 is a surprisingly flexible stereo Bluetooth headset that is good for listening to music, taking calls, or going wireless with your home stereo.
More Headsets
table
| Samsung HM3700 | Price | call features | range | Sound Quality |
|---|---|---|---|---|
| Sony SBH20 | Price | call features | range | Sound Quality |
| Jabra Clipper | Price | call features | range | Sound Quality |
| iKross ikbt19 | $30 | call features | 10 meters or 33 feet | Sound Quality |
| Headset Model | Price | call features | range | Sound Quality |
15 October 2013 » JavaScript Application Frameworks
Surveys
- Journey Through The JavaScript MVC Jungle
- The Top 10 Javascript MVC Frameworks Reviewed
- A Comparison of Angular, Backbone, CanJS and Ember
- Reddit angular vs ember
- ANGULARJS VS EMBERJS NOTES
- The Battle of Modern Javascript Frameworks: Conclusion – Which One to Choose
- Ember vs Angular – Templates
- Why Angular, Ember, or Backbone don’t work for us
backbone.js Recommended
ember.js Recommended
plus
- And the Winner is…Ember.js
- Why Discourse uses Ember.js
- Building an Ember app with RailsAPI - Part 1
- Why does Ember.js rock?
- 10 Javascript MVC Frameworks Reviewed - Ember picked
- Ember.js - Web Applications Done Right
- Manning - Ember.js in Action
- Ember.js: The Architecture Advantage
- AngularJS vs Ember - ember preferred
- AngularJS & Ember.js Comparison: Which One’s The Better Choice?
minus
CanJS Recommended
AngularJS Recommended
- Migrating from Ember.js to AngularJS
- Choosing a JS MVC Framework: Angular.js vs Ember.js
- 3 Reasons to Choose AngularJS for Your Next Project
- Why Does Angular.js Rock?
- Why I Chose AngularJS
Dojo Recommended
Spine Recommended
KnockoutJS Recommended
Quotes of Note
AngularJS vs Ember
Discourse is an Ember application and has been since the first prototype, so I have a lot of experience with it.
If I were to rank the amount of tools various client side MVC frameworks give you, Angular seems to exist somewhere near the half way point between Backbone and Ember.
Ember has more concepts to learn and more to wrap your head around than AngularJS. Before you write off Ember due to its complexity, consider why the developers added all that extra stuff. Perhaps it’s there for a reason?
Ember is a toolbox full of concepts you will find useful if you want to build a large and maintainable application. The trade offs it has made in its API are there to help you structure your code in a sane way. As you learn Ember you will notice several philosophies and opinions that are completely absent from the AngularJS framework.
In Ember, all models extend the Ember.Object base class. When you do this, you gain the ability to declare relationships within and between models
This illustrates a key difference between Ember and AngularJS. Ember subscribes to the Uniform Access Principle. In an Ember template, regardless of whether you are accessing something that is computed or something that is a primitive, the expression looks the same. In AngularJS, functions have to be specifically demarcated.
This can cause maintainability nightmares down the road. Over time, in a large software project, you will inevitably want to replace something that was previously a primitive with a method. In Ember you can do this painlessly; in AngularJS you’ll have to update every template where that model is used.
11 October 2013 » Rails-API - Rails for Restful JSON
Do the cool kids like it?
11 October 2013 » Phusion Passenger and Bluehost
What is Phusion Passenger and why should I care?
Overview image.

Stack Overflow question on App. Servers
10 October 2013 » Move Email to Bluehost
Download the mail from GoDaddy
getmail is a mail retriever designed to allow you to get your mail from one or more mail accounts on various mail servers to your local machine for reading with a minimum of fuss. getmail is designed to be secure, flexible, reliable, and easy-to-use. getmail is designed to replace other mail retrievers such as fetchmail.
Configuration
Configuration file is ~/.getmail/getmails
            [retriever]
            type = SimplePOP3Retriever
            server = pop.theserver.net
            username = me@domain.com
            password = strongpassword

            [destination]
            type = Maildir
            path = ~/.getmail/maildir/
It was necessary to move the emails from the saved folder to the inbox, run getmail to grab them and then move them back to the saved folder.
Upload to Bluehost
Perhaps use software like this, imap-upload
Lifehacker article on importing to gmail with imap
Apparently Thunderbird can drag and drop to an imap server.
Maildir Directory Structure
Dovecot uses Maildir++ directory layout for organizing mailbox directories. This means that all the folders are directly inside ~/Maildir directory:
~/Maildir/new, ~/Maildir/cur and ~/Maildir/tmp directories contain the messages for INBOX. The tmp directory is used during delivery, new messages arrive in new and read shall be moved to cur by the clients.
~/Maildir/.folder/ is a mailbox folder
~/Maildir/.folder.subfolder/ is a subfolder of a folder (ie. “folder/subfolder”)
Most importantly this means that if your maildir folders exist in eg. ~/Maildir/folder and ~/Maildir/folder/subfolder, Dovecot won’t see them unless you rename them to Maildir++ layout. v1.1 supports them by adding :LAYOUT=fs to mail_location.
.
            ~/godaddy_export/cur/
            ~/godaddy_export/new/
            ~/godaddy_export/tmp/
            ~/godaddy_export/.craig/cur/
            ~/godaddy_export/.craig/new/
            ~/godaddy_export/.craig/tmp/
            ~/godaddy_export/.gcs/cur/
            ~/godaddy_export/.gcs/new/
            ~/godaddy_export/.gcs/tmp/
I could rsync to these folders on Bluehost .
            ~/godaddy_export/.craig/
            ~/godaddy_export/.gcs/
to
~/mail/coot.net/craig/.godaddy_craig/
~/mail/coot.net/craig/.godaddy_gcs/
cd ~/godaddy_export/
scp -r .gcs cootnet@coot.net:mail/coot.net/godaddy_gcs
scp -r .craig cootnet@coot.net:mail/coot.net/craig/.godaddy_craig
Then in Roundcube the folder must be subscribed to.
09 October 2013 » Pink Adobe Green Chile Stew Recipe
From
Green chile stew at shockinglydelicious.com
Recipe: Pink Adobe Green Chile Stew
Summary: A fragrant, flavorful, comforting, authentic pork stew from the Pink Adobe Restaurant in Santa Fe that showcases Hatch green chiles from New Mexico.
Ingredients
- 2 tablespoons olive oil
- 2 pounds boneless pork, cut into 1-inch cubes
- 1/2 cup chopped onion (I used 1 small onion)
- 1 clove garlic, minced (I used 2 garlic cloves)
- 1/4 cup flour
- 2 cup peeled and chopped fresh tomatoes
- 2 cups roasted, peeled and chopped fresh green chilies or 2 7-ounce cans green chilies, drained and chopped (I used 8 Hatch chiles that I roasted and skinned – 4 regular and 4 hot)
- 1 fresh jalapeno chopped (I omitted this for fear of making it too hot for the family)
- 1 teaspoon salt (I used ¾ teaspoon)
- 1/2 teaspoon freshly ground black pepper (I used a few grinds of the pepper mill)
- 1/2 teaspoon sugar
- 1 cup chicken or beef broth (I used chicken broth)
Instructions
- Heat olive oil in 4-quart Dutch oven with cover. Add pork and cook until lightly browned. Add onion and garlic and stir with meat. Add flour and stir 1-2 minutes. Add tomatoes, green chiles, jalapeno (if using), salt, pepper and sugar. Mix to incorporate. Add broth. Lower heat. Cover pot and simmer for 1- 1 1/2 hours until meat is tender.
- Serve with flour tortillas.
Quick notes

Source: “The Pink Adobe Cookbook,” By Rosalea Murphy; Dell Trade Paperback.
Preparation time: 15 minute(s)
Cooking time: 70-90 minutes
Number of servings (yield): 6
Culinary tradition: USA (Southwestern)
My rating 4 stars: ★★★★☆ 1 review(s)
09 October 2013 » Webmail at Bluehost
Using Roundcube as the webmail application.
Spam Assassin is the spam utility.
22 May 2013 » Welcome to the Blog
Got to Blog at all?
Sure, why not.
Move to Bluehost
I did a survey of shared hosting companies and Bluehost had plenty of happy users. Considerations:
- Reasonable price
- Large and well established
- ssh
Blog Engine is Nanoc
- Static site generator, I have control of contents
- Edit local, rsync to Bluehost to publish, Archive at Github
- Choice of content format. Markdown, haml, html, …
- Ruby based
Tags
- linux
- debian
- diy
- arduino
- cellphone
- turntable
- antenna
- diy_audio
- led
- rune_audio
- tuner
- chipamp
- raspberry_pi
- bluehost
- am
- mpd
- developers_to_watch
- beaglebone
- stereo_system
- headphone_amp
- i3wm
- fm
- arch_linux
- bluetooth
- nas
- preamp
- git
- javascript
- sql
- ti_cc_3000
- wifi
- reactor_safety
- volumio
- raspbian
- pptp
- Debian
- keyboard
- portable
- lp_storage
- firefox_phone
- firefox_os
- repair
- radio
- moteino_home_automation
- xmonad
- gitlab
- rails
- rails-api
- windows_os
- vm_host
- virtualbox
- electronics
- cubox
- rhombic_antenna
- diy_li_ion_battery_pack
- survival
- music_player
- headphones
- robotics
- welcome
- speaker
- subwoofer
- tear_drop_trailers
- philips_cd935
- diy_cabling
- laptop
- pickup
- hurricane_lantern
- coding
- cd_player
- bluez
- programming
- headset
- hardware_hackers
- arduino_ide
- tube_audio
- porch_steps_led
- ebay
- fm_transmitter
- coax_power_plug
- recipe
- vpn
- arduino_radio
- tv
- gammu
- stereo_receiver
- seamonkey
- thunderbird
- vinyl_lp
- cleaning
- hardware
- rs232
- max232
- gogs
- job_hunt
- phusion_passenger
- tuned_loop
- firefox
- icemonkey
- job_skills
- webmail
- spam_assassin
- irc
- security
- pc_audio
- green_chile
- moosefet
- usb
- ajax